Hotpoint EXPERIENCE FDLET 31020 Скачать руководство пользователя страница 10

10

GB

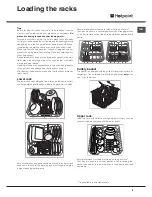
Adjusting the height of the upper rack

In order to make it easier to arrange the crockery, the upper rack 
may be moved to a higher or lower position.

The height of the upper rack should be adjusted WHEN THE 
RACK IS EMPTY.
NEVER raise or lower the rack on one side only.

If the rack is equipped with a 

Lift-Up


device

*

 (see figure)

, lift 

it up by holding its sides. To restore the lower position, press 

the levers (

A

) at the sides of the rack and follow the rack down.
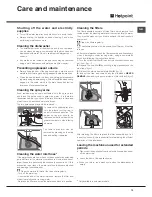
Unsuitable crockery

•  Wooden crockery and cutlery.
•  Delicate decorated glasses, artistic handicraft and antique 

crockery. Their decorations are not resistant.

•  Parts  in  synthetic  material  which  do  not  withstand  high 

temperatures.

•  Copper and tin crockery.
•  Crockery soiled with ash, wax, lubricating grease or ink.

The colours of glass decorations and aluminium/silver pieces 
can change and fade during the washing process. Some types 

of glass (e.g. crystal objects) can become opaque after a number 

of wash cycles too. 

Damage to glass and crockery

Caused by:

•  Type of glass and glass production process.
•  Chemical composition of detergent.
•  Water temperature of rinse cycle.

Tips:

•  Only  use  glasses  and  porcelain  guaranteed  by  the  

manufacturer as dishwasher safe.

•  Use a delicate detergent suitable for crockery.
•  Collect glasses and cutlery from the dishwasher as soon as  

the wash cycle is over.

The upper rack can be adjusted for height based on requirements: 

high position to place bulky crockery in the lower rack and low 
position to make the most of the tip-up compartments/sectors  
by creating more space upwards.

Tip-up compartments with adjustable position

*

The side tip-up compartments can be positioned at three different 
heights to optimize the arrangement of crockery inside the rack.

Wine glasses can be placed safely in 
the tip-up compartments by inserting 
the stem of each glass into the 
corresponding slot. 
For optimum drying results incline 
the tip-up compartments more. To 
change the inclination, pull up the 
tip-up compartment, slide it slightly 
and position it as you wish.

Cutlery tray

*

Some dishwasher models are fitted with a sliding tray which 
can be used to hold serving utensils or small cups. For 
optimum washing performance, avoid positioning bulky 
crockery directly below the tray. 
The cutlery tray can be removed 

(see Figure).

*

Only available in selected models with different numbers and 

positions.

Содержание EXPERIENCE FDLET 31020

Страница 1: ...ructions 1 Precautions and advice 2 3 Product Data 3 Installation 4 5 6 Description of the appliance 7 Refined salt and rinse aid 8 Loading the racks 9 10 Detergent and dishwasher use 11 Wash cycles 1...

Страница 2: ...when barefoot When unplugging the appliance always pull the plug from the mains socket Do not pull on the cable The water supply tap must be shut off and the plug should be removed from the electrica...

Страница 3: ...13 Energy efficiency class on a scale from A low consumption to D high consumption A Energy consumption per year in kWh 2 295 Energy consumption of the standard cleaning cycle in kWh 1 04 Power consu...

Страница 4: ...ter inlet and outlet hoses may be positioned towards the right or the left in order to achieve the best possible installation Make sure the dishwasher does not bend or squash the hoses Connecting the...

Страница 5: ...uld be used If you lose the fuse cover a replacement may be obtained from your local authorised Service Centre or Electrical company Correct replacement is identified by colour coding or the marking o...

Страница 6: ...panel display may vary in colour and may have a flashing or fixed light depending on the dishwasher model Switching the appliance on for the first time Advice regarding the first wash cycle After the...

Страница 7: ...Tip up dispensers 4 Rack height adjuster 5 Lower rack 6 Lower spray arm 7 Washing filter 8 Salt dispenser 9 Detergent and rinse aid dispensers 10 Data plate 11 Control panel Control panel Start Pause...

Страница 8: ...y setting is for medium water hardness Switch the dishwasher on using the On Off button Switch it off using the On Off button Press and hold the START PAUSE button for 5 seconds Switch it on using the...

Страница 9: ...fter loading the appliance make sure that the spray arms can rotate freely Lower rack The lower rack can hold pans lids dishes salad bowls cutlery etc Large plates and lids should ideally be placed at...

Страница 10: ...ergent Water temperature of rinse cycle Tips Only use glasses and porcelain guaranteed by the manufacturer as dishwasher safe Use a delicate detergent suitable for crockery Collect glasses and cutlery...

Страница 11: ...age it is not possible to change the wash cycle Accidental interruptions If the door is opened during the wash cycle or there is a power cut the cycle stops It starts again from the point at which it...

Страница 12: ...in Water consumption l cycle Energy consumption KWh cycle 1 Eco Yes No 03 10 11 1 04 2 Intensive Yes No 02 30 16 5 1 7 3 Normal Yes No 02 00 16 0 1 35 4 Fast No No 01 00 11 5 1 15 5 Delicates Yes No 0...

Страница 13: ...of time let the water run to make sure it is clear and free of impurities before performing the necessary connections If this precaution is not taken the water inlet could become blocked and damage t...

Страница 14: ...Salt and Rinse Aid The salt and rinse aid dispenser cap has not been closed properly The rinse aid has been used up or the dosage is too low The dishes and glasses are streaked or have a bluish tinge...

Страница 15: ...ansportation improper use neglect or interference or as a result of improper installation Replacement of any consumable item or accessory These include but are not limited to plugs cables batteries li...

Страница 16: ...16 GB www hotpoint co uk Indesit Company Spa Viale Aristide Merloni 47 60044 Fabriano AN Italy 195125077 02 NC 02 2015 pb Xerox Fabriano...

Отзывы: