background image

GB

22

PLEASE PHONE US TO REGISTER YOUR APPLIANCE  AND ACTIVATE YOUR PARTS GUARANTEE ON 08448 24 24 24

Care and Cleaning

Warning: Before cleaning, please ensure that the
electricity supply to the appliance is switched off
and the appliance is fully cold.

! Never use steam cleaners or pressure cleaners on
the appliance.

!


Clean the glass part of the oven door using a sponge

and a non-abrasive cleaning product, then dry
thoroughly with a soft cloth. Do not use rough abrasive
material or sharp metal scrapers as these could
scratch the surface and cause the glass to crack.

!


The accessories can be washed like averyday

crockery (even in your dishwasher).

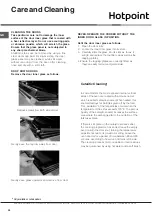
1. "STAYCLEAN" OVEN LINERS*

(Top Oven Sides, Main Oven Sides and

Rear Panel)

MAIN OVEN SIDES AND REAR PANEL

TOP OVEN SIDES

(a) How "Stayclean" works.

The surfaces of the "Stayclean" oven liners (Main
Oven rear panel) are treated with a special vitreous
enamel which absorbs cooking soils. At
temperatures of 220°C (425°F) or above, the special
surface enables these soils to be slowly destroyed.
The higher the temperature the more effective it is.

(b) Cleaning.

In most cases normal cooking operations at 220°C
(425°F) will permit this cleaning operation to proceed
during cooking. However if higher cooking
temperatures are not used regularly, it may be
necessary, in order to prevent heavy soiling, to run
the ovens without shelves or meat pan, at a
maximum setting for a couple of hours (Fan Oven
mode only).

It should not normally be necessary to clean the
"Stayclean" panels with water. If the user feels it is
desirable to do so, wipe them over with a clean,
soapy cloth, followed by a wipe with a clean damp
cloth.

DO NOT use biological washing powder, harsh
abrasives or chemical oven cleaners of any kind
as this could damage the "Stayclean" oven liners.

2. CLEANING GRILL, TOP OVEN AND

MAIN OVEN

OVEN
SHELVES

GRILL
PAN

 BASE &
REAR

MEAT
PAN

MAIN
OVEN
BASE

(a) Base & Rear of Top Oven and Base of Main
Oven.

Wipe out the oven with a damp soapy cloth. For
more stubborn stains on the base of the oven use a
well soaped fine steel wool soap pad.

(b) Grill Pan, Meat Pan* & Oven Shelves.

To prevent stains from being burnt on to the grill
pan, food support and rod shelf, always wash
immediately after use in warm soapy water.
Use a well soaped fine steel wool soap pad to
remove stubborn stains from the rod shelves, grill
pan, meat pan and the base of the oven.

DO NOT use aerosol cleaners on this oven as
they could adversely affect the fan motor unit,
and cannot be wiped off the fan blade.

(c) Solarplus Grill.

To clean the Solarplus Grill, use a clean, damp,
soapy cloth and wipe over. If stubborn stains
remain, gently clean with a well soaped nylon
scouring pad and wipe over with a damp cloth.

DO NOT use metal cleaning utensils, wire wool or
proprietary oven cleaners on the grill element
mesh.

*Available only on certain models

Содержание DXD7 912 C IX

Страница 1: ...op Oven Temperature Charts Meat 17 Top Oven Temperature Charts Baking 18 Main Oven The Intelligent Cooking System 19 Temperature Conversion Chart 21 Care and Cleaning 22 If something goes wrong 25 Dis...

Страница 2: ...ontinuously supervised This appliance can be used by children aged from 8 years and above and persons with reduced physical sensory or mental capabilities or lack of experience and knowledge if they h...

Страница 3: ...igned specifically for domestic use and responsibility will not be accepted for use in any other installation When the cooker is first used an odour may be emitted this will cease after a period of us...

Страница 4: ...of food in accordance with the instructions outlined in this booklet Any other use of the appliance e g for heating the room constitutes improper use and is dangerous The manufacturer may not be held...

Страница 5: ...er appliance that generates heat such as a plinth heater Note Due to many different types of installation a mains cable is not supplied with this product The installer will fit the correct type and le...

Страница 6: ...ARTS GUARANTEE ON 08448 24 24 24 Installation 890mm Max 870mm Min 597mm min 720mm min 150mm min 170mm max 570mm to top of plinth 570 min 570mm A minimum distance of 25mm should be maintained between t...

Страница 7: ...RTS GUARANTEE ON 08448 24 24 24 Wall Fixing Bracket Cabinet Doors Cooker 2 5mm heat resistant cable to BS 6141 Table 15 Cable size to suit current rating of appliance s Hob Cable Double pole control s...

Страница 8: ...IN TOP OVEN button MAIN OVEN button TEMPERATURE numerical digits END OF COOKING icon CLOCK icon DURATION icon MINUTE MINDER icon Preheating Residual heat indicator CONTROL PANEL LOCK indicator MODE ic...

Страница 9: ...rk or after a blackout the button on the display will flash for 10 seconds To set the clock 1 Press button 2 Turn the TIMER knob towards and to adjust the hour value 3 Once you have reached the correc...

Страница 10: ...n In order to cool down the external temperature of the oven a cooling fan blows a stream of air between the control panel and the oven door as well as towards the bottom of the oven door Once cooking...

Страница 11: ...rupt the cooking time and temperature BAKED CAKES mode This function is ideal for cooking desserts which are made using natural yeast baking powder and desserts which contain no yeast Place the dish i...

Страница 12: ...mately 1 hour the dough should double in volume Cut the dough into equal sized loaves Place them in the dripping pan on a sheet of baking paper Dust the loaves with flour Make incisions on the loaves...

Страница 13: ...Follow steps 1 to 3 to set the duration as detailed above 2 Press the button twice the icon and the numerical digits on the display will begin to flash 3 Turn the TIMER knob towards and to adjust the...

Страница 14: ...n the grill pan grid when the grill pan runners are on the top runner position There are two halves to the grill one on the left and one on the right You can choose to have both sides on or just the l...

Страница 15: ...it the handle to the grill pan so that the external hooks embrace the edge of the pan fig 1 2 Make sure that the middle part of the handle fits exactly the protruding support of the pan fig 2 and hold...

Страница 16: ...placed on shelf 1 of the top oven will be heated when the main oven is in use When the main oven is not in use for instance when a meal is being cooked on the hob place the plates and serving dishes o...

Страница 17: ...Lamb Lamb Lamb 80 C Poultry Poultry Poultry Poultry Poultry 90 C Medium 70 C Pork Pork Pork Pork Pork 80 C Well Done 75 C Veal Veal Veal Veal Veal 75 C Meat Pre heat Temperature C Time approx Positio...

Страница 18: ...tcrust Pastry Yes 190 200 Time Dependent on recipe Runner 1 or 2 from bottom of oven Puff Pastry Yes 200 210 Time Dependent on recipe Runner 1 from bottom of oven Yorkshire Pudding Yes 190 200 30 40 R...

Страница 19: ...onal Roast Meat and Roast Chicken Use the information given in the Cook Charts for the shelf positioning of the pan and runners To reposition the telescopic runners unclip the runners from position mo...

Страница 20: ...a sandwich Fatless sponge sandwich Swiss roll Semi rich fruit cake Rich fruit cake Shortcrust pastry Puff pastry Yorkshire pudding Yorkshire pudding Individual Bread Meringues yes yes yes yes yes yes...

Страница 21: ...OUR APPLIANCE AND ACTIVATE YOUR PARTS GUARANTEE ON 08448 24 24 24 TemperatureConversionChart G F v v F v 250 120 100 1 275 140 120 2 300 150 130 3 325 160 140 4 350 180 160 5 375 190 170 6 400 200 180...

Страница 22: ...vy soiling to run the ovens without shelves or meat pan at a maximum setting for a couple of hours Fan Oven mode only It should not normally be necessary to clean the Stayclean panels with water If th...

Страница 23: ...supply to the appliance is switched off and the appliance is fully cold before removing the lamp lens Open the oven door and remove the oven shelves Using a thick cloth grip the lamp lens unscrew ant...

Страница 24: ...e inner door glass into its slots 3 Carefully slide the glass into its slots as far as it will go and replace the top filler cap as well as the tapping plates 4 Ensure the tapping plates are correctly...

Страница 25: ...ide Switch off appliance and allow to cool for approx 30 mins Switch the cooker back on and check that the Grill Top oven is now operating Grill keeps turning on and off When the Grill control is oper...

Страница 26: ...f injury to children please dispose of your product carefully and safely Remove all doors and lids Remove the mains cable where fitted by cutting off flush with the appliance and always ensure that no...

Страница 27: ...ic of Ireland The guarantee does not cover Damageresultingfromtransportation improperuse neglectorinterference or as a result of improper installation Replacement of any consumable item or accessory T...

Страница 28: ...HONE US TO REGISTER YOUR APPLIANCE AND ACTIVATE YOUR PARTS GUARANTEE ON 08448 24 24 24 05 2016 195146035 00 XEROX FABRIANO 28 Indesit Company S P A Viale Aristide Merloni 47 60044 Fabriano AN www hotp...

Отзывы: