background image

26

GB

PLEASE PHONE US TO REGISTER YOUR APPLIANCE  AND ACTIVATE YOUR PARTS GUARANTEE ON 08448 24 24 24

If something goes wrong...

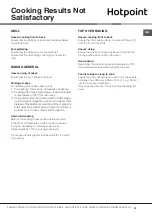
Before calling a Service Engineer, please check through the following lists. 
THERE MAY BE NOTHING WRONG.

If you have been through the above list and there is still a problem, contact Service

Disposal of your product

To minimise the risk of injury to children please dispose 
of your product carefully and safely. Remove all doors 
and lids. Remove the mains cable (where fitted) by 
cutting off flush with the appliance and always ensure 
that no plug is left in a condition where it could be 
connected to the electricity supply.
To help the environment, Local Authority instructions 
should be followed for the disposal of your product.

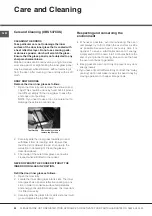
Disposal of old electrical appliances 

Problem

Check

Nothing works.

(a) Check
If you find :-

Display is blank.

Then it is likely that there is no electricity supply to your oven.

Check:
(i)   That the main cooker wall switch is turned on.

(ii)  Check other appliances to see if you have a power cut.
(iii) Check the main circuit breaker for the property.

Timer Display  "0.00   AUTO"

The power supply to your oven has possibly been interrupted, but has now come

back on again. Reset the timer to the correct day and "Manual" operation using the
instructions given in the timer section of the book.

Main & Top Ovens do not

work,

but the Grill works.

Check the following to ensure that the timer is in Manual Mode: Check that the Auto
Symbol is not lit up and is not flashing. See timer section for instructions on how to
return timer to "Manual".

Top Ovens and Grill do not
work, but the Main Oven
works.

Operating the cooker under the following conditions may cause a safety device to

operate.

(a) Grilling with the door closed - always grill with the door open to the correct
position - see grilling

(b) Grilling for an excessively long period at maximum setting - see grilling guide.
(c) Grilling with inadequate ventilation in the cabinet - see installation instructions.

Grill keeps turning on and off

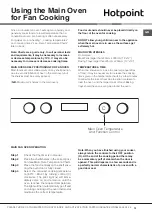
When the "Grill" control (A) is operating at less than MAX, the grill will cycle on and
off, this is normal and is not a fault.

Can not set an "Auto Cook"
programme

Remember: "Cook Period" is the actual length of time for which, the timer will switch

the oven(s) on as part of an "Auto Cooking" programme.

Draught from beneath control
panel.

A gentle flow of air will be blown from beneath the control panel when the appliance

is used. If the appliance is still warm, this cooling fan may run on, or restart itself after

all of the controls have been turned off. The fan will stop once the appliance has

been cooled. This is normal and not a fault.

Timer buzzer/bleeper operates
continually

Press the minute minder button to silence the Buzzer/Bleeper.

Respecting and conserving the

environment

Whenever possible, avoid pre-heating the oven and
 always try to fill it. Open the oven door as little as 
possible because heat is lost every time it is opened.ÿ
To save aÿsubstantial amount of energy, simply switch 
off the oven 5 to 10 minutes before the end of your
 planned cooking time and use the heat the oven 
continues to generate.

Keep gaskets clean and tidy to prevent any door 
energy losses 

If you have a timed tariff electricity contract, the 
“delay cooking” option will make it easier to save 
money by moving operation to cheaper time periods.

The base of your pot or pan should cover the hot
 plate. If it is smaller, precious energy will be wasted 
and pots that boil over leave encrusted remains that 
can be difficult to remove.
Cook your food in closed pots or pans with well-fitting
 lids and use as little water as possible. Cooking with the
 lid off will greatly increase energy consumption
Use purely flat pots and pans
If you are cooking something that takes a long time, 
it's worth using a pressure cooker, which is twice as
 fast and saves a third of the energy.


Содержание DKU5 541 J C IX

Страница 1: ...14 15 Temperature Conversion Chart 16 Oven Temperature Chart Meat 17 Oven Temperature Charts Baking 18 Cooking Results Not Satisfactory 19 Care and Cleaning 20 22 Installation 23 25 If something goes...

Страница 2: ...ontinuously supervised This appliance can be used by children aged from 8 years and above and persons with reduced physical sensory or mental capabilities or lack of experience and knowledge if they h...

Страница 3: ...refully The appliance is designed specifically for domestic use and responsibility will not be accepted for use in any other installation When the cooker is first used an odour may be emitted this wil...

Страница 4: ...PAN WITH A FIRE BLANKET OR DAMP CLOTH this will smother the flames and extinguish the fire 3 LEAVE THE PAN TO COOL FOR AT LEAST 60 MINUTES BEFORE MOVING IT Injuries are often caused by picking up a ho...

Страница 5: ...rill Element Stay Clean Liners Wirework Shelf Supports Stay Clean Liners Wirework Shelf Support Oven Fan Top Oven Door Oven Light Oven Light Grill Pan Food Support Inner Door Glass Oven Shelves Main O...

Страница 6: ...evice which disconnects the heating element and oven fan when the door is opened The heating element and oven fan will not operate until the oven door is closed Note It is advisable to check that all...

Страница 7: ...ing cooking A cooking mode must be selected before programming can take place Programming the cooking duration 1 Press the button several times until the icon and the three digits on the DISPLAY begin...

Страница 8: ...Pouring a little water into the grill pan will make the collection of grease particles more efficient and prevent the formation of smoke 1 2 Top Oven Shelf Positioning for Grilling DO NOT PLACE FOOD...

Страница 9: ...L grill or anti clockwise for HALF grill to select the Grill Setting MIN MAX Grill Controls Example High Grill Setting NOTE Do not grill with the grill top oven door closed Step 3 After use turn the g...

Страница 10: ...tes Dish placed directly on the shelf Your cooker is not fitted with a conventional grill Hotpoint have developed a Solarplus high speed grill which is designed to reduce your grilling times It is qui...

Страница 11: ...above As a guide the front of the utensil should be approx 100mm 4 from the front of the shelf Note Charts are a guide only to suit personal taste and requirements it may be necessary to increase or d...

Страница 12: ...and on during cooking as the oven thermostat maintains the correct tempera ture Step 4 Place the food on the shelf directly below the element ensuring the oven door is closed NOTE At the end of your...

Страница 13: ...0mm 15 x12 Baking Trays larger than325mm x 250mm 13 x10 TEMPERATURE TIME When two shelves are in use to cook large quantities of food it may be necessary to increase the cooking times given in the tem...

Страница 14: ...be defrosted using the fan only setting where possible it is recommended that the food should be small and thin The items should be placed so that the maximum amount of surface area is exposed to the...

Страница 15: ...Make sure that the dishes to be used will fit into the oven ensuring enough room for air to circulate 2 All dishes cooked on the slow setting will require a minimum of 6 hours however if they are cook...

Страница 16: ...AND ACTIVATE YOUR PARTS GUARANTEE ON 08448 24 24 24 Temperature Conversion Chart Gas Mark F Conventional Oven Fan Oven 250 120 100 1 275 140 120 2 300 150 130 3 325 160 140 4 350 180 160 5 375 190 170...

Страница 17: ...spaced Meat Pre heat Temperature C Time approx Beef No 160 180 20 25 mins per 450g 1lb 20 mins extra Lamb No 160 180 20 30 mins per 450g 1lb 25 mins extra Pork No 160 180 20 30 mins per 450g 1lb 25 m...

Страница 18: ...rtcrust Pastry No 180 190 Depending on use Puff Pastry Yes 190 200 Depending on use Yorkshire Pudding Yes 180 190 30 45 mins Individual Yorkshire Pudding Yes 190 200 20 45 mins Milk Pudding No 130 140...

Страница 19: ...ne and sugar Remember when using a food mixer or processor not to over cream soft margarine Over undercooking Refer to the cooking times and temperatures given in the Oven Temperature Charts provided...

Страница 20: ...leaning operation to proceed during cooking However if higher cooking temperatures are not used regularly it may be necessary in order to prevent heavy soiling to run the ovens without shelves or meat...

Страница 21: ...tric shocks please ensure that the electricity supply to the appliance is switched off and the appliance is fully cold before cleaning lamp lens Open the oven door and remove the oven shelves Using a...

Страница 22: ...at the door is not allowed to slam shut due to the reduction in door weight Clean the glass as described above 3 The inside of the outer door glass can now be cleaned while still fitted to the cooker...

Страница 23: ...with NICEIC National Inspection Council for Electrical Installation Contracting The cooker should be installed in accordance with the latest edition of the IEE Regulations Warning This appliance must...

Страница 24: ...PARTS GUARANTEE ON 08448 24 24 24 Installation 890mm Max 870mm Min 597mm min 720mm min 150mm min 170mm max 570mm to top of plinth 570 min 570mm A minimum distance of 25mm should be maintained between...

Страница 25: ...YOUR PARTS GUARANTEE ON 08448 24 24 24 Wall Fixing Bracket Cabinet Doors Cooker 2 5mm heat resistant cable to BS 6141 Table 15 Cable size to suit current rating of appliance s Hob Cable Double pole co...

Страница 26: ...an excessively long period at maximum setting see grilling guide c Grilling with inadequate ventilation in the cabinet see installation instructions Grill keeps turning on and off When the Grill cont...

Страница 27: ...e appliance is used in the United Kingdom or Republic of Ireland The guarantee does not cover Damageresultingfromtransportation improperuse neglectorinterference or as a result of improper installatio...

Страница 28: ...E PHONE US TO REGISTER YOUR APPLIANCE AND ACTIVATE YOUR PARTS GUARANTEE ON 08448 24 24 24 05 2016 195145968 00 XEROX FABRIANO Indesit Company S P A Viale Aristide Merloni 47 60044 Fabriano AN www hotp...

Отзывы: