


Control Panel
Grill Element
Top Oven Door
Oven Shelves
Bottom Oven Door
Door Switch*
Oven Light*
Grill Pan & Food Support*
Inner Door Glass
Oven Light
Inner Door Glass
The main parts of your Double Oven
The Controls
IMPORTANT
Before using your oven in the ordinary way,
ALWAYS make sure that the timer has been set to
MANUAL operation. Unless this is done, the main
oven cannot heat up. Before seeking assistance,
make sure this is done (refer to oven timer
operation).
MULTIFUNCTION SELECTOR
Rotate the control knob in either direction to the
required function. Many of the functions will also
require the main oven thermostat to be set before the
oven will heat up.
MAIN OVEN TEMPERATURE CONTROL
This is used in addition to the multifunction selector.
This is used for the functions: fan oven, fan grill, half
grill and full grill and conventional oven.
Turn the control clockwise to set the oven thermostat to
the required temperature.
If the timer is set correctly and the selector switch set
to a suitable function an indicator light will illuminate.
This will remain on until the oven reaches the required
temperature. This light will then cycle on and off as the
thermostat maintains control of the oven temperature.
TOP OVEN TEMPERATURE CONTROL
Turn the control clockwise to set the top oven
thermostat to the required temperature. An indicator
light will illuminate. This will remain on until the oven
reaches the required temperature. This light will then
cycle on and off as the thermostat maintains control of
the oven thermostat.
GRILL CONTROL
The grill control is designed to provide variable heat
control of either both grill elements on together or the
single left-hand grill element only.
To set the grill power turn the grill control to any setting
MIN (1) - MAX (4), clockwise for FULL grill and anti-
clockwise for HALF grill.
COOLING FAN
A gentle flow of air will be blown below the control
panel when the grill control is used and after a short
period of time when the ovens are used.
Note: Whenever the appliance has been used, the
cooling fan may run on or restart itself after all the
controls have been turned off. This indicates that the
appliance is still warm.
A
B
C
D
Grill
Control
Top Oven
Temperature
Control
Timer
Main Oven
Temperature
Control
Multifunction
Selector
Top
Oven
Pilot
Light
Grill
Pilot
Light
Main
Oven
Pilot
Light
1.
To remove the two side grilles,
pull them out
from the
catalytic
panels.
A
B
L
eft
gu
i
de
ra
il
R
i
ght
gu
i
de
ra
il
D
f
i
re
e
x
ct
tra
i
on
o
ct
i
on
*
Only in some models
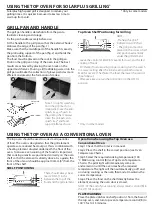
Telescopic runners *
The bottom oven on this cooker can comes equipped with
telescopic runners to facilitate inserting or removing
accessories.
Assembling the telescopic runners*
2.
Choose which shelf to use with
the
sliding rack. Paying attention to
the
direction in which the sliding
rack is
to be extracted, position joint
A and
then joint B on the
rail
.
3.
Refit the
side grilles with the
guide rails on the
catalytic panels
.
Содержание DD2540IX
Страница 1: ...Instructions for Installation and Use Built in double oven...
Страница 4: ...90 C Installation...
Страница 6: ...562mm Viewed down through cabinet No 6x25mm screw 4 supplied Oven Door Fig 3 Cabinet Bottom trim...
Страница 26: ......
Страница 27: ......
Страница 28: ...400011319028...


