background image

Instructions for 

Installation and Use

Buil

t

-in double oven 

Содержание DD2540IX

Страница 1: ...Instructions for Installation and Use Built in double oven...

Страница 2: ...and other residential environments no other use is permitted e g heating rooms IMPORTANTTO BE READ AND OBSERVED This appliance is not for professional use Do not use the appliance outdoors Donotstoree...

Страница 3: ...f it in accordance with local waste disposal regulations For further information on the treatment recovery and recycling of household electrical appliances contact your local authority the collection...

Страница 4: ...90 C Installation...

Страница 5: ...ation Slot required here if cabinet does not fit to ceiling 51mm x 457mm min area Ventilation Slot required here if the cabinet does fit to the ceiling 51mm x 457mm min area Ventilation Slot required...

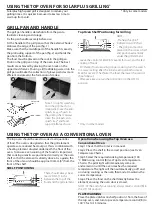
Страница 6: ...562mm Viewed down through cabinet No 6x25mm screw 4 supplied Oven Door Fig 3 Cabinet Bottom trim...

Страница 7: ...l Right guide rail D f ire ex ct tra ion o ction Only in some models Telescopic runners The bottom oven on this cooker can comes equipped with telescopic runners to facilitate inserting or removing ac...

Страница 8: ...hen cycle on and off as the thermostat maintains control of the oven temperature GRILL CONTROL The grill control is designed to provide variable heat control of either both grill elements or SolarPlus...

Страница 9: ...selected Use the oven thermostat control to set the required temperature Fan Only The oven fan will operate when this function is selected The oven thermostat control must be set in the off position...

Страница 10: ...that the appliance is still warm Oven Interior Lights The oven lights are operated when their respective oven control is used The bottom oven has a light only position TOP OVEN GRILLING Step 1 Ensure...

Страница 11: ...f you press and hold either button the display will scroll through the values more quickly making it quicker and easier to set the value 3 Wait for 10 seconds or press the button again to finalise the...

Страница 12: ...he control should be set After use always return the grill control to the OFF 1 position USING THE TOP OVEN AS A CONVENTIONAL OVEN The top oven should be used to cook small quantities of food The oven...

Страница 13: ...s place the pan on the shelf position recommended See Chart 2 There is no need to preheat the oven before cooking and all fan grilling should be carried out with the oven door closed this saves energy...

Страница 14: ...or the extra oven load Unless otherwise indicated in the charts food is placed in a cold oven i e without preheating If food is placed in an already hot oven the suggested cooking time should be reduc...

Страница 15: ...ss than 1 75kg 31 2 lbs should be roasted in a smaller meat pan tin or they may be pot roasted a small joint or a large meat pan causes unnecessary oven splashing and evaporation of meat juices d Addi...

Страница 16: ...USED Toasting of Bread Products 3 1 6 minutes Grill pan set Small cuts of meat Bacon 3 10 minutes Grill pan set with water 20 30 minutes Fish Fillets Fingers 3 or 2 half power setting 10 30 minutes P...

Страница 17: ...190 210 30 45 min baking tray Meringues Yes 2 or 3 100 baking tray Salty cakes Yes 2 or 3 180 200 35 55 min grid with pan Pizza Yes 2 or 3 200 Max 20 35 min baking tray Food Preheat time Shelf positio...

Страница 18: ...tray Puff Pastry yes 2 or 3 160 190 depending on size baking tray Yorkshire Pudding yes 2 or 3 170 190 35 45 min grid with pan Individual yorkshire Pudding yes 2 or 3 180 200 20 30 min grid with pan...

Страница 19: ...3 4 hrs baking tray Salty cakes yes 3 180 200 35 65 min grid pan Food Preheat time Shelf position from the base Temperature C Approximate cooking time pan to be used oven Conventional only in 4 knobs...

Страница 20: ...e readiness of joints of meat or whole poultry is to insert a meat thermometer into the thickest part of a joint or the thickest part of poultry thighs during the cooking period The meat thermometer w...

Страница 21: ...0 2 5 over 2 5 170 180 170 180 160 170 160 170 160 40 50 40 50 40 50 45 50 45 50 20 20 20 30 40 60 70 80 90 100 110 140 150 Season If joint preferred rare grill for the shorter time If preferred well...

Страница 22: ...them with oven gloves if they are still hot Food residues can be removed using a washing up brush or a sponge REPLACEMENT OF THE OVEN LAMP TOP OVEN LAMP Disconnect the oven from the power supply Unsc...

Страница 23: ...t brush HQWO HDVH WKH JODVV XSZDUGV DQG UHPRYH IURP WKH GRRU 5HSHDW ZLWK WKH FHQWUH GRRU JODVV LI ILWWHG 1 Open the door fully and unscrew the two screws securing the glass panel so that the securing...

Страница 24: ...cancel the audible tone press the minute minder button Oven temperatures too high or low Check temperature and shelf positions are as recommended in the Oven Temperature Charts It may be necessary to...

Страница 25: ...urn off the oven and restart it to seeif the problem persists To receive assistance call the number given on the warranty leaflet enclosed with the product or follow the instructions on our website Be...

Страница 26: ......

Страница 27: ......

Страница 28: ...400011319028...

Отзывы: