background image

31

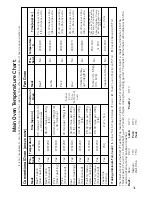
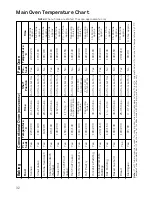
Main Ov

en T

emperature Char

t

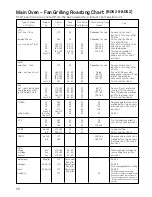
It is not necessary to pre-heat the fan oven before roasting. N

ote: Where times are stated, they are approximate only.

Beef/ Lamb

(slow roasting)

Meat

170/180

35 mins per 450g (1 lb)

+ 35 mins over.

Runner 

2 or3 

from

bottom of

oven.

35-45 mins per 450g

(1 lb)

40 mins per 450g (1 lb)

+ 40 mins over

40 mins per 450g (1 lb)

40-45 mins per 450g

(1  lb) + 40 mins over

40-45 mins per 450g

(1 lb)

25-30 mins per 450g

(1  lb) + 25 mins over

25-30 mins per 450g

(1 lb)

2-2

1

/

2

hrs

190/200

170/180

190/200

170/180

190/200

170/180

190/200

150

Temperature

˚C

Pre-

heat

C

onv

entional Ov

en  

(BD62 & BD52)

F

an Ov

en

Time (approx.)

Beef/ Lamb

(foil covered)

Pork

(slow roasting)

Pork

(foil covered)

Veal

(slow roasting)

Veal

(foil covered)

Poultry/Game

(slow roasting)

Poultry/Game

(foil covered)

Casserole

Cooking

If using aluminium foil, never:  1.

Allow foil to touch sides of oven.   

2.

Cover oven interior with foil.   

3

. Cover shelves with foil.

Beef

Meat

160/180

20-25 mins per 450g

(1lb) + 20 mins extra

20-30 mins per 450g

(1lb) + 25 mins extra

25-30 mins per 450g

(1lb) + 25 mins extra

25-30 mins per 450g

(1lb) + 25 mins extra

18-20 mins per 450g

(1lb) + 20 mins extra

12-14 mins per 450g 

(1lb) at plus 12 mins extra

*For every 450g (1lb) over

5.5kg (12lb) allow 10 mins

per 450g (1lb) and roast

at 150

o

C

1

1

/

2

- 2 Hrs

160/180

160/180

160/170

160/180

140-150

150-160

or 150

Temperature

˚C

Time (approx.)

Lamb

Pork

Veal

Chicken/ Turkey

up to 4kg (8 lb)

Turkey 4 to 5.5kg

(8 to 12 lb)

Casserole Stews

Position in

Oven

The most accurate method of testing the readiness of joints of 

meat or whole poultry is to insert a meat thermometer into the

thickest part of a joint, or the thickest part of poultry thigh

s, during the cooking period. The meat thermometer will indicat

e when the

required internal temp has been reached.

Beef -

Rare: 

60˚C 

Lamb: 

80˚C 

Poultry: 

90˚C

Medium: 

70˚C 

Pork:

90˚C

Well Done: 

75˚C 

Veal: 

75˚C

Yes

Yes

Yes

Yes

Yes

Yes

Yes

Yes

Yes

Pre-

heat

No

No

No

No

No

No

No

Содержание BD52 Mk2

Страница 1: ...47 Mk2 DE47X1 To the Installer Before installation fill in the product details on the back cover of this book The information can be found on the rating plate To the User You must read the instruction...

Страница 2: ...Chart BD62 BD52 26 Using the Main Oven for other Functions 27 Main Oven Convection BD62 BD52 and Fan Oven 28 Main Oven Fan Oven Cookery Notes 29 30 Main Oven Cooking Temperature Charts 31 32 Main Ove...

Страница 3: ...three hours keeping the oven doors closed Ensure that the room is well ventilated e g open a window or use an extractor fan and that persons who may be sensitive to the odour avoid any fumes It is su...

Страница 4: ...the main oven is in use as the contents may be hot Always keep the appliance clean as a build up of grease or fat from cooking can cause a fire Always follow the basic principles of food handling and...

Страница 5: ...appliance Never operate the grill with the door closed as this will cause the appliance to overheat Never use the appliance as a room heater Never use the grill to warm plates Never dry any items on...

Страница 6: ...rature Control Timer Top Oven Temperature Control Top Oven Pilot Main Oven Pilot Grill Control Rod Shelf Oven Light Oven Fan Stay Clean Liner Meat pan and Roasting rack Model Serial number Inner Door...

Страница 7: ...trol Top Oven Pilot Main Oven Pilot Grill Control Rod Shelf Oven Light Oven Fan Stay Clean Liner Meat pan Inner Door Glass Oven Light Grill Pan Food support and Anti Splash Tray Top Oven Door Oven She...

Страница 8: ...arisons of oven settings for gas conventional ovens and fan oven in degrees F and C CONVENTIONAL OVEN F C 250 120 275 140 300 150 325 160 350 180 375 190 400 200 425 220 450 230 475 240 GAS MARK 1 2 1...

Страница 9: ...ill illuminate This will remain on until the oven reaches the required temperature This light will then cycle on and off as the thermostat maintains control of the oven temperature TOP OVEN TEMPERATUR...

Страница 10: ...OL Turn the control clockwise to set the top oven thermostat to the required temperature An indicator light will illuminate This will remain on until the oven reaches the required temperature This lig...

Страница 11: ...ostat to set the required temperature Half Grill With this function selected only the left hand side of the grill will be on Use the oven thermostat control to set the required temperature Oven door m...

Страница 12: ...ood 7 We advise that dishes containing left over cooked poultry or meat e g Shepherd s Pie should not be cooked automatically if there is to be a delay period 8 Ensure that delay start times are kept...

Страница 13: ...d to cancel an Auto Cooking programme and return the oven s to Manual operation Used to adjust the various timer function settings Minute Minder Button Cook Period Button End Time Button Manual Button...

Страница 14: ...MINDER Step 1 Ensure the time of day is set correctly Step 2 Press and hold the Minute Minder button Step 3 With the Minute Minder button held in set the required Minute Minder period using the and bu...

Страница 15: ...ion Note If your appliance has two ovens When the timer has been set for one oven it is possible to use the other oven only during the same Automatic programme At the end of the Automatic Cook Period...

Страница 16: ...il the timer is returned to Manual operation see below Step 6 Press the Manual button The audible tone will be cancelled and the oven s will be returned to Manual Step 7 Turn the oven control s to the...

Страница 17: ...the sequence again 5 If at any time the display shows three flashing zero s 0 00 and Auto it is likely that the electricity supply to the oven has been interrupted Reset the timer to the correct time...

Страница 18: ...t in use Note To stop fat splashing onto the grill mesh it is important to use the ant splash tray as shown in the grilling chart Always clean the grill pan anti splash tray and food support after eac...

Страница 19: ...the grill setting MIN 1 MAX 4 NOTE MIN 1 Low MAX 4 High Grill Controls Example High Grill Setting depending on model NOTE Do not grill with the grill top oven door closed Step 3 After use turn the gr...

Страница 20: ...wire mesh This stops you from touching live parts DO NOT under any circumstances insert objects into the grill mesh as this could damage the element wire break the glass tubes or if the grill is on ca...

Страница 21: ...of the shelf SHELF POSITIONING There should always be at least 25mm 1 inch between the top of the food and the grill element DO NOT PLACE FOOD UTENSILS DIRECTLY ON THE OVEN FLOOR 3 2 1 ENSURE SHELVES...

Страница 22: ...he shelf directly below the element ensuring the oven door is closed PLATE WARMING Place the plates dishes on shelf position 1 from the base of the top oven and turn top oven temperature control B to...

Страница 23: ...0 15 60 75 7 inch Time Dependent on size Time Dependent on recipe Time Dependent on recipe 30 40 20 30 90 120 40 50 30 45 150 180 180 190 170 180 180 190 200 210 150 160 140 150 190 200 200 210 190 20...

Страница 24: ...lves with foil Beef Meat 160 180 20 25 mins per 450g 1lb 20 mins extra 20 30 mins per 450g 1lb 25 mins extra 25 30 mins per 450g 1lb 25 mins extra 25 30 mins per 450g 1lb 25 mins extra 18 20 mins per...

Страница 25: ...e of the way the oven is heated this is a more economical way of roasting General Recommendations Most types of meat and poultry cooked by this method will have an all over brownness and crispness on...

Страница 26: ...45 50 30 140 150 grill for the longer time over 2 5 160 45 50 40 Grill on shelf position 1 CHICKEN 1 0 180 30 30 60 Season and brush over with 1 5 180 30 30 75 melted butter to give nicely 2 0 170 35...

Страница 27: ...eam cakes butter cream filled cakes gateaux cheese cakes iced cakes quiches pastries biscuits bread croissants fruit and many delicate frozen foods If fish meat and poultry are to be defrosted using t...

Страница 28: ...ven temperature is controlled 6 After use always return both controls to the off position and close the oven door Main Oven Fan Oven all Models Important NEVER line the shelves the floor or the sides...

Страница 29: ...d in a cold oven i e without pre heating If food is placed in an already hot oven the suggested cooking time should be reduced depending on the type and quantity of food being cooked It should be note...

Страница 30: ...dditional fat should not be added except for veal very lean meat or poultry which can either be larded with fat bacon or brushed very sparingly with cooking oil or melted fat e Beef lamb mutton and po...

Страница 31: ...ver oven interior with foil 3 Cover shelves with foil Beef Meat 160 180 20 25 mins per 450g 1lb 20 mins extra 20 30 mins per 450g 1lb 25 mins extra 25 30 mins per 450g 1lb 25 mins extra 25 30 mins per...

Страница 32: ...Small Cakes Victoria Sandwich Sponge Sandwich Fatless Swiss Roll Semi rich Fruit cakes Rich Fruit Cakes Shortcrust Pastry Puff Pastry Yorkshire Pudding Individual Yorkshire Puddings Milk Pudding Bake...

Страница 33: ...ng rack on one shelf while cooking different types of food at the same temperature on other shelf positions three shelves maximum Operating Instructions STEP 1 Ensure the Oven Timer is set to manual E...

Страница 34: ...20 25 minutes per 450g 1lb 20 minutes extra 25 minutes per 450g 1lb 25 minutes extra 30 45 minutes 25 minutes per 450g 1lb 25 minutes extra 20 30 minutes 18 20 minutes per 450g 1lb 20 minutes extra 3...

Страница 35: ...uring enough room for air to circulate 2 All dishes cooked on the slow setting will require a minimum of 6 hours however if they are cooked for 1 2 hours longer then deterioration in their appearance...

Страница 36: ...oximately 5 minutes 3 Position the grill pan centrally under the grill element and push back as far as the location stops on the rod shelf 4 Leave the oven thermostat at setting MAX for toast and for...

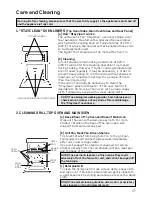
Страница 37: ...s switched off and the appliance is fully cold DO NOT use biological washing powder harsh abrasives or chemical oven cleaners of any kind as this could damage the Stayclean oven liners MAIN OVEN SIDES...

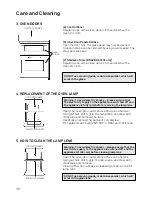
Страница 38: ...w anti clockwise and remove the lens Carefully unscrew the bulb anti clockwise Fit replacement bulb 25W 300 C SES and refit lens 5 HOW TO CLEAN THE LAMP LENS Open the oven door and remove the oven she...

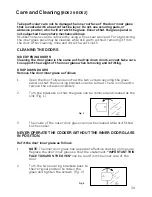
Страница 39: ...glass when removing and refitting DROP DOWN DOORS Remove the door inner glass as follows 1 Open the door fully and unscrew the two screws securing the glass panel so that the securing brackets can be...

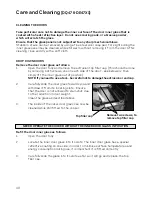
Страница 40: ...low pic then simply lift the inner glass out of position NOTE If you need to use a tool be careful not to damage the extrusion or end cap 2 Carefully slide the inner glass towards you and withdraw it...

Страница 41: ...emove the terminal cover at the rear base of the cooker Pass the cable through the cable clamp and connect to the appropriate terminals provided Allow sufficient cable for any future servicing Tighten...

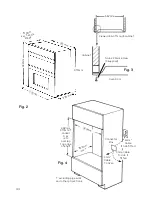
Страница 42: ...ssential that the warmed air is exhausted through the front of the cabinet see fig 1 e If an oven unit is installed adjacent to a tall cabinet steam escaping from the oven when the door is opened coul...

Страница 43: ...equired here if cabinet does not fit to ceiling 51mm x 457mm min area 50mm Air Gap 50mm Air Gap Ventilation Slot required here if the cabinet does fit to the ceiling 51mm x 457mm min area Ventilation...

Страница 44: ...rim is to overlap top edge of shelf excluding pipe work and other projections 4mm2 Cable to Hob if fitted 4mm2 Cable To Oven 6mm2 Cable if hob fitted Connector Box Fig 4 Fig 2 550mm 550mm min 562mm Vi...

Страница 45: ...der the following conditions may cause a safety device to operate a Grilling with the door closed Always grill with the door fully open b Grilling for an excessively long period at maximum setting see...

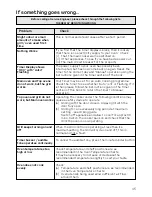
Страница 46: ...ee back page 46 Problem Check To minimise the risk of injury to children please dispose of your product carefully and safely Remove all doors and lids Remove the mains cable where fitted by cutting of...

Страница 47: ...ect or interference or as a result of improper installation Replacement of any consumable item or accessory These include but are not limited to plugs cables batteries light bulbs fluorescent tubes an...

Страница 48: ...es We supply a full range of genuine replacement parts as well as accessory products that protect and hygienically clean your appliance to keep it looking good and functioning efficiently throughout i...

Отзывы: