background image

5

D

ISHWASHER

Installation

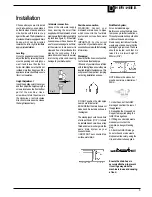
Cold water connection.
Connect the cold water supply
hose, inserting the small filter
supplied with the dishwasher and
making sure that it is fastened tightly
in place (see figure 2). If the water
hoses are new or have been out of
use for an extended period of time,
let the water run to make sure it is
clear and free of impurities before
making the connection. If this
precaution is not taken, the water
inlet could get blocked, causing
damage to your dishwasher.

Choose where you want to install
your dishwasher, you can place it
so that its sides or back panel are
side by side with furniture or up
against the wall. The dishwasher is
provided with water supply and drain
hoses, which can be directed
towards the left or right to facilitate
appropriate installation.

Levelling.
Once the appliance is positioned,
adjust the feet by screwing them in
or out depending on how high you
want it and to level it so that it is
horizontal. Make sure that it is not
inclined more than 2 degrees. If the
appliance is level, it will  help ensure
its correct operation.

Height Adjustment
Insert the appliance into the cutout
and then adjust the height using the
screws located on the front bottom
part of the machine. Use a
screwdriver to turn the screws in
the clockwise or anti-clockwise
direction to increase or decrease
the height respectively.

A

Fig.2

Drain hose connection.
WARNING: Connect your
dishwasher drain hose to pipes
which connect to the foul drain
system and not to surface water
drains.
IMPORTANT: For the correct
operation of your dishwasher, it is
essential to comply with the following
information:-

Standpipe:
Ensure that the hose is not pushed
too far down the standpipe.
If the end of your drain hose is fitted
with ‘retaining flaps’, ensure they are
inserted fully into the standpipe.  This
will prevent the pipe from jumping
out during installation and use.

DO NOT position the standpipe
near an electrical outlet.
ENSURE that the drain hose is not
kinked and it is routed as shown in
the diagram.

The standpipe should have a bore
of at least 38mm (11/2”). It should
be installed as shown, have a trap
fitted and must discharge into the
same drain system as your
household sink.
It MUST NOT be connected to a
surface water drain.

Sink Waste System:
For under sink drainage:
Before connecting the drain hose,
remove any internal restrictions -
This will prevent a build up of debris
which could cause a blockage.
Remove any restrictions from the
waste spigot and ensure that the
sealing bung is removed. The hose
should be routed, such that it is
raised to a minimum height of
800mm (31/2”).

NOTE: Ensure the sink outlet
pipe has a minimum diamtere of
32mm.

1. Untie the end of the GREY
drainage hose from the rear of
the appliance.
2. Reposition the ‘Hooked End
Support’ as required along the
GREY drainage hose.
3. If fitting an under sink waste
disposal unit, cut out the
membrane, bung or blanking
plug.
4. Attach the GREY drainage
hose to the under sink waste
disposal unit securely, using the
clip and rubber tube supplied.

Ensure the drain hose is
securely attached, to prevent
it coming away while the
machine is in use and causing
a flood.

Содержание BCI45

Страница 1: ...Instructions for Installation and Use Dishwasher Model BCI45...

Страница 2: ......

Страница 3: ...ontacts 3 4 5 6 6 7 8 9 10 11 12 13 14 15 16 Back Cover Retention of this Instruction Book This Instruction Book must be kept handy for reference as it contains important details on the safe and prope...

Страница 4: ......

Страница 5: ...glyadvisedthatthisworkiscarriedout byaqualifiedelectrician Ifthedomesticwiringincludesaresidualcurrent operatedcircuit breaker ensurethatitconformstothelatestregulations Safety Information Atthetimeof...

Страница 6: ...r ensurethatthe openingsontheundersideare notobstructed 9 Do not touch the heating elementduringorstraightafter awashcycle 10 Iftheappliancemalfunctions turnoffthewaterinlettapand disconnecttheplugfro...

Страница 7: ...to the foul drain system and not to surface water drains IMPORTANT For the correct operationofyourdishwasher itis essentialtocomplywiththefollowing information Standpipe Ensurethatthehoseisnotpushed...

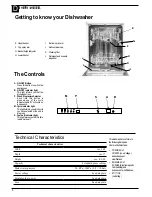
Страница 8: ...spray arm G Basketheightadjuster H Lowerbasket Getting to know your Dishwasher I Bottomsprayarm J Saltcontainercap K Washingfilter L Detergentandrinseaid dispenser Technical Characteristics Thisdishw...

Страница 9: ...hot water splashes then keep button P pressed for approximately5seconds untilyou hear3shortbeeps Indicatorlight M willcomeoffandatthispoint all thesettingswillhavebeencancelled Youarenowfreetore sett...

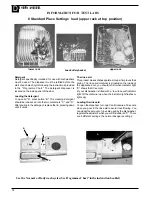
Страница 10: ...3UH ZDVK ZLWK FROG ZDWHU 3UH ZDVK ZLWK KRW ZDWHU DW WHQGHG ZDVK DW 5LQVH ZLWK FROG ZDWHU 5LQVH ZLWK KRW ZDWHU DW U LQJ JU 1RUPDO 1RUPDOO GLUW SDQV DQG GLVKHV 6WDQGDUG GDLO F FOH SUH ZDVKHV ZLWK FROG...

Страница 11: ...o my cycles 2 kg 0 14 0 17 0 1 7 0 14 36 18 44 1 8 4 4 20 60 36 71 45 89 4 5 8 9 MED 40 40 71 89 8 9 60 25 Filling the salt container Alwaysusesaltwhichisintended fordishwasheruse The salt container i...

Страница 12: ...se aid needstobereducedifthe dishesarestickyoryoucan seewhitestreaks WerecommendGlist3in1foruseinallHotpointdishwashers BrilliantcleaningisguaranteedwithGlist3in1 HotpointonlyrecommendsGlist3in1Dishwa...

Страница 13: ...s saucersand plates shallowsaladbowls slightly dirtyfryingpansandshallowpans Positionlightweightdishesinsuch aswayastoavoidtheirbeingmoved bythesprayofwater How to adjust the upper basket Theupperbask...

Страница 14: ...and cleanitcarefullyunderrunningwater Then returnthefiltertoitsplaceand tightenthewatersupplyhoseback intoposition Unplug the appliance Beforecarryingoutanycleaningor maintenanceonthedishwasher always...

Страница 15: ...altcontaineris securely closed and that the watersoftnersettingiscorrect thecorrectamountofdetergent isbeingused Certaindetergents can be more corrosive than others thetankismadeofsteeland thereforean...

Страница 16: ...roduct makes dishes sparkle more as it improves their drying The rinse aid container is situated on the inside of the appliance door you should refill it when indicator light D shows that it is empty...

Страница 17: ...ll repairs include a parts and labour guarantee for 12 months from the date of the repair If you require any information or have any questions about your appliance our operators are on hand with help...

Страница 18: ...he following provisions that your appliance l Has been installed and used correctly in accordance with this instruction booklet l Has been used solely for domestic purposes and is located on domestic...

Страница 19: ......
Страница 20: ...e co uk Republic of Ireland 1850 302 200 Note Our operators will require the following information Model number Serial number Extended Warranties UK 08709 088 088 Open 8 to 8 Mon Sun www theservicecen...

Отзывы: