Hotpoint AHP69PX Скачать руководство пользователя страница 3

3

/*


width 43.5 cm 
height 32 cm 
depth 40 cm


56 l


voltage: 230 - 240 V~ 50Hz 
maximum power absorbed 2560-
3050 W (see data plate)


Directive 2002/40/EC on the label of 
electric ovens. Standard EN 50304 


Energy consumption for Natural 
convection – heating mode: 
Traditional mode


Declared energy consumption for 
Forced convection Class – heating 
mode:        Baking


This appliance conforms to the 
following European Economic 
Community directives: 73/23/EEC 
dated 19/02/73 (Low Voltage) and 
subsequent amendments - 
89/336/EEC dated 03/05/89 
(Electromagnetic Compatibility) and 
subsequent amendments - 
93/68/EEC dated 22/07/93 and 
subsequent amendments. 
2002/96/EC


Electrical Connection

Electrical  connection

The electrical connection to the mains must be made

on the appliance.  The power voltage and frequency

are as indicated on the rating plate.

THIS APPLIANCE MUST BE EARTHED.

Connecting the power supply cable

To open the terminal board:

• Using a screwdriver, press on the tabs situated

on each side of the terminal board cover.

• Pull open the terminal board cover.

To connect the power supply cable, proceed as

follows:

_

Unscrew the cable clamp screw and the contact

screws L-N-

$

.

• Fasten the wires beneath the screwheads using

the following colour scheme: 

Blue 

(N) 

Brown 

(L)

Yellow-Green

$

• Fasten the power supply cable in the

corresponding cable clamp and close the cover.

Electrical  Connection:

Voltage Frequency: 230

V-1+N  50Hz

Fuse Section: 16A

Supply  cable:

3x1.5mm


You can connect your oven to the system means of

a terminal board. Refer to above information for the

minimal cable sections and the calibration of the

protective elements according to the connection.

If the appliance is installed 

with a junction box

, an

omnipolar circuit breaker

 - with a minimum contact

opening of 3mm - should be installed between the

appliance and the mains.

Power cable supply connection to the electrical

mains:

We recommend you use a power supply cable which

is long enough to allow you to take the oven out of

its recess in the event of maintenance operations

(only use HAR - H 05 - RRF quality cables fitted with

a plug conforming to the regulations in force.

The plug must be accessible at all times.

Unplug the appliance before all operations, even

when replacing the oven lamp.

Using the appliance without correct earthing is

highly  dangerous.

! After connecting the appliance to the flexible

cable, tighten all the screws on the terminal

board.

4

2

N

L

Содержание AHP69PX

Страница 1: ...s 6 8 Cooking modes Programming cooking Practical cooking advice Cooking advice table Precautions and tips 9 General safety Disposal Respecting and conserving the environment Care and maintenance 10 1...

Страница 2: ...oncerning the safe operation installation and maintenance of the appliance Please keep these operating instructions for future reference Pass them on to possible new owners of the appliance Positionin...

Страница 3: ...he cable clamp screw and the contact screws L N Fasten the wires beneath the screwheads using the following colour scheme Blue N Brown L Yellow Green Fasten the power supply cable in the corresponding...

Страница 4: ...ion 2 position 1 Description of the appliance Overall view Control panel Display SELECTOR Knob THERMOSTAT knob DISPLAY TIME SETTING button FAST CLEAN button TIMER knob TEMPERATURE and TIME digits END...

Страница 5: ...temperature may be changed by turning the THERMOSTAT knob 3 When the preheating indicator switches off and a buzzer sounds the preheating process is complete you may now place the food in the oven 4...

Страница 6: ...e heating elements through forced circulation of the air throughout the oven This helps prevent food from burning on the surface and allows the heat to penetrate right into the food Always cook in thi...

Страница 7: ...appears on the DISPLAY the oven will stop cooking and a buzzer sounds Programming has been set when the and buttons are illuminated The DISPLAY shows the cooking end time and the cooking duration alte...

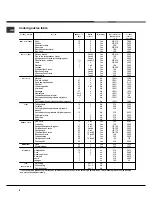
Страница 8: ...00 100 100 100 15 20 10 15 8 10 10 15 15 20 15 20 15 20 10 12 3 5 70 80 70 80 Grilledchicken Cuttlefish Spit roastchickenusingrotisseriespit where present Spit roastduckusingrotisseriespit wherepresen...

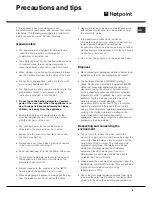
Страница 9: ...nance work without having disconnected the appliance from the electricity mains If the appliance breaks down under no circumstances should you attempt to perform the repairs yourself Repairs carried o...

Страница 10: ...ch the surface and cause the glass to crack For more thorough cleaning purposes the oven door may be removed 1 Open the oven door fully see diagram 2 Lift up and turn the small levers located on the t...

Страница 11: ...isplay when lit indicates that the oven door was automatically locked as soon as the temperature reached a high value The icon indicates that the cleaning cycle may be cancelled at any time by pressin...

Страница 12: ...t its life UK 08709 077 077 Republic of Ireland 0818 313 413 www hotpointservice co uk Appliance Registration We want to give you additional benefits of Hotpoint ownership To activate your free 5 year...

Страница 13: ...ion Replacement of any consumable item or accessory These include but are not limited to plugs cables batteries light bulbs fluorescent tubes and starters covers and filters Replacement of any removab...

Страница 14: ...14 Notes...

Страница 15: ...15 Notes...

Страница 16: ...16 10 2006 195058925 00 XEROX BUSINESS SERVICES Notes...

Отзывы: