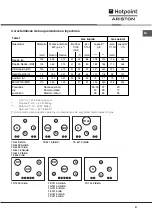
Hotpoint Ariston TD 631 S IX/HA Скачать руководство пользователя страница 37

N

L

BE

3

7

L

G

R

G

asaansl

u

itin

g

De aansluiting van het apparaat aan de gasbuizen

moet worden uitgevoerd zoals voorgeschreven door de

geldende normen, en nadat men er zeker van is dat

het fornuis is ingesteld voor het type gas dat men gaat

gebruiken.  In  het  omgekeerde  geval   

(voor  België)

gaat  u te werk zoals beschreven in de paragraaf

“Aanpassing aan verschillende types gas”. Om het

apparaat aan de gasbuizen aan te sluiten (II2E

+

3

+

voor 

B

elgie en I2L voor

Nederland), dient men eerst de

verbinder te monteren.”

R

”

(Deze is op aanvraag

verkrijgbaar bij de technische-

service-dienst Ariston) Tevens

dient men zijn pakking op de

verbinder “

G

”,die er uit ziet als

een “

L

” , van de voedings-

struktuur te monteren. De verbinder is gedraad: rond

mannelijk 1/2 gas.

De aansluiting voert men uit met behulp van:

- een onbuigbare buis (voor 

B

elgie volgens de

normen N

B

N D51-003)

- of met een flexibile buis van roestvrij staal die in de

muur zit en voortzet met bedradingsverbinder.

Daarbij dient het apparaat uitgerust te zijn van een

gaskraantje (voor 

B

elgie A.G.

B

.) die gemakkelijk

draaibaar dient te zijn. Voor Nederland dient dit

gaskraantje aan de huidige Nationale Normen te

voldoen.

A

an

s

l

u

i

t

in

g


m

e

t


on

b

u

i

gz

a

m

e


b

u

i

s


(

k

o

p

er


o

s

t

aa

l

)

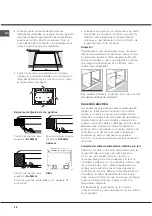
 De aansluiting aan de gasleiding moet zodanig

worden uitgevoerd dat het apparaat niet beweegt.

Op de voedingsstructuur van het apparaat bevindt

zich een “

L

”-vormig, richtbaar verbindingsstuk

waarvan de afdichting is verzekerd door een pakking.

Als het verbindingsstuk gedraaid moet worden is het

absoluut noodzakelijk de pakking te vervangen (bij het

apparaat geleverd). Het verbindingsstuk waardoor het

gas toegang krijgt tot het fornuis is voorzien van

schroefdraad: 1/2 gas cilindrische schroefbout.

A

an

s

l

u

i

t

in

g


m

e

t


een


roe

s

t

v

ri

j

e


s

t

a

l

en

 f

l

e

x

i

b

e

l

e


b

u

i

s

aan


een


ona

f

g

e

b

ro

k

en

 w

and


v

oor

z

ien


v

an

aan

h

e

c

h

t

in

g

en


m

e

t


s

c

h

roe

f

draad

.

Het verbindingsstuk waardoor het gas toegang krijgt

tot het fornuis is voorzien van schroefdraad: 1/2 gas

cilindrische  schroefbout.

De in werking stelling van deze buizen moet zodanig

worden bewerkstelligd dat hun lengte in uitgerolde

toestand niet meer dan 2000 mm is. Nadat de

H

e

t


aan

s

l

u

i

t

en


v

an


de


v

oedin

g

s

k

a

b

e

l


aan


h

e

t

e

l

e

k

t

ri

s

c

h

e


ne

t

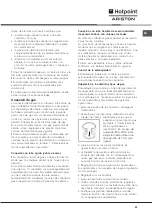
Gebruik voor de voedingskabel een stekker die

genormaliseerd is voor de lading aangegeven op het

typeplaatje.

Wanneer het apparaat rechtstreeks op het net wordt

aangesloten moet u tussen het apparaat en het net

een meerpolige schakelaar aanbrengen met een

afstand tussen de contacten van minstens 3mm,

aangepast aan het elektrische vermogen en voldoend

aan de geldende normen (de aarding mag niet worden

onderbroken door de schakelaar). De voedingskabel

moet zodanig worden geplaatst dat hij nergens een

temperatuur bereikt van 50°C hoger dan de

kamertemperatuur.

 De installateur is verantwoordelijk voor een correcte

elektrische aansluiting en het in acht nemen van de

veiligheidsnormen.

Voor het aansluiten moet u controleren dat:

• het stopcontact geaard is en voldoet aan de

geldende normen;

• het stopcontact in staat is het maximale vermogen

van het apparaat te dragen, zoals aangegeven op

het  typeplaatje;

• de spanning zich bevindt tussen de waarden die

staan aangegeven op het typeplaatje;

• het stopcontact en de stekker overeenkomen. Als

dat niet zo is, dient u ofwel de stekker ofwel het

stopcontact te vervangen; gebruik geen

verlengsnoeren of dubbelstekkers.

 Wanneer het apparaat geïnstalleerd is moeten het

snoer en het stopcontact gemakkelijk te bereiken zijn.

 De kabel mag niet worden gebogen of

samengedrukt.

 De kabel moet van tijd tot tijd worden gecontroleerd

en mag alleen door erkende monteurs worden

vervangen (

zie Service

).

 De fabrikant kan nergens aansprakelijk voor worden

gesteld als deze normen niet worden nageleefd.

Содержание TD 631 S IX/HA

Страница 1: ...ratteristiche Caretteristiche dei bruciatori ed ugelli Descrizione dell apparecchio 6 Vista d insieme Avvio e utilizzo 7 Consigli pratici per l uso dei bruciatori Consigli pratici per l uso delle pias...

Страница 2: ...contenenti bidoni di GPL debbono prevedere delle aperture verso l esterno cos da permettere l evacuazione dal basso delle eventuali fughe di gas Pertanto i bidoni di GPL siano essi vuoti o parzial me...

Страница 3: ...alle norme in vigore il filo di terra non deve essere interrotto dall interruttore Il cavo di alimentazione deve essere posizionato in modo tale che in nessun punto superi di 50 C la temperatura ambie...

Страница 4: ...gello utilizzare una chiave aperta da 7mm vedi figura 3 rimontare le parti eseguendo all inverso le operazioni 4 al termine dell operazione sostituite la vecchia etichetta taratura con quella corrispo...

Страница 5: ...00 0 40 30 28 50 73 71 79 95 Mini WOK MW 110 3 50 1 30 57 91 254 250 138 333 Pressioni di alimentazione Nominale mbar Minima mbar Massima mbar 28 30 20 35 37 25 45 20 17 25 A 15 C e 1013 mbar gas secc...

Страница 6: ...iametri e potenze diverse normali o rapide quest ultime si riconoscono dalle altre per la presenza di un bollo rosso al centro Spia FUNZIONAMENTO PIASTRA ELETTRICA si accende per qualsiasi posizione d...

Страница 7: ...ne di ottenere il massimo rendimento utile ricordare quanto segue utilizzare recipienti adeguati a ciascun bruciatore vedere tabella al fine di evitare che le fiamme fuoriescano dal fondo dei recipien...

Страница 8: ...In caso di guasto in nessun caso accedere ai meccanismi interni per tentare una riparazione Contattare l Assistenza vedi Assistenza Assicurarsi che i manici delle pentole siano sempre rivolti verso l...

Страница 9: ...ica occorre procedere frequentemente ad una accurata pulizia della parte terminale dei dispositivi di accensione istantanea elettronica e verificare che i fori di uscita del gas non siano ostruiti Le...

Страница 10: ...nuto premuta a fondo la manopola per un tempo sufficiente ad attivare il dispositivo di sicurezza Sono ostruiti i fori di fuoriuscita del gas in corrispondenza del dispositivo di sicurezza Sono ostrui...

Страница 11: ...operatore sar a completa disposizione per fissare un appuntamento con il Centro Assistenza Tecnico Autorizzato pi vicino al luogo da cui si chiama attivo 7 giorni su 7 sabato e domenica compresi e no...

Страница 12: ...connection Gas connection Data plate Burner and nozzle specifications Description of the appliance 17 Overall view Start up and use 18 Practical advice on using the burners Practical advice on using...

Страница 13: ...is heavier than air Therefore rooms containing LPG cylinders must also be equipped with vents to allow gas to escape in the event of a leak As a result LPG cylinders whether partially or completely f...

Страница 14: ...e earthing wire must not be interrupted by the circuit breaker The supply cable must not come into contact with surfaces with temperatures higher than 50 C The installer must ensure that the correct e...

Страница 15: ...e in the reverse order 4 Once this procedure is finished replace the old rating sticker with one indicating the new type of gas used Sticker are available from any of our Service Centres Adjusting the...

Страница 16: ...1 00 0 40 30 28 50 73 71 79 95 Mini WOK MW 110 3 50 1 30 57 91 254 250 138 333 Supply Pressures Nominal mbar Minimum mbar Maximum mbar 28 30 20 35 37 25 45 20 17 25 At 15 C and 1013 mbar dry gas Prop...

Страница 17: ...S BURNERS differ in size and power Use the diameter of the cookware to choose the most appropriate burner to cook with Control Knobs for GAS BURNERS and ELECTRIC PLATES adjust the power or the size of...

Страница 18: ...erate efficiently Use appropriate cookware for each burner see table so that the flames do not extend beyond the bottom of the cookware Always use cookware with a flat base and a cover When the conten...

Страница 19: ...nder no circumstances should you attempt to repair the appliance yourself Repairs carried out by inexperienced persons may cause injury or further malfunctioning of the appliance Contact a Service Cen...

Страница 20: ...substances removed For hobs which ligth automatically the terminal part of the electronic instant lighting devices should be cleaned frequently and the gas outlet holes should be checked for blockage...

Страница 21: ...liance You pressed the knob all the way in You keep the knob pressed in long enough to activate the safety device The gas holes are not blocked in the area corresponding to the safety device The gas h...

Страница 22: ...laquette signal tique Caract ristiques des br leurs et des injecteurs Description de l appareil 29 Vue d ensemble Mise en marche et utilisation 30 Conseils pratiques pour l utilisation des br leurs Co...

Страница 23: ...a pi ce doit pr voir un syst me d vacuation vers l ext rieur des fum es de combustion r alis au moyen d une hotte ou par ventilateur lectrique qui entre automatiquement en fonction d s que l on allume...

Страница 24: ...voirfigures La table ne peut tre install e qu au dessus de fours encastrables quip s de ventilation de refroidissement Raccordement lectrique Les tables munies d un cordon d alimentation tripolaire so...

Страница 25: ...ique I2E pour le Luxembourg et I2L pour la Hollande il faut avant tout installer le raccord R disponible sur demande aupr s du Service d Assistance Technique Ariston avec son tanch it G sur le raccord...

Страница 26: ...ice versa plusieurs reprises V rifiez ainsi qu il n y ait pas extinction du br leur 4 En cas de mauvais fonctionnement du dispositif de s curit gaz thermocouple quipant certains appareils quand les br...

Страница 27: ...65 183 Auxiliaire A 55 1 00 0 40 30 28 50 73 71 79 95 1 00 111 Mini WOK MW 110 3 50 1 30 57 91 254 250 138 333 3 30 365 Pressions d alimentation Pour la France Nominale mbar Minimum mbar Maximum mbar...

Страница 28: ...mbar Minimum mbar Maximum mbar 25 20 30 A 15 C et 1013 mbar gaz sec Propane P C S 50 37 MJ kg Butane P C S 49 47 MJ kg Naturele G20 P C S 37 78 MJ m3 Naturele G25 P C S 32 49 MJ m3 1 Seulement pour le...

Страница 29: ...eux au diam tre de votre casserole Manettes de commande des BR LEURS GAZ et de la PLAQUE LECTRIQUE pour le r glage de la flamme ou de la puissance La bougie d allumage des BR LEURS GAZ permet l alluma...

Страница 30: ...dement n oubliez pas d utiliser des r cipients appropri s chaque br leur voir tableau pour viter que les flammes ne d passent de sous les casseroles de toujours utiliser des casseroles fond plat et av...

Страница 31: ...yez en aucun cas d acc der aux m canismes internes pour tenter de r parer l appareil Contactez le service d Assistance voir Assistance Faites attention ce que les manches des casseroles soient toujour...

Страница 32: ...age automatique nettoyez fr quemment et soigneusement l extr mit des dispositifs d allumage lectronique instantan et v rifiez que les orifices de sortie du gaz ne sont pas bouch s Nettoyez les plaques...

Страница 33: ...fond sur la manette vous avez bien appuy fond sur la manette pendant un laps de temps suffisant pour permettre l activation du dispositif de s curit les orifices de sortie du gaz situ s en face du dis...

Страница 34: ...smaatregelen en advies 43 Algemene veiligheidsmaatregelen Afvalverwijdering Onderhoud en verzorging 44 De elektrische stroom afsluiten Schoonmaken van het apparaat Onderhoud gaskranen Storingen en opl...

Страница 35: ...een doorsnede van minstens 100 cm2 en die zodanig is geplaatst dat hij niet per ongeluk verstopt kan raken Een andere manier is door op indirecte wijze lucht te onttrekken aan de aangrenzende vertrek...

Страница 36: ...nverpakking Als de kookplaat niet boven een inbouwoven wordt ge nstalleerd moet u een houten isolatieplank aanbrengen Deze moet op een minimum afstand van 20 mm van de onderkant van de kookplaat worde...

Страница 37: ...e buis aan een onafgebroken wand voorzien van aanhechtingen met schroefdraad Het verbindingsstuk waardoor het gas toegang krijgt tot het fornuis is voorzien van schroefdraad 1 2 gas cilindrische schro...

Страница 38: ...val van een brander Mini WOK moet men een steeksleutel van 7 mm gebruiken om de branderkop los te draaien zie afbeelding 3 zet de onderdelen weer op hun plaats door de handelingen in omgekeerde volgor...

Страница 39: ...4 3 40 376 Halp Snel S 75 1 65 0 40 30 28 64 120 118 96 157 1 65 183 Hulp A 55 1 00 0 40 30 28 50 73 71 79 95 1 00 111 Mini WOK MW 110 3 50 1 30 57 91 254 250 138 333 3 30 365 Spanning van voeding Nom...

Страница 40: ...1 Allen voor apparaten met veiligheidsmechanisme om gaslekkages te voorkomen 145 S R S A S R S A S RR MW A UR RR S S A MW RR S S TD 750 S IX HA TD 751 S GH HA TQ 751 S GH HA TQ 751 S IX HA TZ 751 S H...

Страница 41: ...r van de pan die u wilt gebruiken Knoppen van de GASBRANDERS en van de ELEKTRISCHE KOOKPLAAT voor het regelen van de vlam of van het vermogen Bougie voor het ontsteken van de GASBRANDERS zorgt voor ee...

Страница 42: ...tegendeklokintedraaien op6verschillendestanden Positie Normale of snelle plaat 0 Uit 1 Minimum sterkte 2 5 Middelsterkten 6 Maximum sterkte Alsdeknopnietopuitstaatzalhetcontrolelampjeaangevendatde koo...

Страница 43: ...stopcontact zit Als de oven defect is mag u nooit aan het interne systeem sleutelen om een reparatie proberen uit te voeren Neem contact op met de Technische Dienst zie Service Richt de handvaten van...

Страница 44: ...an een automatische ontsteking moet het uiteinde van de elektronische ontstekingselementen regelmatig worden gereinigd en moet u controleren dat de gaatjes van de vlamverspreiders niet verstopt zijn D...

Страница 45: ...j het kookvlak U de knop goed heeft ingedrukt U de knop lang genoeg heeft ingedrukt voor het activeren van het veiligheidsmechanisme De gaten van de vlamverspreiders dichtbij het veiligheidsmechanisme...

Страница 46: ...ter sticas de los quemadores e inyectores Descripci n del aparato 52 Vista de conjunto Puesta en funcionamiento y uso 53 Consejos pr cticos para el uso de los quemadores Consejos pr cticos para el uso...

Страница 47: ...ro de incendio o dormitorios Los gases de petr leo licuados m s pesados que el aire se depositan en las partes m s bajas Por lo tanto los ambientes que contienen botellas de GPL deben tener aberturas...

Страница 48: ...s figuras Es posible instalar la encimera s lo sobre hornos empotrados dotados de ventilaci n Conexi n el ctrica Las encimeras que poseen cable de alimentaci n tripolar se fabrican para funcionar con...

Страница 49: ...rada de gas al aparato es roscada 1 2 gas macho cil ndrico Conexi n con tubo flexible de acero inoxidable de pared continua con uniones roscadas La uni n de entrada de gas al aparato es roscada 1 2 ga...

Страница 50: ...evo gas que se va a utilizar disponible en nuestros Centros de Asistencia T cnica Cuando la presi n del gas utilizado sea distinta de la prevista o variable es necesario instalar en la tuber a de entr...

Страница 51: ...40 30 28 50 73 71 79 95 Mini WOK MW 110 3 50 1 30 57 91 254 250 138 333 Presiones de suministro Nominal mbar Minimo mbar M ximo mbar 28 30 20 35 37 25 45 20 17 25 A 15 C y 1013 mbar gas seco Propano...

Страница 52: ...adecuado para el di metro del recipiente que va a utilizar Mandos de los QUEMADORES A GAS y de la PLACA EL CTRICA para la regulaci n de la llama o de la potencia Buj a de encendido de los QUEMADORES...

Страница 53: ...eaobtenerelm ximorendimiento es tilrecordarlo siguiente utilicerecipientesadecuadosparacadaquemador verla tabla con el fin de evitar que las llamas sobresalgan por el fondodelosrecipientes utilice sie...

Страница 54: ...r a no acceda nunca a los mecanismos internos para intentar una reparaci n Llame al Servicio de Asistencia T cnica ver Asistencia Verifique que los mangos de las ollas est n siempre dirigidos hacia de...

Страница 55: ...tico es necesario realizar frecuentemente una cuidadosa limpieza de la parte terminal de los dispositivos de encendido instant neo electr nico y verificar que los orificios de salida del gas no est n...

Страница 56: ...era La regulaci n del m nimo es correcta El fondo del recipiente es perfectamente plano El recipiente est centrado en el quemador o en la placa el ctrica Las parrillas fueron invertidas Si a n cuando...

Отзывы: