background image

Downloaded from www.vandenborre.be

IT

Istruzioni per l’uso

PIANO

Sommario

Installazione, 2-4

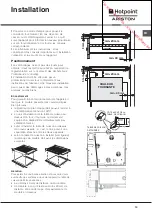
Posizionamento

Collegamento  elettrico

D

es

c

rizione

 d

ell’appare

cch

io,

 5

-

6

Pannello di controllo

Zone  di  cottura  estensibili

A

vv

io


e


utilizzo,

 7

-

10

Accensione del piano cottura

Accensione delle zone di cottura

Funzione power

Spegnimento delle zone di cottura

Gli  elementi  riscaldanti

Programmazione della durata di una cottura

Il  contaminuti

Blocco dei comandi

Spegnimento del piano cottura

Modalità  “demo”

Consigli pratici per l’uso dell’apparecchio

Dispositivi  di  sicurezza

Consigli pratici per la cottura

Pre

c

auzioni


e

 c

onsi

g

li,

 11

Sicurezza generale

Smaltimento

M

anutenzione


e

 c

ura,

 1

2

Escludere la corrente elettrica

Pulire l’apparecchio

Smontare il piano

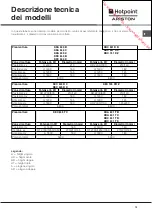
D

es

c

rizione


te

c

ni

c

a

 d

ei


mo

d

elli,

 13

Italiano,

 1

IT

Espanol,  53

E

S

Deutsch,  40

DE

Français, 14

English,27

GB

FR

KEC 635 

T

 C

KEC 6

4

5 D C

KEC 6

4

5 D X

KR

A

 631 

T

 B

KR

A

 631 

T

 X

KR

A

 6

4

0 B

KR

A

 6

4

0 C

KR

A

 6

4

0 X

KRC 631 

T

 B

KRC 631 

T

 X

KRC 6

4

0 B

KRC 6

4

0 X

KRC 6

4

1 D B

KRC 6

4

1 D X

KEC 7

4

5 D

O

 Z

KRC 7

4

1 D Z

Содержание KEC 635 T C

Страница 1: ...na cottura Il contaminuti Blocco dei comandi Spegnimento del piano cottura Modalità demo Consigli pratici per l uso dell apparecchio Dispositivi di sicurezza Consigli pratici per la cottura Precauzioni e consigli 11 Sicurezza generale Smaltimento Manutenzione e cura 12 Escludere la corrente elettrica Pulire l apparecchio Smontare il piano Descrizione tecnica dei modelli 13 Italiano 1 IT Espanol 53...

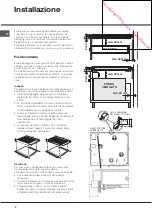
Страница 2: ...e resistente al calore a una temperatura di circa 100 C se si desidera installare il piano cottura sopra un forno questo deve essere provvisto di un sistema di raffreddamento a ventilazione forzata evitare di installare il piano cottura sopra una lavastoviglie all occorrenza frapporre un elemento di separazione a tenuta stagna fra i due apparecchi a seconda del piano cottura che si desidera instal...

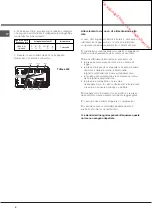
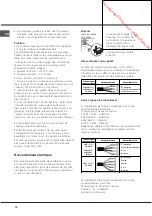
Страница 3: ...per facilitare le operazioni di estrazione del forno Morsettiera L apparecchio è provvisto nella parte inferiore di una scatola per il collegamento a differenti tipi di alimentazione elettrica l immagine è indicativa e può non corrispondere al modello acquistato Collegamento monofase Il piano è dotato di cavo di alimentazione già collegato e predisposto per il collegamento monofase Effettuare l al...

Страница 4: ...sponsabile del corretto collegamento elettrico e dell osservanza delle norme di sicurezza Prima di effettuare l allacciamento accertarsi che la presa abbia la messa a terra e sia a norma di legge la presa sia in grado di sopportare il carico massimo di potenza della macchina indicato nella targhetta caratteristiche posta sull apparecchio la tensione di alimentazione sia compresa nei valori della t...

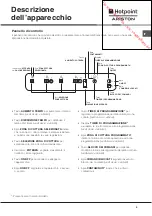
Страница 5: ...ay TIMER DI PROGRAMMAZIONE visualizza le scelte relative alla programmazione vedi Avvio e utilizzo Spie ZONA DI COTTURA PROGRAMMATA indicano le zone di cottura quando si avvia una programmazione vedi Avvio e utilizzo Tasto BLOCCO DEI COMANDI per impedire modifiche fortuite alle regolazioni del piano cottura vedi Avvio e utilizzo Spia COMANDI BLOCCATI segnala l avvenuto blocco dei comandi vedi Avvi...

Страница 6: ...ASTRA DOPPIA Spia PIASTRA TRIPLA ACCESA Tasto ACCENSIONE PIASTRA TRIPLA Tasto ACCENSIONE PIASTRA DOPPIA per attivare la piastra doppia vedi Avvio e utilizzo Spia PIASTRA DOPPIA ACCESA segnala l accensione della piastra doppia Tasto ACCENSIONE PIASTRA TRIPLA per attivare la piastra tripla vedi Avvio e utilizzo Spia PIASTRA TRIPLA ACCESA segnala l accensione della piastra tripla Piastra estensibile ...

Страница 7: ... e mantenere premuto per almeno 2 secondi il tasto di selezione della zona di cottura su cui è attiva la funzione oppure scegliere un diverso livello di potenza tramite i tasti e Spegnimento delle zone di cottura Per spegnere una zona di cottura selezionarla tramite il relativo tasto di selezione e Premere il tasto la potenza della zona di cottura scende progressivamente fino allo spegnimento Gli ...

Страница 8: ...ire sulle regolazioni es interrompere la cottura è necessario sbloccare i comandi premere il tasto per qualche istante la spia si spegne e i comandi si sbloccano Spegnimento del piano cottura Premendo il tasto l apparecchio si spegne Se i comandi dell apparecchio sono stati bloccati continueranno ad essere bloccati anche dopo aver riacceso il piano di cottura Per poter riaccendere il piano è neces...

Страница 9: ... di cottura il display di potenza visualizza Il display si spegne quando la zona di cottura si è sufficientemente raffreddata Surriscaldamento In caso di surriscaldamento dei componenti elettronici il piano cottura si spegne automaticamente e sul display appare F seguito da un numero lampeggiante Questo messaggio scompare e il piano torna utilizzabile non appena la temperatura è scesa a un livello...

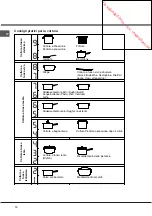
Страница 10: ...fuoco vivo e doratura Arrosti Bistecche Scaloppine Filetti di pesce Uova al tegamino Addensamento rapido Sughi liquidi Acqua bollente Pasta Riso Verdure Latte S Addensamento lento Sughi consistenti S Cottura a fuoco medio Cottura a bagnomaria Cottura Pentola a pressione dopo il sibilo Cottura a fuoco lento Cottura a fuoco lento Stufati Riscaldamento delle pietanze Cottura a fuoco lentissimo Salsa ...

Страница 11: ...to elevata per almeno trenta minuti dopo lo spegnimento Il calore residuo è segnalato anche da un indicatore vedi Avvio e utilizzo Tenere a debita distanza dal piano cottura qualsiasi oggetto che potrebbe fondere ad esempio oggetti in plastica in alluminio o prodotti con un elevato contenuto di zucchero Fare particolare attenzione a imballaggi e pellicole in plastica o alluminio se dimenticati sul...

Страница 12: ...cchero rimuoverli con il raschietto immediatamente finché la superficie è ancora calda Una volta pulito il piano può essere trattato con un prodotto specifico per la manutenzione e la protezione la pellicola invisibile lasciata da questo prodotto protegge la superficie in caso di scolamenti durante la cottura Si raccomanda di eseguire queste operazioni con l apparecchio tiepido o freddo Ricordarsi...

Страница 13: ...800 180 Potenza totale 6700 6600 Piani cottura KEC 645 D C KEC 645 D X KEC 745 DO Z Zone di cottura Potenza in W Diametro in mm Potenza in W Diametro in mm Posteriore sx AD 2200 800 210 140 AD 2200 800 210 140 Posteriore dx H 1400 160 H 1400 160 Anteriore sx H 1200 145 H 1200 145 Anteriore dx H 1800 180 HO 2000 1100 145x250 Potenza totale 6600 6800 Piani cottura KEC 635 T C KRA 631 T B KRA 631 T X...

Страница 14: ...illage des commandes Extinction de la table de cuisson Mode Démonstration demo Conseils d utilisation de l appareil Les sécurités Conseils utiles pour la cuisson Précautions et conseils 24 Sécurité générale Mise au rebut Nettoyage et entretien 25 Mise hors tension Nettoyage de l appareil Démontage de la table Description technique des modèles 26 KEC 635 T C KEC 645 D C KEC 645 D X KRA 631 T B KRA ...

Страница 15: ...n fonctionnement de l appareil il faut que le meuble possède des caractéristiques bien précises le matériau du plan d appui doit pouvoir résister à une température d environ 100 C en cas d installation de la table de cuisson au dessus d un four il faut que ce dernier soit équipé d un dispositif de refroidissement par ventilation forcée éviter d installer la table de cuisson au dessus d un lave vai...

Страница 16: ...es parties qui servent de protection doivent être fixées de manière à ne pouvoir être enlevées qu avec l aide d un outil Raccordement électrique Le branchement électrique de la table de cuisson et celui d un éventuel four à encastrer doivent être effectués séparément pour des raisons de sécurité électrique et pour pouvoir démonter plus facilement le four en cas de besoin Bornier L appareil est équ...

Страница 17: ...éseau électrique En cas de raccordement direct au réseau il faut intercaler entre l appareil et le réseau un interrupteur à coupure omnipolaire ayant au moins 3 mm d écartement entre les contacts L installateur est responsable du bon raccordement électrique de l appareil et du respect des normes de sécurité Avant de procéder au branchement s assurer que la prise est bien munie d une terre conforme...

Страница 18: ...r PROGRAMMATEUR pour afficher les choix correspondant à la programmation voir Mise en marche et utilisation Voyants FOYER PROGRAMMÉ ils indiquent les foyers quand une programmation est lancée voir Mise en marche et utilisation Touche VERROUILLAGE DES COMMANDES pour empêcher toute intervention extérieure sur les réglages de la table de cuisson voir Mise en marche et Utilisation Voyant COMMANDES VER...

Страница 19: ...e foyer double voir Mise en marche et Utilisation Voyant FOYER DOUBLE ALLUMÉ il signale l allumage du foyer double Touche ALLUMAGE FOYER TRIPLE pour activer le foyer triple voir Mise en marche et Utilisation Voyant FOYER TRIPLE ALLUMÉ il signale l allumage du foyer triple Foyer extensible ovale Touche ALLUMAGE FOYER OVALE pour activer le foyer ovale voir Mise en marche et Utilisation Voyant FOYER ...

Страница 20: ...ourne à l affichage du niveau de puissance sélectionné Pour désactiver cette fonction appuyer pendant au moins 2 secondes de suite sur la touche de sélection du foyer où la fonction est activée ou bien choisir un autre niveau de puissance à l aide des touches et Les éléments chauffants La table de cuisson selon les modèles peut être équipée de deux types d éléments chauffants halogènes et radiants...

Страница 21: ...yer sur la touche pendant quelques instants le voyant s éteint et les commandes sont déverrouillées Extinction de la table de cuisson Appuyer sur la touche pour éteindre l appareil Si les commandes de l appareil ont été verrouillées elles le seront encore au rallumage de la table Pour pouvoir rallumer la table de cuisson il faut d abord déverrouiller les commandes ModeDémonstration demo Il est pos...

Страница 22: ...e L afficheur s éteint dès que le foyer a suffisamment refroidi Surchauffe En cas de surchauffe de ses composants électroniques la table s éteint automatiquement et l afficheur indique Fsuivi d un chiffre clignotant Cet affichage disparaît et la table est à nouveau utilisable dès que la température est redescendue à un niveau acceptable Interrupteur sécurité L appareil est équipé d un interrupteur...

Страница 23: ...n vive Crepes Saise et coloration Rotis Steack Escalope Filets de poisson Oeufs au plat Réduction rapide Sauce liquides Eau Frémissante Pates Riz Légumes Lait S Réduction lente Sauce épaisses S Cuisson moyenne Cuisson au bain marie Cuisson Autocuiseur après chuchotement Cuisson douce Mijotage Ragouts Réchauffage des préparations Cuisson très douce Sauce chocolat Maintien au chaud ...

Страница 24: ... Mise en marche et Utilisation Garder à bonne distance de la table de cuisson tout objet qui pourrait fondre des objets en plastique ou en aluminium par exemple ou des produits à haute teneur en sucre Faire très attention aux emballages au film plastique et au papier aluminium au contact des surfaces encore chaudes ou tièdes ils risquent d endommager gravement la table S assurer que les manches de...

Страница 25: ...e cuisson doit être aussitôt enlevé à l aide du grattoir tant que la surface est encore chaude Une fois que la table est propre elle peut être traitée avec un produit d entretien et de protection spécial celui ci forme un film invisible qui protège la surface en cas de débordement accidentel Opérer de préférence quand l appareil est tiède ou froid Prendre soin de toujours bien rincer à l eau clair...

Страница 26: ...totale 6700 6600 Tables de cuisson KEC 645 D C KEC 645 D X KEC 745 DO Z Foyers Puissance en W Diamètre en mm Puissance en W Diamètre en mm Arrière gauche AD 2200 800 210 140 AD 2200 800 210 140 Arrière droit H 1400 160 H 1400 160 Avant gauche H 1200 145 H 1200 145 Avant droit H 1800 180 HO 2000 1100 145x250 Puissance totale 6600 6800 Tables de cuisson KEC 635 T C KRA 631 T B KRA 631 T X KRC 631 T ...

Страница 27: ...ation Timer Control panel lock Switching off the hob Demo mode Practical advice on using the appliance Safety devices Practical cooking advice Precautions and tips 37 General safety Disposal Care and maintenance 38 Switching the appliance off Cleaning the appliance Disassembling the hob Technical description of the models 39 KEC 635 T C KEC 645 D C KEC 645 D X KRA 631 T B KRA 631 T X KRA 640 B KRA...

Страница 28: ... must be heat resistant up to a temperature of approximately 100 C If the appliance is to be installed above an oven the oven must be equipped with a forced ventilation cooling system Avoid installing the hob above a dishwasher if this cannot be avoided place a waterproof separation device between the two appliances Depending on the hob you want to install the cabinet must have the following dimen...

Страница 29: ...board On the lower part of the appliance there is a connection box for the different types of electricity supply the picture is only an indication and is not an exact representation of the purchased model Single phase connection The hob is equipped with a pre connected electricity supply cable which is designed for single phase connection Connect the wires in accordance with the instructions given...

Страница 30: ...e correct electrical connection has been made and that it is fully compliant with safety regulations Before connecting the appliance to the power supply make sure that The appliance is earthed and the plug is compliant with the law The socket can withstand the maximum power of the appliance which is indicated on the data plate located on the appliance itself The voltage falls within the range of v...

Страница 31: ...ER display shows which programme has been selected see Start up and use COOKING ZONE PROGRAMMED indicator lights show which cooking zones are being used during a cooking programme see Start up and use CONTROL PANEL LOCK button prevents accidental changes to the hob settings see Start up and use CONTROL PANEL LOCK indicator light shows the control panel has been locked see Start up and use TIMER in...

Страница 32: ...the double hotplate see Start up and use DOUBLE HOTPLATE ON indicator light shows the double hotplate has been switched on TRIPLE HOTPLATE ON button switches on the triple hotplate see Start up and use TRIPLE HOTPLATE ON indicator light shows the triple hotplate has been switched on Oval extendable hotplate OVAL HOTPLATE ON button switches on the oval hotplate see Start up and use OVAL HOTPLATE ON...

Страница 33: ...ctor button corresponding to the cooking zone on which the function has been activated alternatively select a different power level using the buttons and Switching off the cooking zones To switch off a cooking zone select it using the corresponding selector button and Press the button the power of the cooking zone will progressively decrease until it is switched off Heating elements Two types of h...

Страница 34: ... any of the controls e g to stop cooking you must switch off this function Press the button for a few moments the indicator light will switch off and the lock function will be removed Switching off the hob Press the button to switch the appliance off If the control panel lock has been activated the controls will continue to be locked even after the hob is switched on again In order to switch the h...

Страница 35: ...splay switches off when the cooking zone has cooled sufficiently Overheating protection If the electronic elements overheat the hob switches off automatically and F appears on the display followed by a flashing number When the temperature has reached a suitable level this message disappears and the hob may be used again Safety switch The appliance has a safety switch which automatically switches t...

Страница 36: ...ooking Crêpes Cooking on a high flame and browning roasts steaks escalopes fish fillets fried eggs Fast thickening liquid juices Boiling water pasta rice vegetables Milk S Slow thickening dense juices S Medium flame cooking Bain marie cooking Pressure cooking after whistle Low flame cooking Low flame cooking stews Reheating dishes Very low flame cooking Chocolate sauce Keeping food hot ...

Страница 37: ...rning when residual heat is present see Start up and use Keep any object which could melt away from the hob for example plastic and aluminium objects or products with a high sugar content Be especially careful when using plastic film and aluminium foil or packaging if placed on surfaces which are still hot they may cause serious damage to the hob Always make sure that pan handles are turned toward...

Страница 38: ...elted on the hob remove them immediately with the scraper while the surface is still hot Once it is clean the hob may be treated with a special protective maintenance product the invisible film left by this product protects the surface from drips during cooking This maintenance task should be carried out while the appliance is warm not hot or cold Always remember to rinse the appliance well with c...

Страница 39: ... 180 H 1800 180 Total power 6700 6600 Hobs KEC 645 D C KEC 645 D X KEC 745 DO Z Cooking zone Power W Diameter mm Power W Diameter mm Back Left DHal 2200 800 210 140 DHal 2200 800 210 140 Back Right H 1400 160 H 1400 160 Front Left H 1200 145 H 1200 145 Front Right H 1800 180 OH 2000 1100 145x250 Total power 6600 6800 Hobs KEC 635 T C KRA 631 T B KRA 631 T X KRC 631 T B KRC 631 T X Cooking zone Pow...

Страница 40: ... Ausschalten des Kochfeldes Demo Mode Vorführmodus Praktische Ratschläge zum Einsatz des Gerätes Sicherheitsvorrichtungen Praktische Back Brathinweise Vorsichtsmaßregeln und Hinweise 50 Allgemeine Sicherheit Entsorgung Reinigung und Pflege 51 Abschalten Ihres Gerätes vom Stromnetz Reinigung des Gerätes Demontage des Kochfeldes Technische Beschreibung der Modelle 52 KOCHFELD Italiano 1 DE Espanol 5...

Страница 41: ...gewährleisten muss der Umbauschrank folgende Eigenschaften aufweisen Die Auflagefläche muss aus hitzebeständigem Material beschaffen sein um einer Temperatur von ca 100 C standzuhalten Soll das Kochfeld über einem Backofen installiert werden muss letzterer mit einem Kühlsystem mit Zwangsbelüftung ausgestattet sein Von der Installation eines Kochfeldes über einem Geschirrspüler wird abgeraten Gegeb...

Страница 42: ...dass ein Entfernen derselben ohne Zuhilfenahme eines Werkzeugs nicht möglich ist Elektroanschluss Bei der Installation des Kochfeldes und der eines eventuellen Einbaubackofens müssen sämtliche Elektroanschlüsse getrennt vorgenommen werden und dies nicht nur aus Sicherheitsgründen sondern auch um den Backofen falls nötig leichter herausziehen zu können Klemmengehäuse Das Gerät ist mit einem Gehäuse...

Страница 43: ...z angeschlossen ist zwischen Stromnetz und Gerät ein allpoliger Schalter mit einer Mindestkontaktöffnung von 3 mm zwischenzuschalten Der Installateur ist für den ordnungsgemäßen elektrischen Anschluss sowie die Einhaltung der Sicherheitsvorschriften verantwortlich Vor dem Anschluss stellen Sie bitte sicher dass die Netzsteckdose geerdet ist und den gesetzlichen Bestimmungen entspricht die Netzstec...

Страница 44: ...OGRAMMIERUNGSTIMER Auf diesem Display werden die jeweils programmierten Zeiten angezeigt siehe Inbetriebsetzung und Gebrauch Kontrollleuchten PROGRAMMIERTE KOCHZONE Diese zeigen die Kochzonen an die programmiert wurden siehe Inbetriebsetzung und Gebrauch Taste SPERRE DER SCHALTELEMENTE Um versehentliche Änderungen der am Kochfeld erfolgten Einstellungen zu verhindern siehe Inbetriebsetzung und Geb...

Страница 45: ...HALTET Diese zeigt an dass die Doppelkochzone eingeschaltet wurde Taste EINSCHALTEN DER DREIFACHKOCHZONE Mittels dieser kann die Dreifachkochzone aktiviert werden siehe Inbetriebsetzung und Gebrauch Kontrollleuchte DREIFACHKOCHZONE EINGESCHALTET Diese zeigt an dass die Dreifachkochzone eingeschaltet wurde Ovale erweiterbare Kochzone Taste EINSCHALTEN DER OVALEN KOCHZONE Mittels dieser kann die ova...

Страница 46: ...reicht ist Sobald sie erreicht ist zeigt das Display wieder die eingestellte Leistungsstufe Um diese Funktion zu deaktivieren halten Sie die Bedieungstaste des Kochfelds auf dem die Funktion aktiv ist für mindestens 2 Sekunden gedrückt oder wählen Sie eine andere Leistungsstufe von 0 bis 9 über den Leistungswähler und DieHeizelemente Das Kochfeld kann je nach Modell mit zwei Arten von Heizelemente...

Страница 47: ...hte leuchtet auf Zu weiteren Einstellungen z B um den Garvorgang zu unterbrechen müssen die Schaltelemente erst wieder freigegeben werden Drücken Sie die Taste für einige Sekunden die Kontrollleuchte erlischt die Schaltelemente werden freigegeben Ausschalten des Kochfeldes Durch Drücken der Taste wird das Kochfeld ausgeschaltet Sollten die Schaltelemente gesperrt worden sein bleiben diese auch bei...

Страница 48: ...e Anzeige schaltet sich ab sobald die Kochzone ausreichend abgekühlt ist Überhitzung Im Falle einer Überhitzung der elektronischen Gerätekomponenten schaltet sich das Kochfeld automatisch aus auf dem Display erscheint die Anzeige Fgefolgt von einer blinkenden Zahl Diese Meldung erlischt und das Kochfeld kann wieder eingesetzt werden sobald die Temperatur auf einen akzeptablen Wert gesunken ist Sic...

Страница 49: ... garen Crêpes Stark garen und bräunen Braten Koteletts Schnitzel Fischfilets Spiegeleier Schnell eindicken flüssige Soßen Kochendes Wasser Nudeln Reis Gemüse Milch S Langsam eindicken dickflüssige Soßen S Sanftgaren Wasserbad Garen im Schnellkochtopf nach dem Dampfaustritt Sehr sanft Garen Sehr sanft Garen Aufwärmen von Speisen Extrem sanft Garen Schokoladensoße Warmhalten ...

Страница 50: ...blendet siehe Inbetriebsetzung und Gebrauch Halten Sie sämtliche Gegenstände die schmelzen könnten wie Plastikteile oder Kunststoffe sowie Zucker oder stark zuckerhaltige Speisen von dem Kochfeld fern Achten Sie besonders auf Verpackungsmaterial Frischhaltefolie und Alufolie Wird derartiges Material auf den noch heißen oder warmen Oberflächen belassen können sie das Kochfeld dauerhaft beschädigen ...

Страница 51: ... noch warmen Oberfläche entfernt werden Nach der Reinigung kann das Kochfeld mit einem Pflegeprodukt nachbehandelt werden Der unsichtbare Schutzfilm den ein solches Produkt hinterlässt schützt die Oberfläche vor eventuell überkochenden Speisen Es empfiehlt sich diese Nachbehandlung bei lauwarmem oder abgekühltem Gerät vorzunehmen Achten Sie darauf das Kochfeld nach der Reinigung stets mit klarem W...

Страница 52: ... 1800 180 Gesamtleistung 6700 6600 Kochfelder KEC 645 T C KEC 645 T C KEC 745 DO Z Kochzonen Leistung W Durchmesser mm Leistung W Durchmesser mm Hinten links AD 2200 800 210 140 AD 2200 800 210 140 Hinten rechts H 1400 160 H 1400 160 Vorne links H 1200 145 H 1200 145 Vorne rechts H 1800 180 HO 2000 1100 145x250 Gesamtleistung 6600 6800 Kochfelder KEC 635 T C KRA 631 T B KRA 631 T B KRA 631 T B KRA...

Страница 53: ...utos Bloqueo de los mandos Apagado de la encimera Modalidad demo Consejos prácticos para el uso del aparato Dispositivos de seguridad Consejos prácticos para la cocción Precauciones y consejos 63 Seguridad general Eliminación Mantenimiento y cuidados 64 Interrumpir el suministro de corriente eléctrica Limpiar el aparato Desmontar la encimera Descripción técnica de los modelos 65 KEC 635 T C KEC 64...

Страница 54: ... que el mueble tenga las características adecuadas el plano de apoyo debe ser de material resistente al calor a una temperatura de aproximadamente 100ºC si se desea instalar la encimera sobre un horno el mismo debe poseer un sistema de enfriamiento con ventilación forzada evite instalar la encimera sobre un lavavajillas pero si fuera necesario interponga un elemento de separación estanco entre los...

Страница 55: ...tección se deben fijar de modo tal que no puedan ser quitadas sin la ayuda de una herramienta Conexión eléctrica La conexión eléctrica de la encimera y la de un horno empotrado deben ser realizadas por separado tanto por razones de seguridad eléctrica como para facilitar las operaciones de extracción del horno Tablero de bornes El aparato posee en su parte inferior una caja para su conexión a dife...

Страница 56: ...tación eléctrica a la red En el caso de conexión directa a la red es necesario interponer entre el aparato y la red un interruptor omnipolar con apertura mínima entre los contactos de 3 mm El instalador es responsable de la correcta conexión eléctrica y del cumplimiento de las normas de seguridad Antes de efectuar la conexión verifique que la toma tenga conexión a tierra y que sea conforme con la ...

Страница 57: ...aliza las selecciones correspondientes a la programación ver Puesta en funcionamiento y uso Pilotos ZONA DE COCCIÓN PROGRAMADA indican las zonas de cocción cuando comienza una programación ver Puesta en funcionamiento y uso Botón BLOQUEO DE MANDOS para impedir modificaciones fortuitas a las regulaciones de la encimera ver Puesta en funcionamiento y uso Piloto MANDOS BLOQUEADOS indica que se ha pro...

Страница 58: ... Puesta en funcionamiento y uso Piloto PLACA DOBLE ENCENDIDA indica el encendido de la placa doble Botón ENCENDIDO DE LA PLACA TRIPLE para activar la placa triple ver Puesta en funcionamiento y uso Piloto PLACA TRIPLE ENCENDIDA indica el encendido de la placa triple Placa extensible oval Botón ENCENDIDO DE LA PLACA OVALADA para activar la placa ovalada ver Puesta en funcionamiento y uso Piloto PLA...

Страница 59: ...o mínimo el botón de selección de la zona de cocción elegida En la pantalla indicadora de la potencia se alterna la visualización de la letra P y del nivel de potencia precedentemente fijado durante todo el tiempo necesario para que se alcance dicho nivel de potencia Una vez alcanzado la pantalla volverá a visualizar el nivel de potencia fijado Para desactivar esta función presione y mantenga pres...

Страница 60: ... el peligro de modificaciones fortuitas de las regulaciones niños operaciones de limpieza etc Presionando el botón los mandos se bloquean y el piloto que se encuentra encima del botón se enciende Para poder volver a realizar regulaciones por ej interrumpir la cocción es necesario desbloquear los mandos presione el botón durante algunos instantes la luz testigo se apagará y el panel de control se d...

Страница 61: ...te Cuando se enfría la zona de cocción la pantalla de potencia visualiza La pantalla se apaga cuando la zona de cocción se ha enfriado lo suficiente Sobrecalentamiento En el caso de un sobrecalentamiento de los componentes electrónicos la encimera se apagará automáticamente y en la pantalla aparecerá Fseguida de un número centelleante Este mensaje desaparecerá y la encimera se podrá volver a utili...

Страница 62: ...ción a fuego fuerte y dorado Asados Bistec Escalopes Filetes de pescado Huevo frito Espesamiento rápido Salsas líquidas Agua hirviendo Pasta arroz Verduras Leche S Espesamiento lento Salsas consistentes S Cocción a fuego medio Cocción a Baño María Cocción olla a presión después del silbido Cocción a fuego bajo Cocción a fuego bajo guisados Calentar comidas Cocción a fuego muy bajo Salsa al chocola...

Страница 63: ... El calor residual también está señalado por un indicador ver Puesta en funcionamiento y uso Mantenga cualquier objeto que se pueda fundir a una debida distancia de la encimera por ejemplo objetos de plástico de aluminio o productos con un elevado contenido de azúcar Tenga particular cuidado con los embalajes y películas de plástico o aluminio si se dejan sobre las superficies todavía calientes o ...

Страница 64: ...o azúcar elimínelos inmediatamente con la raedera mientras la superficie está todavía caliente Una vez limpia la encimera se puede tratar con un producto específico para el mantenimiento y la protección la película invisible que deja este producto protege la superficie en caso de escurrimientos durante la cocción Se recomienda realizar estas operaciones con el aparato tibio o frío Recuerde siempre...

Страница 65: ...a total 6700 6600 Encimeras KEC 645 D C KEC 645 D X KEC 745 DO Z Zonas de cocción Potencia en W Diámetro en mm Potencia en W Diámetro en mm Posterior izquierda AD 2200 800 210 140 AD 2200 800 210 140 Posterior derecha H 1400 160 H 1400 160 Delantera izquierda H 1200 145 H 1200 145 Delantera derecha H 1800 180 HO 2000 1100 145x250 Potencia total 6600 6800 Encimeras KEC 635 T C KRA 631 T B KRA 631 T...

Страница 66: ...D o w n l o a d e d f r o m w w w v a n d e n b o r r e b e 66 ES ...

Страница 67: ...D o w n l o a d e d f r o m w w w v a n d e n b o r r e b e 67 ES ...

Страница 68: ...D o w n l o a d e d f r o m w w w v a n d e n b o r r e b e 68 ES 04 2008 195065953 03 XEROX BUSINESS SERVICES ...

Отзывы: