background image

29

These guidelines will help you to plan your exercise

program. For detailed exercise information, obtain a

reputable book or consult your physician. Remember,

proper nutrition and adequate rest are essential for

successful results.

EXERCISE INTENSITY

Whether your goal is to burn fat or to strengthen your

cardiovascular system, exercising at the proper inten-

sity is the key to achieving results. You can use your

heart rate as a guide to find the proper intensity level.

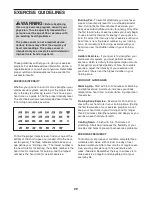
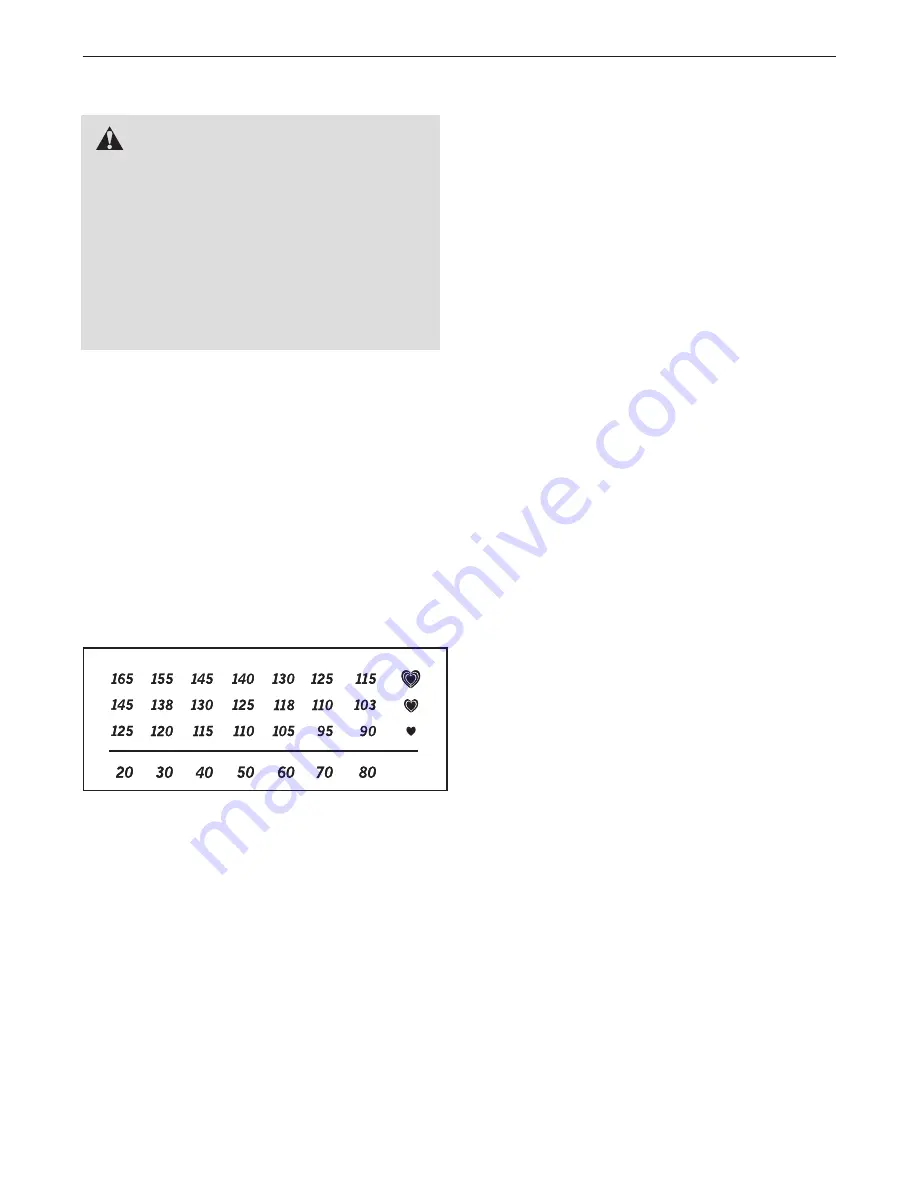
The chart below shows recommended heart rates for

fat burning and aerobic exercise.

To find the proper intensity level, find your age at the

bottom of the chart (ages are rounded off to the near-

est ten years). The three numbers listed above your

age define your “training zone.” The lowest number is

the heart rate for fat burning, the middle number is the

heart rate for maximum fat burning, and the highest

number is the heart rate for aerobic exercise.

Burning Fat

—To burn fat effectively, you must exer-

cise at a low intensity level for a sustained period of

time. During the first few minutes of exercise, your

body uses

carbohydrate calories

for energy. Only after

the first few minutes of exercise does your body begin

to use stored

fat calories

for energy. If your goal is to

burn fat, adjust the intensity of your exercise until your

heart rate is near the lowest number in your training

zone. For maximum fat burning, exercise with your

heart rate near the middle number in your training

zone.

Aerobic Exercise

—If your goal is to strengthen your

cardiovascular system, you must perform aerobic

exercise, which is activity that requires large amounts

of oxygen for prolonged periods of time. For aerobic

exercise, adjust the intensity of your exercise until

your heart rate is near the highest number in your

training zone.

WORKOUT GUIDELINES

Warming Up

—Start with 5 to 10 minutes of stretching

and light exercise. A warm-up increases your body

temperature, heart rate, and circulation in preparation

for exercise.

Training Zone Exercise

—Exercise for 20 to 30 min-

utes with your heart rate in your training zone. (During

the first few weeks of your exercise program, do not

keep your heart rate in your training zone for longer

than 20 minutes.) Breathe regularly and deeply as you

exercise–never hold your breath.

Cooling Down

—Finish with 5 to 10 minutes of

stretching. Stretching increases the flexibility of your

muscles and helps to prevent post-exercise problems.

EXERCISE FREQUENCY

To maintain or improve your condition, complete three

workouts each week, with at least one day of rest

between workouts. After a few months of regular exer-

cise, you may complete up to five workouts each

week, if desired. Remember, the key to success is to

make exercise a regular and enjoyable part of your

everyday life.

EXERCISE GUIDELINES

WARNING:

Before beginning

this or any exercise program, consult your

physician. This is especially important for

persons over the age of 35 or persons with

pre-existing health problems.

The pulse sensor is not a medical device.

Various factors may affect the accuracy of

heart rate readings. The pulse sensor is

intended only as an exercise aid in determin-

ing heart rate trends in general.

Содержание HF-XT9800-E

Страница 1: ...ing this equipment Keep this manual for future reference QUESTIONS If you have questions or if parts are damaged or missing please see HOW TO CONTACT CUSTOMER CARE on the back cover of this manual www HotelFitness com Model No HF XT9800 E 0 Serial No Write the serial number in the space above for reference ...

Страница 2: ... HOW TO CONTACT CUSTOMER CARE Back Cover LIMITED WARRANTY Back Cover WARNING DECAL PLACEMENT This drawing shows the location s of the warning decal s If a decal is missing or illegible see the back cover of this manual and request a free replacement decal Apply the decal in the location shown Note The decal s may not be shown at actual size HOTEL FITNESS is a registered trademark of Hotel Fitness ...

Страница 3: ...ide 5 Inspect and properly tighten all parts regu larly Replace any worn parts immediately 6 Keep children under age 12 and pets away from your elliptical exerciser at all times 7 Your elliptical exerciser should not be used by persons weighing more than 350 lbs 159 kg 8 Wear appropriate exercise clothes while exercising do not wear loose clothes that could become caught on your elliptical exer ci...

Страница 4: ...ed to make your workouts at home more effective and enjoyable For your benefit read this manual carefully before you use the elliptical exerciser If you have ques tions after reading this manual please see the back cover of this manual To help us assist you note the product number and serial number before contacting us The model number and the location of the serial number are shown on the front c...

Страница 5: ... the packing materials until assembly is completed In addition to the included tool s assembly requires a Phillips screwdriver an adjustable wrench and a rubber mallet As you assemble the elliptical exerciser use the drawings below to identify small parts The number in parenthe ses below each drawing is the key number of the part from the PART LIST near the end of this manual The number following ...

Страница 6: ...he Upright 2 to the Frame 1 with four M8 x 20mm Screws 60 Tip Start all the Screws before tightening any of them Then slide the Shield Cover 39 downward to the bottom of the Upright 2 Attach the Cup Holder 19 to the Upright 2 with two M4 x 15mm Screws 52 2 Attach the Right Handlebar Leg 32 to the Right Pedal Leg 28 with an M8 x 32mm Screw 63 four 5mm Bushings 56 and an M8 Locknut 54 Do not overtig...

Страница 7: ...ching the wires Attach the Console 6 to the Upright 2 with four M8 x 20mm Screws 60 3 4 60 60 6 68 68 84 1 8 2 Avoid pinching the wires Console Wire Harness Wire Harness 3 Identify the Right Frame Cover 8 and orient it as shown Attach the Right Frame Cover 8 to the Frame 1 with two M6 x 20mm Screws 68 and an M6 x 13mm Screw 84 Attach the Left Frame Cover not shown in the same way ...

Страница 8: ...m Screws 52 65 35 32 88 86 52 52 90 88 5 Identify the Right Handlebar 35 which is marked with an R sticker Apply a generous amount of the included fas tener adhesive to two M8 x 30mm Screws 65 Then attach the Right Handlebar 35 to the Right Handlebar Leg 32 with the two M8 x 30mm Screws 65 Attach the Left Handlebar not shown to the Left Handlebar Leg not shown in the same way 5 ...

Страница 9: ...eft over after assembly is completed To protect the floor or carpet from damage place a mat under the elliptical exerciser 7 Remove the adhesive backing from the Rear Stabilizer Overlay 10 and from the Rear Stabilizer Cover 5 Press the Rear Stabilizer Overlay 10 onto the Track Frame 3 and the Rear Stabilizer Cover 5 ...

Страница 10: ...atures of the Basic console see page 13 To learn about the features of the Workout TV console see the userʼs manual included with the Workout TV console To upgrade your console and expand the capabilities of your elliptical exerciser whenever you choose please see the back cover of this manual Basic Console HOW TO UPGRADE THE CONSOLE Workout TV Console ...

Страница 11: ...vers and DVD players will require an RF modulator to operate with the ellipti cal exerciser RF modulators and external CATV cables are not available from FreeMotion Fitness but are available at electronics stores See the owner s manual included with the equipment you wish to con nect to see whether an RF modulator is needed HOW TO MOVE THE ELLIPTICAL EXERCISER Due to the size and weight of the ell...

Страница 12: ...direction It is recommended that you turn the pedal discs in the direction shown by the arrow below however for variety you can turn the pedal discs in the oppo site direction To dismount the elliptical exerciser wait until the ped als come to a complete stop Note The elliptical exerciser does not have a freewheel the pedals will continue to move until the flywheel stops When the pedals are statio...

Страница 13: ...hen you have finished exercising you can use the cool down mode to help you recover from your workout The console also provides two heart rate programs that automatically adjust the resistance of the pedals to keep your heart rate near a target level during your workouts The console features the iFit Interactive Workout System which enables the console to accept iFit cards containing workouts desi...

Страница 14: ...ed for the TV to operate See HOW TO PLUG IN THE AC POWER ADAPTER on page 10 When the AC power adapter is plugged in the main display will light and the console will be ready for use IMPORTANT If the elliptical exerciser has been exposed to cold temperatures allow it to warm to room temperature before turning on the console If you do not do this the console displays or other electronic components m...

Страница 15: ...gram instead of the elapsed time The main display will also show your heart rate in beats per minute when you use the handgrip pulse sensor or the optional chest pulse sensor see step 5 on page 16 You can also view selected information at a larger size Press the DISPLAY button repeatedly to view the elapsed time the distance that you have ped aled or the approximate number of calories that you hav...

Страница 16: ...ld the contacts for at least 15 seconds If your heart rate is not shown make sure that your hands are positioned as described Be care ful not to move your hands excessively or to squeeze the metal contacts tightly For optimal performance clean the metal contacts using a soft cloth never use alcohol abrasives or chemi cals to clean the contacts 6 Turn on the fan if desired The fan has high and low ...

Страница 17: ... ENTER button 4 Enter your weight Next the words ENTER WEIGHT and a weight setting of 185 pounds US will appear in the main display To enter your weight 1 kilogram 2 2 pounds press the increase and decrease buttons beside the ENTER button Then press the ENTER button 5 Enter a goal for the program If you selected the MANUAL TIME program the words ENTER WORKOUT TIME and a time set ting of 30 minutes...

Страница 18: ...MANUAL program the main display will show the time your exercise intensity in mets the approximate number of calories you have burned the approximate number of calories you are burn ing per hour and the distance you have pedaled The main display will also show your heart rate when you use the handgrip pulse sensor see step 5 on page 16 or the optional chest pulse sensor see page 27 If you selected...

Страница 19: ...weight 1 kilogram 2 2 pounds press the increase and decrease buttons beside the ENTER button Then press the ENTER button 5 Press the START button or begin pedaling to start the program Each preset program is divided into 20 or 30 one minute segments One resistance level and one target rpm pace setting is programmed for each segment Note The same resistance setting and or target rpm may be programm...

Страница 20: ...of calories you are burning per hour and the distance you have pedaled The main display will also show your heart rate when you use the handgrip pulse sensor see step 5 on page 16 or the optional chest pulse sensor see page 27 To view the time your exercise intensity in mets and your power output in watts press the Display button To view the time the approximate number of calo ries you have burned...

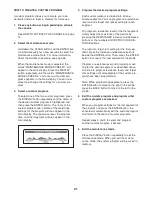
Страница 21: ...ach custom workout is divided into 30 one minute segments You can program one resistance level and one target rpm pace setting for each segment To program a resistance level for the first segment simply adjust the resistance of the pedals by pressing the RESISTANCE increase and decrease buttons or the numbered QUICKTOUCH RESIS TANCE buttons To program a target rpm setting for the first seg ment pr...

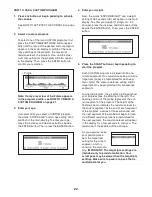
Страница 22: ...the increase and decrease buttons beside the ENTER button Then press the ENTER button 5 Press the START button or begin pedaling to start the program Each CUSTOM program is divided into 30 one minute segments One resistance setting and one target rpm pace is programmed for each seg ment Note The same resistance setting and or target rpm may be programmed for consecutive segments During the program...

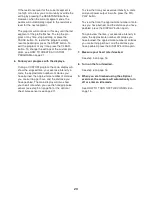
Страница 23: ...lories you have burned the approximate number of calories you are burning per hour and the distance you have pedaled The main display will also show your heart rate when you use the handgrip pulse sensor see step 5 on page 16 or the optional chest pulse sensor see page 27 To view the time your exercise intensity in mets and your power output in watts press the DIS PLAY button To view the time the ...

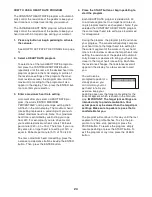
Страница 24: ...s 95 To enter a maximum heart rate setting press the increase and decrease buttons beside the ENTER button Then press the ENTER button 4 Press the START button or begin pedaling to start the program Each HEART RATE program is divided into 30 one minute segments One target heart rate set ting is programmed for each segment Note If you selected the CONSTANT HEART RATE program the same target heart r...

Страница 25: ... press the DISPLAY button again To again view the time your exercise intensity in mets the approximate number of calories you have burned the approximate number of calories you are burning per hour and the distance you have pedaled press the DISPLAY button again 6 Measure your heart rate if desired See step 5 on page 16 7 Turn on the fan if desired See step 6 on page 16 8 When you are finished usi...

Страница 26: ...dle mode When the console is in the idle mode the displays will be reset to zeros and a screen saver will appear in the main display The pause timeout can occur from 1 minute to 5 minutes after the pedals stop moving To change the length of time that will elapse before the pause timeout press the increase and decrease buttons beside the ENTER button 5 Press the DISPLAY button again and change the ...

Страница 27: ...d Remove the iFit card when you are finished exer cising Store the iFit card in a secure place HOW TO USE THE STEREO SOUND SYSTEM To play music or audio books through the consoleʼs stereo sound system while you exercise plug an audio cable not included into the MP3 jack on the console and into a jack on your MP3 player or CD player make sure that the audio cable is fully plugged in Next press the ...

Страница 28: ...track wheels and the track frame on which the track wheels ride IMPORTANT To avoid damage to the console keep liquids away from the con sole and keep the console out of direct sunlight HANDGRIP PULSE SENSOR TROUBLESHOOTING If the console does not display your heart rate when you hold the handgrip pulse sensor or if the displayed heart rate appears to be too high or too low see step 5 on page 16 HO...

Страница 29: ...our goal is to strengthen your cardiovascular system you must perform aerobic exercise which is activity that requires large amounts of oxygen for prolonged periods of time For aerobic exercise adjust the intensity of your exercise until your heart rate is near the highest number in your training zone WORKOUT GUIDELINES Warming Up Start with 5 to 10 minutes of stretching and light exercise A warm ...

Страница 30: ...Achilles Stretch With one leg in front of the other reach forward and place your hands against a wall Keep your back leg straight and your back foot flat on the floor Bend your front leg lean forward and move your hips toward the wall Hold for 15 counts then relax Repeat 3 times for each leg To cause further stretching of the achilles tendons bend your back leg as well Stretches Calves achilles te...

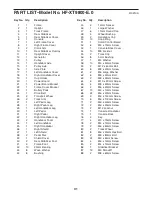
Страница 31: ...izer Foot 41 3 Frame Foot 42 10 25mm Bearing 43 8 Wave Washer 44 8 Bushing 45 2 14mm Spacer 46 1 Large Washer 47 6 11mm Round Cap 48 4 Wheel Bushing 49 2 Handlebar Cap 50 10 Snap Ring 51 1 Small Control Board 52 6 M4 x 15mm Screw 53 1 Console Back Cover 54 10 M8 Locknut 55 2 Track Cap 56 8 5mm Bushing 57 1 M4 Washer 58 10 M4 x 50mm Screw 59 2 M12 x 60mm Bolt 60 8 M8 x 20mm Screw 61 2 M6 Large Wash...

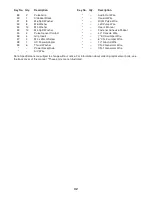
Страница 32: ... V Wire Audio Out Wire Coaxial Wire Right Pulse Wire Left Pulse Wire Userʼs Manual Fastener Adhesive Packet 40 Console Wire 7 ECA Jumper Wire 6 CN 3 Jumper Wire 10 Ground Wire CN 2 Generator Wire CN 1 Generator Wire Key No Qty Description Key No Qty Description Note Specifications are subject to change without notice For information about ordering replacement parts see the back cover of this manua...

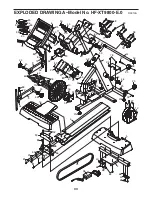
Страница 33: ... 41 41 42 42 42 42 43 43 50 50 46 44 45 73 73 58 58 58 59 59 60 60 60 78 68 68 81 52 24 82 72 54 9 44 45 82 72 54 67 86 53 89 68 40 84 68 81 13 15 16 54 62 62 76 54 52 41 90 89 74 88 88 67 12 77 77 91 92 91 92 75 6 81 91 92 91 92 95 96 97 96 95 97 20 21 23 83 87 85 85 83 87 51 57 87 98 99 99 99 ...

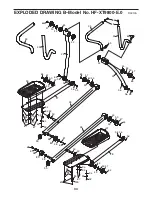
Страница 34: ... 31 26 32 33 34 35 47 43 44 44 44 44 43 50 47 44 50 47 44 50 47 42 50 48 48 48 48 50 42 42 50 47 55 55 49 54 54 56 56 56 56 56 47 56 56 63 64 65 64 63 64 66 33 64 67 67 68 64 68 64 50 61 61 43 43 43 93 93 50 43 42 93 67 67 93 67 93 93 94 94 94 94 94 94 94 93 52 94 93 52 65 ...

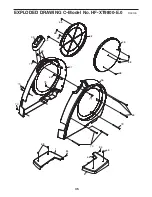
Страница 35: ...35 EXPLODED DRAWING C Model No HF XT9800 E 0 R0310A 36 37 38 38 39 69 79 70 68 71 68 68 68 68 68 7 8 68 68 68 70 71 68 68 84 84 79 70 ...

Страница 36: ... number information If this product experiences a fail ure under the warranty terms set forth FreeMotion Fitness shall provide at their option either repair replacement or refund of the purchase price FreeMotion Fitness compen sates service providers for warranty trips within their service area You may be charged additionally for service calls beyond this service area Hotel Fitness and FreeMotion ...

Отзывы: