background image

75

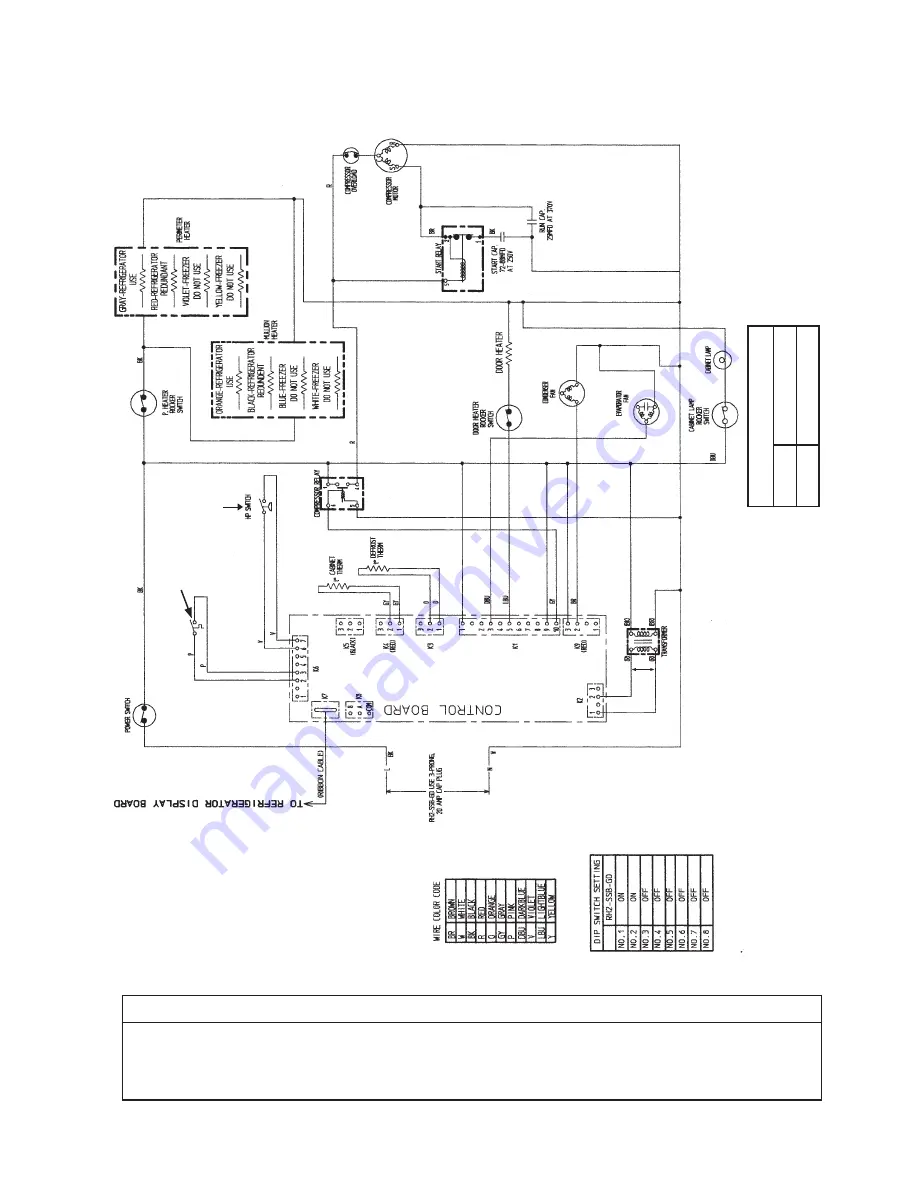
* High-P

ressur

e S

witch 

Cut-out 

500±1

0 PSIG 

Cut-in 

330±1

0 PSIG

*

E1. RH2-SSB-GD (auxiliary code N-6 and earlier)

N/O Close on 

Temper

atur

Rise

Clogged F

ilt

er 

Ther

most

at

C

ontr

ol T

ransf

or

mer 

Output

10V

A

C at 1

15V

A

C Input

NOTICE

Before diagnosing and/or servicing the unit, confirm that you have the proper 
wiring diagram by checking against the diagram located on the evaporator case 
cover.

N/O Close on 

P

ressur

e Rise

*

C

ontr

ol Boar

A

ut

omaticall

y A

djusts 

to N/O or N/C 

High

-P

ressur

e S

witch

Содержание FH1-SSB(-HD)

Страница 1: ... A Superior Degree of Reliability www hoshizaki com Models SSB Professional and TempGuard Series Refrigerated Kitchen Equipment Hoshizaki America Inc Number 73077 Issued 3 8 1999 Revised 5 22 2012 SERVICE MANUAL ...

Страница 2: ...arranty Hoshizaki provides this manual primarily to assist qualified service technicians in the service and maintenance of the appliance Should the reader have any questions or concerns which have not been satisfactorily addressed please call send an e mail message or write to the Hoshizaki Technical Support Department for assistance Phone 1 800 233 1940 770 487 2331 Fax 1 800 843 1056 770 487 336...

Страница 3: ...c Temperature Display Scale F or C 29 2 Service Menu 30 3 LED Lights and Alarm Safeties Chart 31 4 Default Dip Switch Settings 33 a Appliance Operation Freezer Refrigerator S3 dip switch 1 34 b Cabinet Light Heated Glass Door S3 dip switch 2 34 c Door Switch Type S3 dip switch 3 34 d Refrigerator Defrost Initiation Temperature S3 dip switch 4 34 e Display Board Operation S3 dip switch 5 35 f Dual ...

Страница 4: ...itch 54 E Diagnostic Chart 55 IV Replacement of Components 57 A Service for Refrigerant Lines 57 1 Refrigerant Recovery 57 2 Brazing 58 3 Evacuation and Recharge R 404A 58 B Important Notes for Component Replacement 59 C Removal and Replacement of Evaporator Fan Shroud Assembly 60 D Removal and Replacement of Heat Shield on FH2 SSB HD 61 E Removal and Replacement of Door Closure Spring 62 F Door R...

Страница 5: ...ode T 5 to V 5 78 F3 RH3 SSB FG HG auxiliary code A 5 and later 79 G1 FH1 SSB HD auxiliary code P 5 and earlier 80 G2 FH1 SSB HD auxiliary code P 6 to S 5 81 G3 FH1 SSB HD auxiliary code S 6 and later 82 H1 FH2 SSB HD auxiliary code P 5 and earlier 83 H2 FH2 SSB HD HDCU auxiliary code P 6 and later 84 I RFH1 SSB HD 85 1 Refrigerator 85 2a Freezer auxiliary code P 5 and earlier 86 2b Freezer auxili...

Страница 6: ...c precautions including the following Only qualified service technicians should install and service this appliance This appliance must be installed in accordance with applicable national state and local codes and regulations For Power Cord Models This appliance requires an independent power supply of proper capacity See the nameplate for electrical specifications Failure to use an independent powe...

Страница 7: ...se or damage to existing wiring This could lead to heat generation or fire To reduce the risk of electric shock do not touch the power switch with damp hands Before servicing move the power switch to the OFF position and turn off the power supply Lockout Tagout to prevent the power supply from being turned back on inadvertently THIS APPLIANCE MUST BE GROUNDED Failure to properly ground this applia...

Страница 8: ...ot put warm or hot foods in the cabinet Let them cool first or they will raise the cabinet temperature and could deteriorate other foods in the cabinet or overload the appliance All foods should be wrapped in plastic film or stored in sealed containers Otherwise foods may dry up pass their smells onto other foods cause frost to develop result in poor appliance performance or increase the likelihoo...

Страница 9: ...0 21 5 oz PTR2SSB FGFG HGHG 115 60 1 12 8 450 250 17 3 oz RIR1 SSB 115 60 1 7 0 450 200 12 2 oz RIR2 SSB 115 60 1 11 0 450 200 18 2 oz RIR2 SSB51 02 115 60 1 11 0 450 200 18 2 oz RTR1 SSB 115 60 1 7 0 450 200 12 2 oz Design Pressure PSIG Refrigerant Model AC Supply Voltage Amperes Refrigerator Freezer R 404A R 134a HI LO HI LO Ref Freezer Ref RFH1 SSB HD 115 60 1 16 0 450 250 450 250 9 5 oz 12 0 o...

Страница 10: ...er Condenser Air Filter Display Board Top Cover Front Panel Door Door Lock Door Gasket Control Box Power Switch Perimeter Heater Switch Door Latch Cabinet Thermistor Defrost Thermistor Evaporator Case Cover Control Box Cover Model Shown RH1 SSB FG Light Switch glass door model Door Switch Compressor Thermostatic Expansion Valve ...

Страница 11: ...enser Condenser Air Filter Display Board Top Cover Front Panel Door Door Lock Door Gasket Control Box Power Switch Thermostatic Expansion Valve Cabinet Thermistor Defrost Thermistor Evaporator Case Cover Control Box Cover Door Switch Compressor Model Shown RH2 SSB Perimeter Heater Switch ...

Страница 12: ...ilter Display Board Top Cover Front Panel Door Door Lock Door Gasket Control Box Power Switch Thermostatic Expansion Valve Cabinet Thermistor Defrost Thermistor Evaporator Case Cover Control Box Cover Door Switch Compressor Model Shown RH3 SSB FG Door Handle Perimeter Heater Switch Light Switch glass door model ...

Страница 13: ...r Filter Display Board Top Cover Front Panel Door Door Lock Door Gasket Control Box Power Switch Thermostatic Expansion Valve Cabinet Thermistor Defrost Thermistor Evaporator Case Cover Control Box Cover Door Switch Compressor Model Shown PTR2SSB FGFG Perimeter Heater Switch Light Switch glass door model ...

Страница 14: ...nser Air Filter Display Board Top Cover Front Panel Door Door Lock 3 Sided Door Gasket Control Box Power Switch Thermostatic Expansion Valve Cabinet Thermistor Evaporator Case Cover Control Box Cover Door Switch Compressor Model Shown RIR1 SSB Rack Guide Ramp Perimeter Heater Switch Sweep Gasket ...

Страница 15: ... Condenser Air Filter Display Board Top Cover Rear Panel Door Door Lock Door Gasket Control Box Power Switch Thermostatic Expansion Valve Cabinet Thermistor Evaporator Case Cover Control Box Cover Door Switch Compressor Model Shown RTR1 SSB Front Panel Rack Guide Ramp Perimeter Heater Switch ...

Страница 16: ...5 ConFM are on EvapFM continues 2 5 minute Comp delay timer terminates Comp and ConFM energize 2 5 min Comp minimum run timer starts 2b Cool Down RFH1 SSB HD HS HSE Refrigerator LEDs 4 Comp and ConFM and 5 unused are on EvapFM continues 2 5 minute Comp delay timer terminates Comp and ConFM energize 2 5 min Comp minimum run timer starts 3 Cool Down Achieved No Component LEDs are on LED 3 EvapFM on ...

Страница 17: ...A1 Temperature Initiation above B Defrost Termination 1 Refrigerator LEDs 4 Comp and 5 ConFM are on LED 3 EvapFM on is off DTh warms to 40 F 4 C EvapFM and ConFM continue 2 5 minute Comp delay timer terminates Comp energizes 2 RFH1 SSB HD HS HSE Refrigerator LEDs 4 Comp and ConFM and 5 unused are on LED 3 EvapFM on is off DTh warms to 40 F 4 C EvapFM continues 2 5 minute Comp delay timer terminate...

Страница 18: ...Dip switch 8 is only used on RFH1 SSB HD model 2a Cool Down Freezer auxiliary code P 5 and earlier LEDs 4 Comp and 5 ConFM are on LED 3 EvapFM on is off 2 5 minute Comp delay timer terminates Comp ConFM and EvapFM energize 2b Cool Down Freezer auxiliary code P 6 and later LEDs 4 Comp and 5 ConFM are on LED 3 EvapFM on is off 2 5 minute Comp delay timer terminates EvapFM continues Comp and ConFM en...

Страница 19: ...y code Q 5 and later continue Comp and ConFM energize 4d Cool Down Restart RFH1 SSB HS HSE Freezer LEDs 4 Comp and ConFM and 5 DrH PH and MH are on LED 3 EvapFM on is off CTh warms to 3 F 1 7 C above setpoint 2 5 minute Comp delay timer terminates Comp ConFM EvapFM DrH PH and MH energize 5a Defrost Freezer auxiliary code P 5 and earlier and RFH1 SSB HS HSE Freezer 1 Time Initiated Defrost or Manua...

Страница 20: ...reezer auxiliary code P 5 and earlier LEDs 4 Comp and 5 ConFM are on LED 3 EvapFM on is off DTh cools to 70 F 21 C or lower EvapFM energizes a2 RFH1 SSB HS HSE Freezer LEDs 4 Comp and ConFM and 5 DrH PH and MH are on LED 3 EvapFM is off DTh cools to 70 F 21 C or lower EvapFM energizes 4 Defrost Completiton a1 Freezer auxiliary code P 5 and earlier LEDs 4 Comp and 5 ConFM are on LED 3 EvapFM on off...

Страница 21: ...ing contact Hoshizaki Technical Support at 1 800 233 1940 for recommendations Note Some models may utilize any combination of the following heaters during defrost Duct Heater Cord Heater or Drain Heater See VII Wiring Diagrams for specific model details 2 Defrost Termination Defrost Recovery Step 1 a1 Freezer auxiliary code P 6 and later LEDs 3 EvapFM off 4 Comp and 5 ConFM are on DTh warms to 100...

Страница 22: ...and DrH auxiliary code Q 5 and later are on LED 3 EvapFM on is off When CTh reads 15 F 8 3 C above setpoint or less cabinet temperature is displayed on DB Defrost is complete Legend CB control board Comp compressor ConFM condenser fan motor CordH cord heater CPH condensate pan heater CTh cabinet thermistor DB display board DctH duct heater DH defrost heater DrH drain heater DT defrost timer DTh de...

Страница 23: ...n Comp delay timer starts Note 2 5 minute minimum compressor on and off time Evaporator fan motor de energizes when door is open 20 minute minimum defrost time Perimeter heater controlled by perimeter heater switch Glass door GD models heater controlled by glass door heater switch RFH1 SSB HS HSE Condensate pump motor has power supply as soon as the power switch is placed in the ON position Conden...

Страница 24: ... HS HSE Perimeter heater and mullion heater are controlled through the control board and turn on and off with compressor when S3 dip switch 8 is in the off position Models may utilize any combination of the following heaters Condensate Pan Heater Cord Heater Drain Heater Duct Heater and Glass Tube Heater See VII Wiring Diagrams for specific model details DTh in control DH energized Comp de energiz...

Страница 25: ...rded access menu the cabinet setpoint defrost frequency and temperature display scale can be adjusted For further details see II E 1 Guarded Access Menu From the service menu information regarding appliance functions can be obtained For further details see II E 2 Service Menu 2 Display Board Layout Ribbon Cable Connector LED Display Up and Down Buttons ENTER Button RESET Button P N 2A0883 01 Front...

Страница 26: ...t change wiring and connections Do not misconnect terminals Do not short out power supply to test for voltage Always replace the whole control board assembly if it goes bad Keep the thermistor clogged filter door switch and high pressure switch leads and ribbon cable at least 1 1 2 away from high voltage leads 100VAC or more to protect against electrical noise 1 Location The control box control pa...

Страница 27: ...light blue Door Heater RH_ SSB GD freezer 6 Defrost Heater freezer Models may utilize any combination of the following additonal heaters Cord Heater Drain Heater Duct Heater and Glass Tube Heater See VII Wiring Diagrams for specific model details 7 Open 8 Open 9 Power Switch Input black 10 Compressor Relay gray K5 Connector 5VDC Open K4 Connector 5VDC Cabinet Thermistor gray K3 Connector 5VDC Defr...

Страница 28: ...ress ENTER repeatedly until you have cycled through the menu and the appliance returns to the normal display mode If you do not cycle through the menu and no button is pressed in 15 seconds the display will return to normal and the setpoint will remain unchanged b Defrost Frequency 1a Defrost for Refrigerators Control Board Revision 22 and earlier This appliance uses an off cycle defrost When a se...

Страница 29: ...e returns to the normal display mode If you do not cycle through the menu and no button is pressed in 15 seconds the display will return to normal and the defrost frequency will remain unchanged Note The change in the defrost setting will take effect after the next defrost based on the previous setting If it is desired that this change in interval timing take effect immediately turn the appliance ...

Страница 30: ...un time in last 24 hours to the nearest hour Example 16 hours total run time in the last 24 hours Value is every 24 hours 5 50 Right two digits represent compressor on time percentage for the last 5 run cycles A run cycle begins when the compressor switches from off to on and ends the next time it switches from off to on See diagram below Example 50 run time over the last 5 run cycles Value is cal...

Страница 31: ...f temperature 5 beeps every ten seconds Defrost Alarm Defrost has taken longer than 1 hour Control board has terminated defrost Press RESET Alarm will stop and E3 will clear If 4 consecutive defrosts take more than 1 hour a qualified service technician must be called For the service tech to reset this alarm press ALARM RESET on the control board itself E4 6 beeps every ten seconds High Pressure Al...

Страница 32: ... last 45 min Freezer Defrost cycles on programmed defrost timed intervals and terminates at 45 min E10 Dual Temp Models Only 10 beeps every ten seconds Communication Alarm Freezer and refrigerator control boards not communicating properly to control compressor delay When communication is restored alarm will reset During alarm press RESET to silence buzzer for 18 hours CF 1 beep every ten seconds C...

Страница 33: ...FF ON OFF ON RFH1 SSB HS HSE Freezer OFF OFF OFF OFF OFF ON OFF OFF RFH2 SSB HD Freezer Aux Code P 5 and Earlier OFF OFF OFF OFF OFF ON OFF OFF RFH2 SSB HD Freezer Aux Code P 6 and Later OFF OFF OFF OFF OFF ON ON OFF RFH3 SSB HD Freezer Aux Code P 5 and Earlier OFF OFF OFF OFF OFF ON OFF OFF RFH3 SSB HD Freezer Aux Code P 6 and Later OFF OFF OFF OFF OFF ON ON OFF NOTICE S3 Dip Switch 3 Used to acc...

Страница 34: ...n 5 LBU wire when the compressor is off and de energizes when the compressor turns on Factory set no adjustment required S3 Dip Switch Setting Cabinet Light Heated Glass Door No 2 OFF Cabinet Light ON Heated Glass Door GD models c Door Switch Type S3 dip switch 3 Hoshizaki has utilized both normally open and normally closed door switch contact styles S3 dip switch 3 is used to select the type of s...

Страница 35: ...Temp Models g Freezer Evaporator Fan Operation except RFH1 S3 dip switch 7 Active when S3 dip switch 1 and S3 dip switch 8 are in the OFF position freezer application When S3 dip switch 7 is in the ON position evaporator fan operates continuously except during defrost and doors open and the temperature at which the evaporator fan resumes after defrost changes from 0 F 18 C to 70 F 21 C When set to...

Страница 36: ...e correctly Factory set no adjustment required Note S3 dip switch 8 is ignored when S3 dip switch 1 is in the ON position or S3 dip switch 6 is in the OFF position Model Components on CB K9 pin 2 RFH1 SSB HD Freezer Condensate Pan Heater and Drain Heater aux code Q 5 and later RFH1 SSB HS HSE Freezer Drain Heater Perimeter Heater and Mullion Heater RFH2 SSB HD and RFH3 SSB HD Condenser Fan Motor S...

Страница 37: ...ergizing the compressor until the pressure returns to an acceptable level For further details see III Service Diagnosis G Perimeter Frame Heater This appliance is equipped with a perimeter frame heater This prevents the formation of condensate on the front frame of the appliance under high humidity conditions If operating the appliance under conditions where condensate will not form these heaters ...

Страница 38: ... you go through the diagnostic procedure check to assure the components energize and de energize correctly If not those components or controls are suspect Always choose a neutral W wire to establish a good neutral connection when checking high voltages CB POWER OK LED remains on unless power supply is interrupted IMPORTANT The maximum allowable voltage variation is 10 percent of the nameplate rati...

Страница 39: ...ontinuity 8a Cool Down Refrigerator LEDs 4 Comp and 5 ConFM are on EvapFM continues 2 5 minute Comp delay timer terminates Comp and ConFM energize 2 5 min Comp minimum run timer starts 8b Cool Down RFH1 SSB HD HS HSE Refrigerator LEDs 4 Comp and ConFM and 5 unused are on EvapFM continues 2 5 minute Comp delay timer terminates Comp and ConFM energize 2 5 min Comp minimum run timer starts a Comp Dia...

Страница 40: ... GY wire to a neutral W wire If 115VAC is present and cabinet temperature has been met by 3 F 1 7 C or more replace CB If 115VAC is not present check continuity of Comp relay contacts If closed replace Comp relay a2 Comp and ConFM Diagnosis RFH1 SSB HD HS HSE Refrigerator If Comp and ConFM do not de energize check for 115VAC at CB K1 connector pin 10 GY wire to a neutral W wire If 115VAC is presen...

Страница 41: ...M and 5 unused are on LED 3 EvapFM on is off DTh warms to 40 F 4 C EvapFM continues 2 5 minutes later Comp and ConFM energize a Thermistor Diagnosis Has DTh warmed to 40 F 4 C or higher Confirm DTh status see III C Thermistor Check b Comp Diagnosis Confirm that after 2 5 min Comp delay timer terminates CB LED 4 turns on and Comp energizes If not check for 115VAC at CB K1 connector pin 10 GY wire t...

Страница 42: ...e Comp relay contacts are open Confirm 115VAC on Comp relay coil gray GY wire to a neutral W wire If 115VAC is present and contacts are open replace Comp relay d EvapFM Diagnosis Check that EvapFM is running If not check for 115VAC at CB K1 connector pin 3 DBU wire to a neutral W wire If 115VAC is not present replace CB If 115VAC is present check EvapFM blade for binding and EvapFM continuity Lege...

Страница 43: ...ding If overload is open let overload cool and reset Replace overload if it does not reset When overload closes if Comp still does not start check start capacitor start relay and Comp motor winding b1 ConFM Diagnosis Freezer auxiliary code P 5 and earlier If ConFM does not energize check for 115VAC at CB K9 connector pin 2 BR wire to a neutral W wire If 115VAC is not present replace CB Next check ...

Страница 44: ...t de energize check for 115VAC at CB K1 connector pin 10 GY wire to a neutral W wire If 115VAC is present and cabinet temperature has been met by 3 F 1 7 C or more replace CB If 115VAC is not present check continuity of Comp relay contacts If closed replace Comp relay c EvapFM Diagnosis If EvapFM does not de energize check for 115VAC at CB K1 connector pin 3 DBU wire to a neutral W wire If 115VAC ...

Страница 45: ...es not de energize check for 115VAC at CB K1 connector pin 3 DBU wire to a neutral W wire If 115VAC is present replace CB f DrH PH and MH Diagnosis RFH1 SSB HS HSE Freezer If heaters do not de energize check for 115VAC at CB K9 connector pin 2 BR wire to a neutral W wire If 115VAC is present replace CB B Defrost Termination Defrost Recovery Step 1 1a Freezer auxiliary code P 5 and earlier LEDs 3 E...

Страница 46: ...e CB If 115VAC is present check for 115VAC at Comp relay black BK wire and red R wire to a neutral W wire If 115VAC is not present on the black BK wire check wiring connections If 115VAC is present on black BK wire but not on the red R wire Comp relay contacts are open Confirm 115VAC on Comp relay coil gray GY wire to a neutral W wire If 115VAC is present and contacts are open replace Comp relay N...

Страница 47: ...is present check EvapFM blade for binding and EvapFM continuity 8a Cool Down Freezer LEDs 4 Comp and 5 ConFM are on except RFH1 SSB HD LED 3 EvapFM on is off 2 5 min Comp delay timer terminates EvapFM continues Comp and ConFM energize 2 5 min Comp minimum run timer starts 8b Cool Down RFH1 SSB HD Freezer LED 4 Comp and ConFM is on LED 3 EvapFM on is off LED 5 CPH and DrH is on after first cool dow...

Страница 48: ... 9a Cool Down Achieved Freezer auxiliary code P 6 and later No component LEDs are on LED 3 EvapFM on is off CTh cools to 3 F 1 7 C below setpoint EvapFM continues Comp and ConFM de energize 9b Cool Down Achieved RFH1 SSB HD Freezer LED 5 CPH and DrH is on LED 3 EvapFM on is off CTh cools to 3 F 1 7 C below setpoint EvapFM continues CPH and DrH energize and remain energized until power is turned of...

Страница 49: ...B K1 connector pin 6 O wire to a neutral W wire again If 115VAC is not present and Comp is not energized replace CB If 115VAC is present confirm DH amperage If amperage is not present check defrost thermostat and DH continuity If amperage is present confirm that evaporator warms to 100 F 38 C at DTh location Next check DTh status See III C Thermistor Check When DTh reaches 100 F 38 C DH de energiz...

Страница 50: ...on Comp relay coil gray GY wire to a neutral W wire If 115VAC is present and contacts are open replace Comp relay Next if 115VAC is present on the red R wire check continuity of Comp overload If overload is closed check start capacitor start relay and Comp motor winding If overload is open let overload cool and reset Replace overload if it does not reset When overload closes if Comp still does not...

Страница 51: ...BU wire to a neutral W wire If 115VAC is not present replace CB If 115VAC is present check EvapFM blade for binding and EvapFM continuity D Defrost Termination Defrost Completion 1a Freezer auxiliary code P 6 and later LEDs 4 Comp and 5 ConFM are on LED 3 EvapFM on is off When CTh reads 15 F 8 3 C above setpoint or less cabinet temperature is displayed on DB Defrost is complete 1b FH1 SSB HD Freez...

Страница 52: ...ote that the order of the LEDs from the outer edge of the board is 5 4 1 2 3 Components e g Comp cycle during the test Following the output test the appliance resumes operation If the LEDs do not light as described above CB is bad and must be replaced 4 Confirm Clogged Filter Thermostat Check for 5VDC at CB K6 connector pin 2 P wire to K5 connector pin 2 open If 5VDC is not present CB is bad and m...

Страница 53: ... to the OFF position then unplug the appliance 2 Remove the control box cover 3 Remove the cabinet and defrost thermistors 4 Disconnect the cabinet thermistor gray GY wires from the RED K3 connector and the defrost thermistor orange O wires from the WHITE K3 connector 5 Immerse the thermistor sensor portion in a glass containing ice and water for 2 or 3 minutes 6 Check the resistance between the w...

Страница 54: ...CB is bad and must be replaced Diagnosis High Pressure Switch This may be a N O normally open or N C normally closed HPS See VII Wiring Diagrams for cut out and cut in configuration CB automatically adjusts to N O or N C HPS If HPS trips 3 times in 1 hour E4 alarm occurs on CB Press RESET on CB See II E 3 LED Lights and Alarm Safeties Chart Check that the air filter and condenser are clean Next ch...

Страница 55: ...Cooling Appliance Not Cooling Possible Cause 1 Power Supply a Unplugged off blown fuse or tripped or defective circuit breaker b Loose connection c Not within specifications 2 Cord and Plug a Loose connection b Defective 3 Power Switch control box a OFF position b Bad contacts 4 Wiring a Loose connection or open b Faulty 5 Control Transformer a Defective 6 Display Board a Not communicating with co...

Страница 56: ...Frequency a Not enough defrost occurring per day See II E 1 b Defrost Frequency 2 Evaporator a Dirty 3 Evaporator Fan Motor a Defective b Fan Blade Binding 4 Control Board a Defective 5 Refrigerant Charge a Low 6 Thermostatic Expansion Valve a Defective 7 Defrost Thermistor Freezer Only a Out of position or defective 8 Defrost Heater Freezer Only a Defective 9 Drain Line a Restricted 10 Defrost Dr...

Страница 57: ...d store it in an approved container Do not discharge the refrigerant into the atmosphere Do not leave the system open for longer than 15 minutes when replacing or servicing parts The Polyol Ester POE oils used in R 404A applications can absorb moisture quickly Therefore it is important to prevent moisture from entering the system when replacing or servicing parts Always install a new drier every t...

Страница 58: ...ng connections before unbrazing the components NOTICE Always install a new drier every time the sealed refrigeration system is opened Do not replace the drier until after all other repair or replacement has been made Install the new drier with the arrow on the drier in the direction of the refrigerant flow When brazing protect the drier by using a wet cloth to prevent the drier from overheating Do...

Страница 59: ...ICE To prevent compressor damage use a throttling valve or liquid dispensing device to add the remaining liquid charge through the low side refrigerant access valve with the appliance running 9 Close the high and low side gauge manifold valves then disconnect the gauge manifold hoses 10 Cap the access valves to prevent a possible leak B Important Notes for Component Replacement NOTICE When replaci...

Страница 60: ...olution Order HS 3541 that contains a motor Shinko brackets blade and all fasteners required for mounting to the shroud using the existing threaded holes For details see the appliance s parts list b Appliance s evaporator shroud has four threaded holes and a Jakel motor Solution Order a new motor Shinko brackets fan blade and the appropriate fasteners listed in the appliance s parts list Attach th...

Страница 61: ... Slide the clips onto the end plate on the evaporator Install the two Support Clip C clips onto the hairpin end of the evaporator as shown in the illustration 4 Install Support Clip A and Support Clip B onto the return bend end same side as inlet and outlet tubes as shown in the illustration Note All clips are shown in the illustration in the correct orientation for installation Slide the parts on...

Страница 62: ... the top pivot pin and hinge washer from the top hinge bracket 6 Firmly grasp the door and pull it forward at the top Then raise the door disengaging it from the bottom pivot pin 7 Remove the spring guide pin and spring from the spring cartridge 8 Replace the spring with one of the same color Be certain that the spring ends are engaged in both the spring cartridge and the top of the spring guide p...

Страница 63: ...n any appliance is reversible as shown below The instructions for re hinging are provided in the kits listed below Convert Door Type Kit Number Right to Left Full HS 3527 Left to Right Full HS 3528 Right to Left Half HS 3529 Left to Right Half HS 3530 ...

Страница 64: ...hol petroleum soap powder polishing powder alkaline cleaner acid scouring pad and especially those strong cleaners for use on a ventilating fan or a cooking range Also to prevent corrosion do not use sodium hypochlorite chlorine bleach on the stainless steel surfaces Use a clean cloth for cleaning 1 Exterior Wipe the exterior occasionally with a clean soft cloth Use a damp cloth containing a neutr...

Страница 65: ...the plug or power switch with damp hands When shutting down the appliance for more than one week move the power switch to the OFF position and unplug the appliance Do not plug in unplug the appliance to start stop operation Make sure the power switch is in the OFF position before plugging in or unplugging the appliance to reduce the risk of electric shock 1 Before shutting down the appliance move ...

Страница 66: ... children getting trapped Leave the shelves in place so that children may not easily climb inside This appliance contains refrigerant and must be disposed of in accordance with applicable national state and local codes and regulations Refrigerant must be recovered by properly certified service personnel ...

Страница 67: ...ture Rise Clogged Filter Thermostat Control Transformer Output 10VAC at 115VAC Input NOTICE Before diagnosing and or servicing the unit confirm that you have the proper wiring diagram by checking against the diagram located on the evaporator case cover N O Close on Pressure Rise Control Board Automatically Adjusts to N O or N C High Pressure Switch ...

Страница 68: ...perature Rise Control Transformer Output 10VAC at 115VAC Input NOTICE Before diagnosing and or servicing the unit confirm that you have the proper wiring diagram by checking against the diagram located on the evaporator case cover N C Open on Pressure Rise Control Board Automatically Adjusts to N O or N C High Pressure Switch ...

Страница 69: ...Clogged Filter Thermostat Control Transformer Output 10VAC at 115VAC Input NOTICE Before diagnosing and or servicing the unit confirm that you have the proper wiring diagram by checking against the diagram located on the evaporator case cover N O Close on Pressure Rise Control Board Automatically Adjusts to N O or N C High Pressure Switch ...

Страница 70: ...rature Rise Control Transformer Output 10VAC at 115VAC Input NOTICE Before diagnosing and or servicing the unit confirm that you have the proper wiring diagram by checking against the diagram located on the evaporator case cover N C Open on Pressure Rise Control Board Automatically Adjusts to N O or N C High Pressure Switch ...

Страница 71: ...O Close on Temperature Rise Clogged Filter Thermostat Control Transformer Output 10VAC at 115VAC Input NOTICE Before diagnosing and or servicing the unit confirm that you have the proper wiring diagram by checking against the diagram located on the evaporator case cover N O Close on Pressure Rise Control Board Automatically Adjusts to N O or N C High Pressure Switch ...

Страница 72: ...ol Transformer Output 10VAC at 115VAC Input NOTICE Before diagnosing and or servicing the unit confirm that you have the proper wiring diagram by checking against the diagram located on the evaporator case cover N O Close on Temperature Rise N C Open on Pressure Rise Control Board Automatically Adjusts to N O or N C High Pressure Switch ...

Страница 73: ...Clogged Filter Thermostat Control Transformer Output 10VAC at 115VAC Input NOTICE Before diagnosing and or servicing the unit confirm that you have the proper wiring diagram by checking against the diagram located on the evaporator case cover N O Close on Pressure Rise Control Board Automatically Adjusts to N O or N C High Pressure Switch ...

Страница 74: ...Clogged Filter Thermostat Conrol Transformer Output 10VAC at 115VAC Input NOTICE Before diagnosing and or servicing the unit confirm that you have the proper wiring diagram by checking against the diagram located on the evaporator case cover N C Open on Pressure Rise Control Board Automatically Adjusts to N O or N C High Pressure Switch ...

Страница 75: ...Clogged Filter Thermostat Control Transformer Output 10VAC at 115VAC Input NOTICE Before diagnosing and or servicing the unit confirm that you have the proper wiring diagram by checking against the diagram located on the evaporator case cover N O Close on Pressure Rise Control Board Automatically Adjusts to N O or N C High Pressure Switch ...

Страница 76: ...logged Filter Thermostat Control Transformer Output 10VAC at 115VAC Input NOTICE Before diagnosing and or servicing the unit confirm that you have the proper wiring diagram by checking against the diagram located on the evaporator case cover N C Open on Pressure Rise Control Board Automatically Adjusts to N O or N C High Pressure Switch ...

Страница 77: ...nit confirm that you have the proper wiring diagram by checking against the diagram located on the evaporator case cover Control Transformer Output 10VAC at 115VAC Input N C Open on Pressure Rise High Pressure Switch Cut out 490 10 PSIG Cut in 370 20 PSIG Control Board Automatically Adjusts to N O or N C High Pressure Switch ...

Страница 78: ...diagram by checking against the diagram located on the evaporator case cover High Pressure Switch Cut out 490 10 PSIG Cut in 370 20 PSIG Clogged Filter Thermostat Control Transformer Output 10VAC at 115VAC Input N O Close on Temperature Rise N C Open on Pressure Rise Control Board Automatically Adjusts to N O or N C High Pressure Switch ...

Страница 79: ...ervicing the unit confirm that you have the proper wiring diagram by checking against the diagram located on the evaporator case cover Control Transformer Output 10VAC at 115VAC Input High Pressure Switch Cut out 490 10 PSIG Cut in 370 20 PSIG Control Board Automatically Adjusts to N O or N C High Pressure Switch ...

Страница 80: ...Clogged Filter Thermostat NOTICE Before diagnosing and or servicing the unit confirm that you have the proper wiring diagram by checking against the diagram located on the evaporator case cover Control Transformer Output 10VAC at 115VAC Input N O Close on Pressure Rise Control Board Automatically Adjusts to N O or N C High Pressure Switch ...

Страница 81: ...t you have the proper wiring diagram by checking against the diagram located on the evaporator case cover N C Open on Pressure Rise Control Transformer Output 10VAC at 115VAC Input Clogged Filter Thermostat High Pressure Switch Cut out 490 10 PSIG Cut in 370 20 PSIG Control Board Automatically Adjusts to N O or N C High Pressure Switch ...

Страница 82: ...rature Rise N C Open on Pressure Rise Control Transformer Output 10VAC at 115VAC Input NOTICE Before diagnosing and or servicing the unit confirm that you have the proper wiring diagram by checking against the diagram located on the evaporator case cover Control Board Automatically Adjusts to N O or N C High Pressure Switch ...

Страница 83: ... Close on Temperature Rise Clogged Filter Thermostat NOTICE Before diagnosing and or servicing the unit confirm that you have the proper wiring diagram by checking against the diagram located on the evaporator case cover Control Transformer Output 10VAC at 115VAC Input N O Close on Pressure Rise Control Board Automatically Adjusts to N O or N C High Pressure Switch ...

Страница 84: ...perature Rise NOTICE Before diagnosing and or servicing the unit confirm that you have the proper wiring diagram by checking against the diagram located on the evaporator case cover Control Transformer Output 10VAC at 115VAC Input N O Close on Pressure Rise Control Board Automatically Adjusts to N O or N C High Pressure Switch ...

Страница 85: ...E Before diagnosing and or servicing the unit confirm that you have the proper wiring diagram by checking against the diagram located on the evaporator case cover Control Transformer Output 10VAC at 115VAC Input N C Open on Pressure Rise RFH1 SSB HD Main Wiring Power Cord Connections Control Board Automatically Adjusts to N O or N C High Pressure Switch ...

Страница 86: ... Rise Clogged Filter Thermostat NOTICE Before diagnosing and or servicing the unit confirm that you have the proper wiring diagram by checking against the diagram located on the evaporator case cover Control Transformer Output 10VAC at 115VAC Input N C Open on Pressure Rise Control Board Automatically Adjusts to N O or N C High Pressure Switch ...

Страница 87: ...Rise Clogged Filter Thermostat NOTICE Before diagnosing and or servicing the unit confirm that you have the proper wiring diagram by checking against the diagram located on the evaporator case cover Control Transformer Output 10VAC at 115VAC Input N C Open on Pressure Rise Control Board Automatically Adjusts to N O or N C High Pressure Switch ...

Страница 88: ...out 270 10 PSIG Cut in 190 20 PSIG N O Close on Temperature Rise Control Transformer Output 10VAC at 115VAC Input N O Close on Pressure Rise RFH1 SSB HS HSE Main Wiring Power Cord Connections Control Board Automatically Adjusts to N O or N C High Pressure Switch ...

Страница 89: ...gh Pressure Switch Cut out 490 10 PSIG Cut in 370 20 PSIG N O Close on Temperature Rise Control Transformer Output 10VAC at 115VAC Input N O Close on Pressure Rise Control Board Automatically Adjusts to N O or N C High Pressure Switch ...

Страница 90: ...B HD See diagram for RH2 SSB HD See diagram for FH1 SSB HD K RFH2 SSB HD L RFH3 SSB HD NOTICE Before diagnosing and or servicing the unit confirm that you have the proper wiring diagram by checking against the diagram located on the evaporator case cover ...

Страница 91: ... by checking against the diagram located on the evaporator case cover High Pressure Switch Cut out 490 10 PSIG Cut in 370 20 PSIG Control Transformer Output 10VAC at 115VAC Input N C Open on Pressure Rise N O Close on Temperature Rise Control Board Automatically Adjusts to N O or N C High Pressure Switch Clogged Filter Thermostat ...

Страница 92: ...checking against the diagram located on the evaporator case cover High Pressure Switch Cut out 490 10 PSIG Cut in 370 20 PSIG Control Transformer Output 10VAC at 115VAC Input N C Open on Pressure Rise N O Close on Temperature Rise Control Board Automatically Adjusts to N O or N C High Pressure Switch Clogged Filter Thermostat ...

Страница 93: ...roper wiring diagram by checking against the diagram located on the evaporator case cover High Pressure Switch Cut out 490 10 PSIG Cut in 370 20 PSIG Control Transformer Output 10VAC at 115VAC Input N C Open on Pressure Rise N O Close on Temperature Rise Control Board Automatically Adjusts to N O or N C High Pressure Switch Clogged Filter Thermostat ...

Страница 94: ...you have the proper wiring diagram by checking against the diagram located on the evaporator case cover High Pressure Switch Cut out 490 10 PSIG Cut in 370 20 PSIG Control Transformer Output 10VAC at 115VAC Input N C Open on Pressure Rise N O Close on Temperature Rise Control Board Automatically Adjusts to N O or N C High Pressure Switch ...

Страница 95: ...g diagram by checking against the diagram located on the evaporator case cover High Pressure Switch Cut out 490 10 PSIG Cut in 370 20 PSIG Control Transformer Output 10VAC at 115VAC Input N C Open on Pressure Rise N O Close on Temperature Rise Control Board Automatically Adjusts to N O or N C High Pressure Switch ...

Страница 96: ...or servicing the unit confirm that you have the proper wiring diagram by checking against the diagram located on the evaporator case cover Control Transformer Output 10VAC at 115VAC Input N C Open on Pressure Rise N O Close on Temperature Rise Control Board Automatically Adjusts to N O or N C High Pressure Switch ...

Страница 97: ...ing and or servicing the unit confirm that you have the proper wiring diagram by checking against the diagram located on the evaporator case cover N O Close on Temperature Rise Control Transformer Output 10VAC at 115VAC Input N C Open on Pressure Rise Control Board Automatically Adjusts to N O or N C High Pressure Switch ...

Страница 98: ...ing and or servicing the unit confirm that you have the proper wiring diagram by checking against the diagram located on the evaporator case cover N O Close on Temperature Rise Control Transformer Output 10VAC at 115VAC Input N C Open on Pressure Rise Control Board Automatically Adjusts to N O or N C High Pressure Switch ...

Страница 99: ...nosing and or servicing the unit confirm that you have the proper wiring diagram by checking against the diagram located on the evaporator case cover N O Close on Temperature Rise Control Transformer Output 10VAC at 115VAC Input N C Open on Pressure Rise Control Board Automatically Adjusts to N O or N C High Pressure Switch ...

Страница 100: ...unit confirm that you have the proper wiring diagram by checking against the diagram located on the evaporator case cover Clogged Filter Thermostat N O Close on Temperature Rise Control Transformer Output 10VAC at 115VAC Input N C Open on Pressure Rise Control Board Automatically Adjusts to N O or N C High Pressure Switch ...

Отзывы: