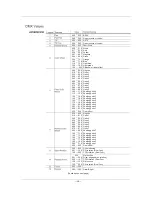
Hosen MH LED 60D Скачать руководство пользователя страница 17


000-----


 009 

010-----019 
020-----029 
030-----039 
040-----049 
050-----059 
060-----069 
070-----079 
080-----099 
100-----119 
120-----139 
140-----159 
160-----179 
180-----199 
200-----219 
220-----255 

No gobo 
Gobo 1 
Gobo 2 
Gobo 3 
Gobo 4 
Gobo 5 
Gobo 6 
Gobo 7 
Shaking gobo 7 
Shaking gobo 6 
Shaking gobo 5 
Shaking gobo 4 
Shaking gobo 3 
Shaking gobo 2 
Shaking gobo 1 
Flow effect 

000-----


 060 

061-----158 
159 

 255 

Gobo indexing 
Clockwise rotating from slow to fast 
Anti-clockwise rotating from slow to fast 
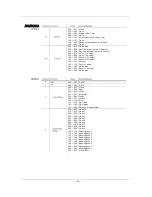
000 

001-----004 
005-----127 
128-----132 
133-----


 255 

No function 
Prism engaged (no rotation) 
CCW rotation (

Slow~Fast

No function 
CW rotation (

Slow~Fast

000----- 

 255   

000----- 

 255  Dark~Bright 

000-----031 
032-----063 
064-----095 
096-----127 
128-----159 
160-----191 
192-----223 
224-----


 255 

Close 
Open 
Strobe: 

Slow~Fast


Open 
Pulse strobe effect: 

Slow~Fast


Open 
Random strobe effect: 

Slow~Fast


Open 

000-----


 019 

020-----039 
040-----059 
060-----079 
080-----099 
100-----119 
120-----139 
140-----159 
160-----179 
180-----199 
200-----219 
220-----


 255 

No function 
Pan/tilt black activated (activated after 3 s) 
Pan/tilt black deactivated (activated after 3 s) 
Auto 1 (activated after 3 s) 
Auto 2 (activated after 3 s) 
Sound 1(activated after 3 s) 
Sound 2(activated after 3 s) 
Custom 
Test (activated after 3 s) 
No function 
Reset (activated after 3 s) 
No function 


----

--14--

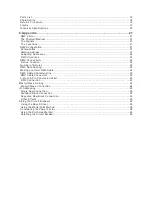
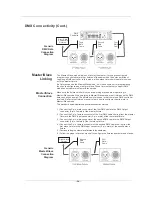
Содержание MH LED 60D

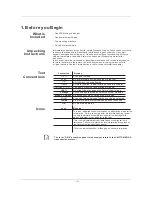
Страница 1: ...User Manual LED MOVING HEAD MH LED 60D Please Read over this Manual before Operating the Light Fixture...

Страница 2: ...aster Slave Linking 6 Mounting 7 Orientation 7 Rigging 7 4 Operation 8 Control Panel Description 8 Control Options 8 Programming 8 DMX Operation 8 Stand alone Operation 8 Master Slave Operation 8 Disp...

Страница 3: ...ixtures 22 DMX Data Cabling 22 Making your Own DMX Cable 22 DMX Cable Characteristics 22 DMX Cable Connectors 23 3 Pin to 5 Pin Conversion Chart 23 DMX Connection 23 Master Slave Linking 24 Master Sla...

Страница 4: ...con indicates useful although non critical information This icon indicates important installation or configuration in formation Failure to comply with this information may prevent the fixture from fun...

Страница 5: ...n or moisture Make sure there are no flammable materials close to the fixture s while operating When hanging this fixture always secure it to a fastening device using a safety cable not provided Alway...

Страница 6: ...olor Wheel Tilt Fine 4 Fixed Gobo Wheel 1 Pan Tilt Speed 5 Rotating Gobo Wheel 2 Color Wheel 6 Gobo Rotation Fixed Gobo Wheel 1 7 Rotating Prism Rotating Gobo Wheel 2 8 Focus Gobo Rotation 9 Dimmer Ro...

Страница 7: ...Product Dimensions Drawing Here Base Fan Fuse Holder Control Panel Base Fan DMX Out DMX In Power Input On Off Switch 4...

Страница 8: ...draw during normal operation Please refer to the Sizing the Circuit B reakers section in the Appendix chapter of this manual Never c onnect the light to a r heostat variable r esistor or dimmer circu...

Страница 9: ...X controller in a master slave operating mode If you are not familiar with the DMX standard please refer to the DMX Primer and DMX Connectivity sections in the Appendix chapter of this manual The ligh...

Страница 10: ...ion programming adjustments and routine maintenance Never mount the fixture in places where rain high humidity extreme temperature changes or restricted ventilationmay affect it Make sure that the loc...

Страница 11: ...hange levels in the Menu M ap This is equivalent to move right and left respectively Use UP and DOWN to move vertically within theMenu Map options 1 Select DMX operation a Go to MENU INTRO RUN b Selec...

Страница 12: ...ue 000 255 7 Go to MENU EDIT XY SPEED 8 Select a tilt pan movement speed 000 255 9 Go to MENU EDIT COLOR 10 Select a color wheel position 000 255 as per the DMX Values table 11 Go to MENU EDIT GOBO 1...

Страница 13: ...E T FINISH 8 Select the finishing point for the limited tilt 000 255 9 Go to MENU RANGE USE 10 Select YES to activate the new settings or NO to stop using them 1 Go to MENU SPECIAL BLACK 2 Select YES...

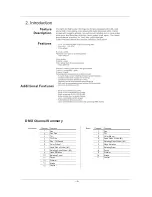
Страница 14: ...11...

Страница 15: ...8 Gobo 9 Shaking gobo 9 Shaking gobo 8 Shaking gobo 7 Shaking gobo 6 Shaking gobo 5 Shaking gobo 4 Shaking gobo 3 Shaking gobo 2 Shaking gobo 1 Flow effect 000 009 010 019 020 029 030 039 040 049 050...

Страница 16: ...stom Test 3 s delay No function Reset 3 s delay No function 000 255 0 540 000 255 0 270 000 016 017 033 034 050 051 067 068 084 085 101 102 118 119 135 136 152 153 255 White Red Yellow Magenta Green O...

Страница 17: ...sm engaged no rotation CCW rotation Slow Fast No function CW rotation Slow Fast 000 255 000 255 Dark Bright 000 031 032 063 064 095 096 127 128 159 160 191 192 223 224 255 Close Open Strobe Slow Fast...

Страница 18: ...lass cleaning fluid Unplug the fixture from power Wait until the fixture is cold Use a vacuum or dry compressed air and a soft brush to remove dust collected on the external vents and reachable intern...

Страница 19: ...eplace optical sensor Faulty X Y control board Circuit breaker fuse keeps tripping blowing Excessive circuit load Check total load placed on the electrical circuit Short circuit along the power wires...

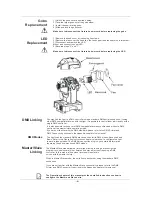
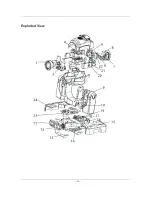
Страница 20: ...Exploded View 17...

Страница 21: ...175 Q260LED Right base cover P300 Q260BB 3 pin XLR A socket P135 XLRA 3 pin XLR B socket P135 XLRB IEC power input and fuse socket P190 Q260LED On Off switch P100 SWTCH Fixed gobo wheel P169 Q260LEDS...

Страница 22: ...equate packaging will be the customer s responsibility As a suggestion proper UPS packing or double boxing is always a safe method to use We reserves the right t o u se it s own discretion t o repair...

Страница 23: ...nalities The DMX fixture configuration consists in determining how many channels each fixture will need as well as assigning the corresponding DMX channels to each fixture in order to size correctly t...

Страница 24: ...The order in which the fixtures connect to the DMX controller is not important and it has no effect on how a controller communicates to each fixture However the user should always define a physical lo...

Страница 25: ...he chassis ground a ground l oop could form which may cause the fixture to perform erratically If you use a DMX controller or fixture with a 5 pin DMX connector you will need to use a 5 pin to 3 pin a...

Страница 26: ...ave mode Make sure the fixtures with which you are working are capable of operating in Master Slave mode When working in Master Slave mode most fixtures use the DMX data connection as well The differe...

Страница 27: ...nd a unique ID address for each fixture This allows the user to control simultaneously the whole group of units at that DMX address by setting the ID Addressing channel to 0 Similarly the user can con...

Страница 28: ...y be too low with respect to the actual current drawn by the fixture In fact as the PF decreases the difference between the current calculated using the watts volts method and the actual current incre...

Отзывы: