


28mm
1
1.5
3
5
4.5 5.6 8 11 16 22 32
m
4
5
1016
ft
∞
10
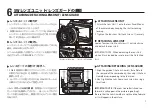
ピントの合わせ方
HOW TO FOCUS
9
1. 被写体までの距離を目測で測り、ヘリコイドマウント⑨
を回して距離をセットします。
2. この時指定した距離に対して、使用する絞りの被写界
深度は、ヘリコイドマウント⑨のボディ寄りの被写界深
度目盛で表示されます。
1. Estimate the distance to the subject and set it on the
Distance Scale by rotating the Focus Ring ⑨ .
2. Depth of field corresponding to the aperture used is
shown on the Depth of Field Scale.
SW612D に、フィルムホルダー用スペーサー㉕とピントガラス枠(別売)
を装着します。
シャッタースピードリング⑦を
「T」にセットします。シャッターを切ってシャッ
ター羽根を全開にし、絞りレバー④を開放にしてフレーミングをします。ピ
ント合わせはヘリコイドマウント⑨で行います。
再びシャッターを切りシャッター羽根を閉じてからシャッタースピードと絞り
値を設定します。
※シャッターの開閉に関しては、P11
「シャッターの開閉
」をご参照ください。
Attach optional Ground Glass Frame and Spacer, set the Aperture
Setting Lever ④ at full opening position, set the Shutter Speed Ring ⑦
at "T", then push the Shutter Release Button ⑥ down.
Focus on the Ground Glass by rotating the Focus Ring ⑨ .
After focusing and framing have been completed, push the Shutter
Release Button ⑥ down again to close the shutter, set the shutter speed
and aperture to the desired value.
Ground Glass Focusing
ピントガラスでの合わせ方
Visual Focusing
目測での合わせ方
⑨
Содержание SW612D
Страница 1: ...Instruction Manual SW 612D...


