

3
2
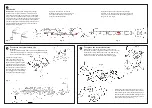
When fitting the replacement motor, make sure
the worm and worm wheel are meshed correctly
before screwing the motor brackets back in place.
Refit the locomotive body before refitting the rear
pony truck so that the rear chassis lugs are free to
enter their locations in the body.
Fig. 2
Fig. 1
Fig. 3
Fig. 6
Fig. 7
Fig. 8
Lubrication
IMPORTANT – Only apply small single drops of light
machine oil to the places indicated in red. This is best
achieved by making a simple oil “dropper” as illustrated
in Fig.1. Insert a straightened paper clip into a cork and
use a bottle cap as a container for the oil. A small drop of
oil can then be picked up by the dropper and applied in
exactly the right place. Immediately wipe off any excess
oil, especially from the locomotive and tender bodies.
Only lubricate moving parts.
Apply one drop of oil to each of the
Walchaerts valve gear and connecting rod
pivot points indicated in red in Fig.2, on
both sides of the locomotive.
Apply one drop of oil to each of the axle bearings
indicated in red. Do not oil the tender axles. Apply one
drop of oil, or a small bead of model railway grease, to
the gear “A”. (See Fig.3).
To replace the locomotive motor
Having removed the locomotive body, remove the rear
pony truck, as shown in Fig.7, which allows access to the rear
motor bracket screw. Remove the screw and, from the top
of the chassis, remove the front motor bracket screw.
The motor can now be lifted clear and replaced. (Fig.8).
A
Fig. 5
Fig. 4
Turn the locomotive upside
down and remove the screw
beneath the bogie. (Fig.5). Turn
the locomotive right way up and
ease the front end of the chassis
downward from the body. When
the front of the chassis is clear of
the body, pull the chassis forward
to disengage the rear chassis lugs
from the rear of the body. (Fig.6)
To remove the locomotive body
Important:
If your locomotive is fitted with a speedometer, first detach the
cable from the left hand rear driving wheel (Fig.4). Keep nut and
spacer safe until the body is replaced.
1
2
3


