A
x 1
x 2
B
C
x 1
D
x 4
x 4
x 1
CF
SA
x 12
x 6
x 2
x 4
x 1
x 1
x 8
x 2
x 2
x 2
4
SC
INSTRUCTIONS
CONTENTS
TRACK LAYOUTS
1
4
5
6
7
1a
25%
50%
75%
100%
3
2a
3a
2
CF
CF
CF
CF
C
C
C
C
D
B
A
B
SA
SC
Track Reference codes shown on the track diagrams are marked on the underside of each track piece.
1.
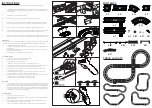
To get started, follow the numbered illustrations to assemble the layout, using the circuit diagram as a
guide! If the track clips have flattened during storage, adjust as shown in 1a to ensure that they fully engage
when assembled.
2.
Add the track supports under the track (if required).
3.
Add Barriers to track in desired location (recommended on the outside of corners).
4.
Insert the plug on wall mounted transformer into the centre socket on the powerbase and insert the
hand controller plugs into the outer sockets marked 1 and 2. Switch on the power at the wall socket.
5.
Place the cars on the track ensuring that their guide blades are located fully in the track slots.
6.
To race, gently squeeze the trigger on the hand controller to accellerate along the straights and release the
trigger to slow down for the curves. The further the trigger is squeezed the faster the car will go.
7.
For beginners, the movement of the trigger can be restricted by sliding the button on the underside of the
handle. There are 4 settings available which will limit maximum power to either 25%, 50%, 75% or 100%.
Any problems?
Most problems are easily cured by cleaning or adjusting the pick-up braids under the car and if necessary replacing
the braid plate unit. Spare braid plate units are supplied in the set together with instructions on how to fit them.
•
Check that the guide blade unit can rotate freely.
•
Check that the cars are properly located in the slot and that both pick-up braids are making good contact
with the track rails.
•
If required adjust the position of the pick-up braids with a screwdriver or similar tool to ensure that they
make good contact with the track rails.
•
An old toothbrush is ideal for straightening or cleaning the braids.
If you still have problems
•
Check that all 3 plugs are properly inserted into the powerbase.
•
Check that the power is turned on at the wall socket.
•
Check that both cars are not in the same slot.
•
Check that you are operating the correct hand controller by trying the other one.
•
Check that all the track sections are properly connected with good electrical connections throughout.
•
Check the slots in the track for any debris that could cause the car guide blade to stick.
•
Wipe the track with a clean, non-fluffy cloth. Do the same for the rear tyres of the cars. Never use
abrasive materials or liquids for cleaning.
•
Check that the rear wheels of the cars can turn freely. Check for any debris that could prevent free
movement and that the axle has not been dislodged from its mounting clips.
•
If the electric motor in the car becomes jammed, remove the car from the track and let it cool down. Do
not touch the motor casing. Call the Customer Care Helpline for advice.
•
Check hand controllers are powered and bound correctly to each lane.
Short circuits
•
There is a safety cut-out in the transformer that automatically switches off the power if there is a short
circuit. If this happens, unplug the transformer, remove the cause of the short circuit, plug the transformer
back in and switch it on. The cut-out will reset itself about 60 seconds after you have unplugged the transformer.
•
To find the cause of the short circuit look in particular for any metal objects that might have fallen across
the track rails or in the slot. Check that no loose strands of braid from the cars have fallen into the slot or
wrapped around the wrong side of the car’s guide blade.
If you keep crashing
•
Remove any debris on the track or in the slot.
•
Check that the car’s pick-up braids are not pushing up the front of the car so that the guide blade cannot
fit fully down into the slot.
•
Maybe all you need to do is... slow down! Release the trigger as the car approaches the curves and
squeeze the trigger gently when the car is on the straights.
•
For beginners use the trigger movement restrictor on the hand controller to prevent excess speed.


