background image

EN

Dual Rates

Your DSM2/DSMX full range transmitter features dual rates to help you select 
the amount of travel that you want from the control surfaces.

High Rate

Low Rate

Aileron

12mm up/down

8mm up/down

Elevator

10mm up/down

8mm up/down

Rudder

25mm left/right

20mm left/right

Always 

decrease throttle at

propeller strike.

Consult local laws and ordinances before choosing a fl ying location. 

Range Check your Radio System

After fi nal assembly, range check the radio system with the aircraft. Refer to 
your specifi c transmitter instruction manual.

Flying

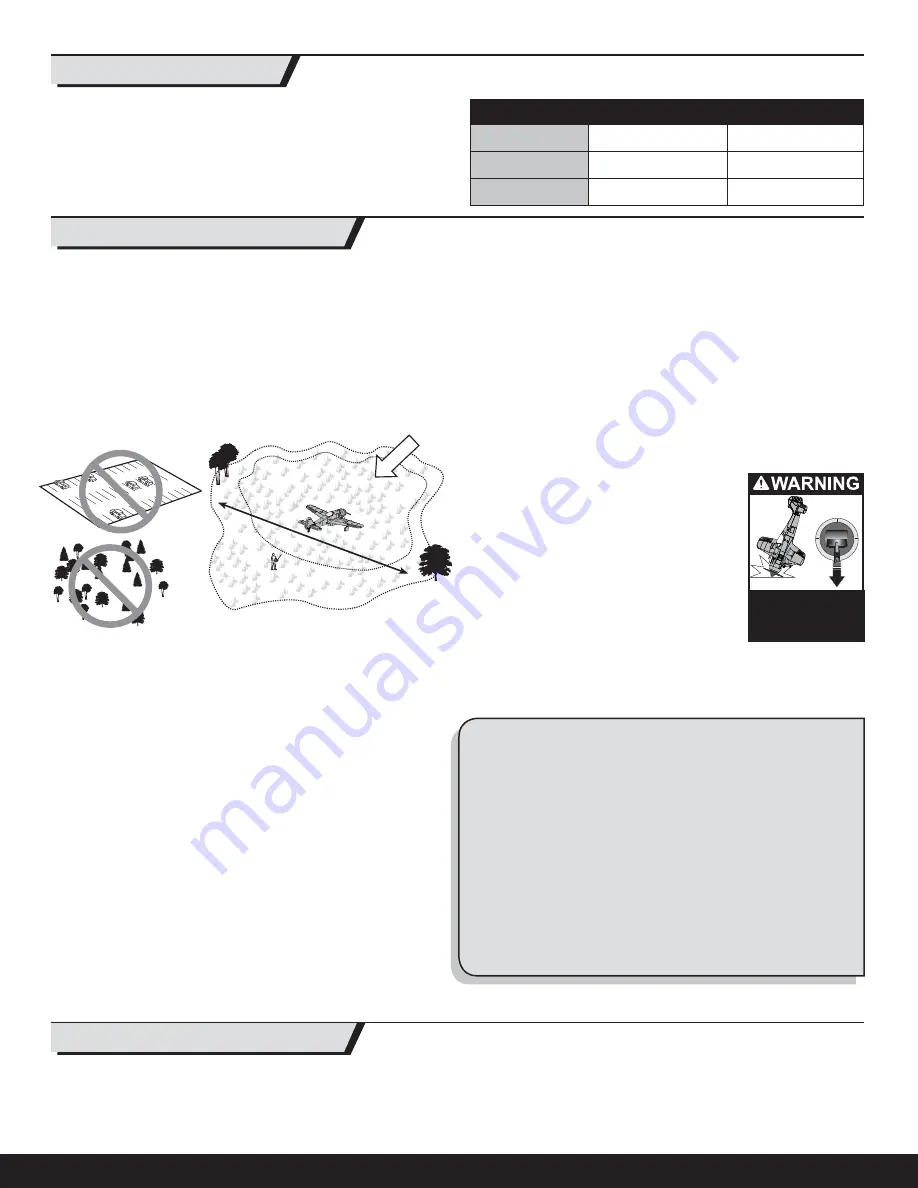
Always choose a wide-open space for fl ying your aircraft. It is ideal for you to 
fl y at a sanctioned fl ying fi eld. If you are not fl ying at an approved site, always 
avoid fl ying near houses, trees, wires and buildings. You should also be careful 
to avoid fl ying in areas where there are many people, such as busy parks, 
schoolyards, or soccer fi elds. 

Belly Landing

If landing on grass without the landing gear, use the same approach as if fl ying 
with landing gear. Start your fl are with the power off about 1 foot (30cm) above 
the ground and hold the nose up until the tail touches down. Try to keep the 
wings level to prevent clipping a wing on the ground and turning the 
aircraft sideways.

NOTICE:

 For belly landing, remove the cannons, payload and support frame 

from the wing or damage to the aircraft may result.

Takeoff

Start the takeoff using rudder to keep the aircraft straight. As the aircraft 
reaches fl ying speed, apply a slight amount of up elevator and the aircraft will 
fl y off the ground. Avoid forcing the aircraft into the air. Climb to check trim. 
Once the trim is adjusted, you can begin to explore the fl ight envelope of the 
aircraft.

Landing

Flight times of 7 minutes or more are achievable if using proper throttle
management. 

For your fi rst fl ights, set your transmitter timer or a stopwatch to 

5 minutes

Adjust your timer for longer or shorter fl ights once you have fl own the model. 
If the motor pulses, land the aircraft immediately and recharge the fl ight bat-
tery. It is not recommended to fl y the battery to Low Voltage Cutoff (LVC). 

To land the aircraft, fl y the aircraft down to the ground using 1/4 –1/3
throttle to allow for enough energy for a proper fl are. The aircraft is easiest to 

land doing a wheel landing (two point), where the aircraft touches down on the
main landing gear fi rst while the tailwheel is still off the ground. The aircraft 
can also be landed in a three-point attitude, where all three wheels touch 
down at the same time. When the aircraft touches down, reduce back pressure 
on the elevator stick to prevent the plane from becoming airborne again.

If landing on grass, it is best to hold full up elevator after touchdown and when 
taxiing to prevent nosing over.

Once on the ground, avoid sharp turns until the plane has slowed enough to 
prevent scraping the wingtips.

NOTICE:

 If a crash is imminent, reduce the throttle and trim fully. Failure to do 

so could result in extra damage to the airframe, as well as damage to the ESC 
and motor.

NOTICE: 

Crash damage is not covered under warranty.

NOTICE:

 When you are fi nished fl ying, never keep the 

aircraft in the sun. Do not store the aircraft in a hot, 
enclosed area such as a car. Doing so can damage 
the foam.

Repairs

Thanks to the Z-Foam™ construction of this aircraft, 
repairs to the foam can be made using virtually any 
adhesive (hot glue, regular CA, epoxy, etc). When parts 
are not repairable, see the Replacement Parts List for 
ordering by item number. For a listing of all replace-
ment and optional parts, refer to the list at the end of this manual.

NOTICE: 

Use of CA accelerant on your aircraft can damage paint. DO NOT 

handle the aircraft until accelerant fully dries.

Low Voltage Cutoff (LVC)

When a Li-Po battery is discharged below 3V per cell, it will not hold a charge. 
The ESC protects the fl ight battery from over-discharge using Low Voltage 
Cutoff (LVC). Before the battery charge decreases too much, LVC removes 
power supplied to the motor. Power to the motor pulses, showing that some 
battery power is reserved for fl ight control and safe landing.

Disconnect and remove the Li-Po battery from the aircraft after use to prevent 
trickle discharge. Charge your Li-Po battery to about half capacity before stor-
age. During storage, make sure the battery charge does not fall below 3V 
per cell. LVC does not prevent the battery from over-discharge during storage.

NOTICE:

 Repeated fl ying to LVC will damage the battery.

Tip:

 Monitor your aircraft battery’s voltage before and after fl ying by using a 

Li-Po Cell Voltage Checker (EFLA111, sold separately).

1.  Disconnect the fl ight battery from the ESC (Required for Safety 

and battery life).

2.  Power OFF the transmitter.
3.  Remove the fl ight battery from the aircraft.
4.  Recharge the fl ight battery.

5.  Repair or replace all damaged parts.
6.  Store the fl ight battery apart from the aircraft and monitor the 

battery charge.

7.  Make note of the fl ight conditions and fl ight plan results, planning for 

future fl ights.

Fly in this area

Stand here

600 

feet (182.8 m)

Wind

Maintenance After Flying

Flying Tips and Repairs

12

Содержание Focke-Wulf 190A

Страница 1: ...Focke Wulf 190A Instruction Manual Bedienungsanleitung Manuel d utilisation Manuale di Istruzioni ...

Страница 2: ...for safety operation and maintenance It is essential to read and follow all the instructions and warn ings in the manual prior to assembly setup or use in order to operate correctly and avoid damage or serious injury Age Recommendation Not for children under 14 years This is not a toy Safety Precautions and Warnings As the user of this product you are solely responsible for operating in a manner t...

Страница 3: ... Landing Gear 6 Wing Installation 7 Control Horn and Servo Arm Settings 7 Drop Tank Installation 8 Servoless Payload Release Installation 8 Horizontal Tail Installation 9 Clevis Installation 9 Fixed Landing Gear Installation 9 Cannon Installation 10 Decal installation 10 First Flight Preparation 10 Center of Gravity CG 10 Control Direction Test 11 Dual Rates 12 Flying Tips and Repairs 12 Maintenan...

Страница 4: ...olding the transmitter bind button or switch Refer to your transmitter s manual for binding button or switch instructions 8 When the receiver binds to the transmitter the light on the receiver will turn solid and the ESC will produce a series of three ascending tones The tones indicate the ESC is armed provided the throttle stick and throttle trim are low enough to trigger arming 9 Remove the bind...

Страница 5: ...ut subsequent connection of a flight battery requires the steps below CAUTION Always keep hands away from the propeller When armed the motor will turn the propeller in response to any throttle movement CAUTION Always disconnect the Li Po battery from the aircraft receiver when not flying to avoid over discharging the battery Batteries discharged to a voltage lower than the lowest approved voltage ma...

Страница 6: ...emoved from the fixed gear mounting plates 8 Connect the retracts to the pre installed gear harness extensions L in the wheel wells Push the connectors under the tape on the wing so the retracts are not blocked Tip Ensure the extended landing gear wheels have no toe in or toe out for proper ground handling 9 When installing the wing connect the gear Y harness to the GEAR port of the receiver 10 Ens...

Страница 7: ...he wing to the fuselage using 2 screws D 4 Turn the aircraft over to connect the servos and optional connectors to the receiver or Y harnesses The left and right servos can be connected to either side of a Y harness TIP Carefully coil and store the servo wires in the hole in the fuselage for easier battery installation When needed disassemble in reverse order B A Wing Installation C D More control...

Страница 8: ...the aircraft reaction whenever a payload is released Never drop any object that creates a hazard to persons or property Never activate the payload release above crowded areas or cars Always choose responsibly when selecting your payload Always follow all aircraft instructions when using the device IMPORTANT The included scale drop tank will slow your aircraft much like the auxiliary tank on a full...

Страница 9: ...elage mounts one on the top and bot tom of each half of the horizontal tail 4 Attach the clevis to the elevator control horn see instructions for clevis connection When needed disassemble in reverse order Clevis Installation Tip Turn the clevis on the linkage to change the length of the linkage between the servo arm and the control horn Pull the tube from the clevis to the linkage Carefully spread...

Страница 10: ...ns by press fitting them into the leading edge of the wing as shown Cannon Installation Decal installation Your aircraft is supplied with two small Iron crosses for the tail insignia to be applied as shown For those desiring a more accurate tail insignia other decals are available separately PKZ4930 not available in all territories 1 Read this instruction manual thoroughly 2 Remove and inspect the ...

Страница 11: ...at neutral and the throttle and throttle trim are in the low posi tion then rebind the aircraft to your transmitter If the receiver loses its link to the transmitter the failsafe will drive the servos to these settings made at binding Control Direction Test Transmitter Command Aircraft Reaction E l e v a t o r Up Elevator Command Down Elevator Command A i l e r o n Stick Right Stick Left R u d d e...

Страница 12: ... point attitude where all three wheels touch down at the same time When the aircraft touches down reduce back pressure on the elevator stick to prevent the plane from becoming airborne again If landing on grass it is best to hold full up elevator after touchdown and when taxiing to prevent nosing over Once on the ground avoid sharp turns until the plane has slowed enough to prevent scraping the wi...

Страница 13: ...from the motor mount Assembly Assemble in reverse order Correctly align and connect the motor wire colors with the ESC wires The propeller size numbers 9 5 x 7 5 must face out from the motor for correct propeller operation A tool is required to tighten the spinner nut on the collet Ensure the spinner is fully connected to the fan for safe operation Not all wiring shown C D G J N H K Service of Pow...

Страница 14: ...with the AMA turbine regulations AMA Document 510 A 3 Model aircraft will not be flown in AMA sanctioned events air shows or model demonstrations unless a The aircraft control system and pilot skills have successfully demonstrated all maneuvers intended or anticipated prior to the specific event b An inexperienced pilot is assisted by an experienced pilot 4 When and where required by rule helmets mu...

Страница 15: ...lace recharge batteries Bind switch or button not held long enough during bind process Power off transmitter and repeat bind process Hold transmitter bind button or switch until receiver is bound Aircraft will not con nect after binding to transmitter Transmitter too near aircraft during connecting process Move powered transmitter a few feet from aircraft disconnect and reconnect flight battery to ...

Страница 16: ...wer your questions and service you in the event that you may need any assistance For questions or assistance please visit our website at www horizonhobby com submit a Product Support Inquiry or call 877 504 0233 toll free to speak to a Product Support representative Inspection or Services If this Product needs to be inspected or serviced and is compliant in the country you live and use the Product...

Страница 17: ...lectrical and electronic equipment The separate collection and recycling of your waste equipment at the time of disposal will help to conserve natural resources and ensure that it is recycled in a manner that protects human health and the environment For more information about where you can drop off your waste equipment for recycling please contact your local city office your household waste dispos...

Страница 18: ...argable FW 190A Serbatoio aux FW 190A PKZ6212 Battery Hatch FW 190A Parkzone FW 190A Akkuklappe Capot de compartiment à batterie FW 190A Portello batteria FW 190A PKZ6213 Canopy w Pilot FW 190A Parkzone FW 190A Kabinenhaube m Pilot Cockpit avec pilote FW 190A Capottina con pilota FW 190A PKZ5116 15 BL Outrunner Motor 950Kv 15BL Außenläufer 950Kv Extra 300 Moteur brushless à cage tournante 15 950kV...

Страница 19: ...degerät EU Chargeur de batterie AC DC Celectra 80 W multi types Caricabatterie per batteria mul tichimica 80 W c a c c EFLC3020 200W DC multi chemistry bat tery charger E flite 200W DC Multi Akku Ladegerät Chargeur multiple DC 200W 200W DC Caricabatterie univer sale EFLC4010 Celectra 15VDC 250W Power Supply E flite 15VDC 250W Netzteil EU Alimentation Celectra CC 15 V 250 W Alimentatore Celectra 15V ...

Страница 20: ...ed trademarks of Horizon Hobby Inc The Spektrum trademark is used with permission of Bachmann Industries Inc Futaba is a registered trademark of Futaba Denshi Kogyo Kabushiki Kaisha Corporation of Japan All other trademarks service marks and logos are property of their respective owners www parkzone com PKZ6250 PKZ6275 Created 03 13 37202 ...

Отзывы: