background image

EN

13

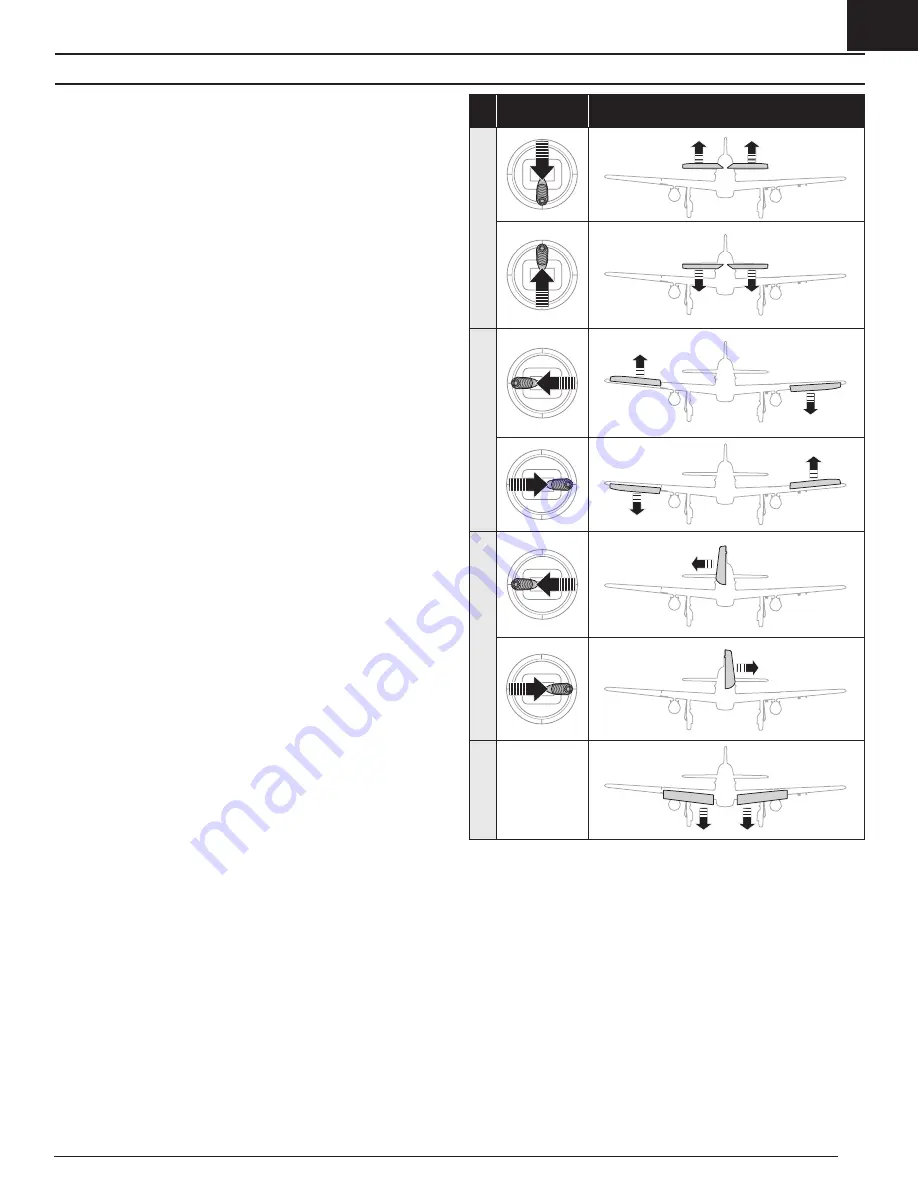
Control Direction Test

Switch on the transmitter and connect the battery. Use the transmitter to 
operate the aileron, elevator and rudder controls. View the aircraft from the rear 
when checking the control directions.

Elevators

1.  Pull the elevator stick back. The elevators should move up, which will cause 

the aircraft to pitch up.

2.  Push the elevator stick forward. The elevators should move down, which 

will cause the aircraft to pitch down. 

Ailerons

1.  Move the aileron stick to the left. The left aileron should move up and the 

right aileron down, which will cause the aircraft to bank left.

2.  Move the aileron stick to the right. The right aileron should move up and the 

left aileron down, which will cause the aircraft to bank right.

Rudder

1.  Move the rudder stick to the left. The rudders should move to the left, which 

will cause the aircraft to yaw left.

2.  Move the rudder stick to the right. The rudders should move to the right, 

which will cause the aircraft to yaw right.

Transmitter 

command

Control Surface

Response

Elev

ator

Aileron

Rudder

Flaps

Содержание E-flite P-51D Mustang 1.5m

Страница 1: ...P 51D Mustang 1 5m Instruction Manual Bedienungsanleitung Manuel d utilisation Manuale di Istruzioni SAFE Select Technology Optional Flight Envelope Protection ...

Страница 2: ...ources tab for this product MEANING OF SPECIAL LANGUAGE The following terms are used throughout the product literature to indicate various levels of potential harm when operating this product WARNING Procedures which if not properly followed create the probability of property damage collateral damage and serious injury OR create a high probability of superficial injury CAUTION Procedures which if ...

Страница 3: ...2 and DSMX Quick Start Information Transmitter Setup 1 Blank Acro Model 2 Wing Type 1 Aileron 1 Flap 3 Servo Reversing Set all to normal 4 Travel Adjust All Surfaces 100 Dual Rates High Rate Low Rate Aileron S 15mm T 15mm S 12mm T 12mm Elevator S 13mm T 10mm S 13mm T 10mm Rudder X 22mm W 22mm X 15mm W 15mm Flap Travel Take off T 27mm Landing T 60mm Elevator Trim Neutral Setting 3mm Down Elevator F...

Страница 4: ...ORTANT After you set up your model always rebind the transmitter and receiver to set the desired failsafe positions IMPORTANT The included receiver has been programmed specifically for operation in this aircraft If you desire to use the AR637T receiver in a different aircraft visit spektrumrc com for reprogramming instructions If your transmitter allows it enable the throttle cut feature Always en...

Страница 5: ... secure into place using the 3 included 3x40mm screws A 3 Connect the z bend end of the control linkage to the second hole of the servo arm B 4 Connect the ball link C to the ball D installed on the elevator s control horn using pliers or ball link pliers Ensure the elevator servo arm is in the correct position When needed disassemble in reverse order Model Assembly C D 3 X 40mm 3 A ...

Страница 6: ...the wing into the wing saddle 2 Secure the wing into position using the included 4 screws 3x40mm A 3 Align the wing tip with the main wing and press them together until they click Simply pull them OFF the main wing to remove 4 Disassemble in reverse order Model Assembly Continued 3 X 40mm 4 A ...

Страница 7: ...es A onto the spinner backplate B using 8 screws 3x20mm C and 8 nuts D The propeller s yellow tips must face out from the motor for correct propeller operation 2 Install the spinner backplate onto the propeller shaft E Make sure the hex of the backplate properly seats into the hex at the base of the propeller shaft 3 Install the propeller washer F and spinner nut G onto the propeller shaft Secure ...

Страница 8: ...ount the receiver to the flat area behind the battery compartment as shown The receiver should be mounted in the orientation shown parallel to the length of the fuselage with the label facing up and the servo ports facing the front of the aircraft The orientation of the receiver is critical for all AS3X and SAFE technology setups CAUTION Incorrect installation of the receiver could cause a crash P...

Страница 9: ...lly charged battery D on the front edge of the battery tray as shown and secure it using the hook and loop straps E 6 Align the battery tray with the tracks in the battery compartment and slide the tray all the way forward until the tray locks 7 Connect the battery to the ESC the ESC is now armed 8 Keep the aircraft immobile and away from wind or the system will not initialize The ESC will sound a...

Страница 10: ...ntil the control surface is centered Attach the linkage to the servo arm or control horn after adjustment The table to the right shows the factory settings for the control horns and servo arms Fly the aircraft at factory settings before making changes NOTICE If control throws are changed from the factory settings the AR637T gain values may need to be adjusted Refer to the Spektrum AR637T manual fo...

Страница 11: ...Select and AS3X modes Thanks to SAFE Select technology this aircraft can be configured for full time SAFE mode full time AS3X mode or mode selection can be assigned to a switch IMPORTANT Before binding read the transmitter setup section in this manual and complete the transmitter setup table to ensure your transmitter is properly programmed for this aircraft IMPORTANT Move the transmitter flight c...

Страница 12: ... and keep the aircraft securely restrained in case of accidental throttle activation IMPORTANT To be able to assign a switch first verify The aircraft was bound with SAFE Select enabled Your choice for the SAFE Select switch is assigned to a channel between 5 and 9 Gear Aux1 4 and travel is set at 100 in each direction The aileron elevator rudder and throttle direction are set to normal not revers...

Страница 13: ...rcraft to pitch down Ailerons 1 Move the aileron stick to the left The left aileron should move up and the right aileron down which will cause the aircraft to bank left 2 Move the aileron stick to the right The right aileron should move up and the left aileron down which will cause the aircraft to bank right Rudder 1 Move the rudder stick to the left The rudders should move to the left which will ...

Страница 14: ...ains active until the battery is disconnected Aircraft movement AS3X Reaction Elevator Aileron Rudder AS3X Control Direction Test During your first flight trim the aircraft for level flight at 3 4 throttle with flaps and gear up Make small trim adjustments with your transmitter s trim switches to straighten the aircraft s flight path After adjusting trim do not touch the control sticks for 3 secon...

Страница 15: ...Low Voltage Cutoff LVC Before the battery charge decreases too much LVC removes power supplied to the motor Power to the motor pulses showing that some battery power is reserved for flight control and safe landing Disconnect and remove the Li Po battery from the aircraft after use to prevent trickle discharge Charge your Li Po battery to about half capacity before storage During storage make sure ...

Страница 16: ...ls Tighten or otherwise secure parts servo arm linkage horn and control surface Worn parts Replace worn parts especially propeller spinner or servo Irregular servo movement Replace servo Inconsistent flight performance Trim is not at neutral If you adjust trim more than 8 clicks adjust the clevis to remove trim Sub Trim is not at neutral No Sub Trim is allowed Adjust the servo linkage Aircraft was...

Страница 17: ...h during bind process Power off transmitter and repeat bind process Hold transmitter bind button or switch until receiver is bound Aircraft will not connect after binding to transmitter Transmitter too near aircraft during connecting process Move powered transmitter a few feet from aircraft disconnect and reconnect flight battery to aircraft Aircraft or transmitter is too close to large metal obje...

Страница 18: ...t Set P 51 1 5 EFLG01252 Retract Strut Pin P 51D 1 5m EFLG01253 Left Retract Strut P 51D 1 5m EFLG01254 Right Retract Strut P 51D 1 5m EFLG01256 Tailwheel Retract Set P51D 1 5 EFLG01257 Tailwheel Axle P 51D 1 5m SPMA380R 9 Gram Servo Metal Gear Reverse SPMAR637T AR637T 6 CH AS3X Telemetry RX SPMSA330 9 gram servo SPMSA430 17g Servo P 51D 1 5m SPMSA450 Servo 13g Metal Gear SPMXAE1100 Avian 100Amp B...

Страница 19: ...aircraft control system and pilot skills have successfully demonstrated all maneuvers intended or anticipated prior to the specific event b An inexperienced pilot is assisted by an experienced pilot 4 When and where required by rule helmets must be properly worn and fastened They must be OSHA DOT ANSI SNELL or NOCSAE approved or comply with comparable standards B RADIO CONTROL 1 All pilots shall a...

Страница 20: ...Services Your local hobby store and or place of purchase cannot provide warranty support or service Once assembly setup or use of the Product has been started you must contact your local distributor or Horizon directly This will enable Horizon to better answer your questions and service you in the event that you may need any assistance For questions or assistance please visit our website at www ho...

Страница 21: ...ate the equipment NOTE This equipment has been tested and found to comply with the limits for a Class B digital device pursuant to part 15 of the FCC Rules These limits are designed to provide reasonable protection against harmful interference in a residential installation This equipment generates uses and can radiate radio frequency energy and if not installed and used in accordance with the inst...

Страница 22: ... trademarks or registered trademarks of Horizon Hobby LLC The Spektrum trademark is used with permission of Bachmann Industries Inc Futaba is a registered trademark of Futaba Denshi Kogyo Kabushiki Kaisha Corporation of Japan All other trademarks service marks and logos are property of their respective owners US 8 672 726 US 9 056 667 US 9 753 457 US 10 078 329 US 9 930 567 US 10 419 970 http www ...

Отзывы: