background image

14

EN

Electronics Installation cont’d

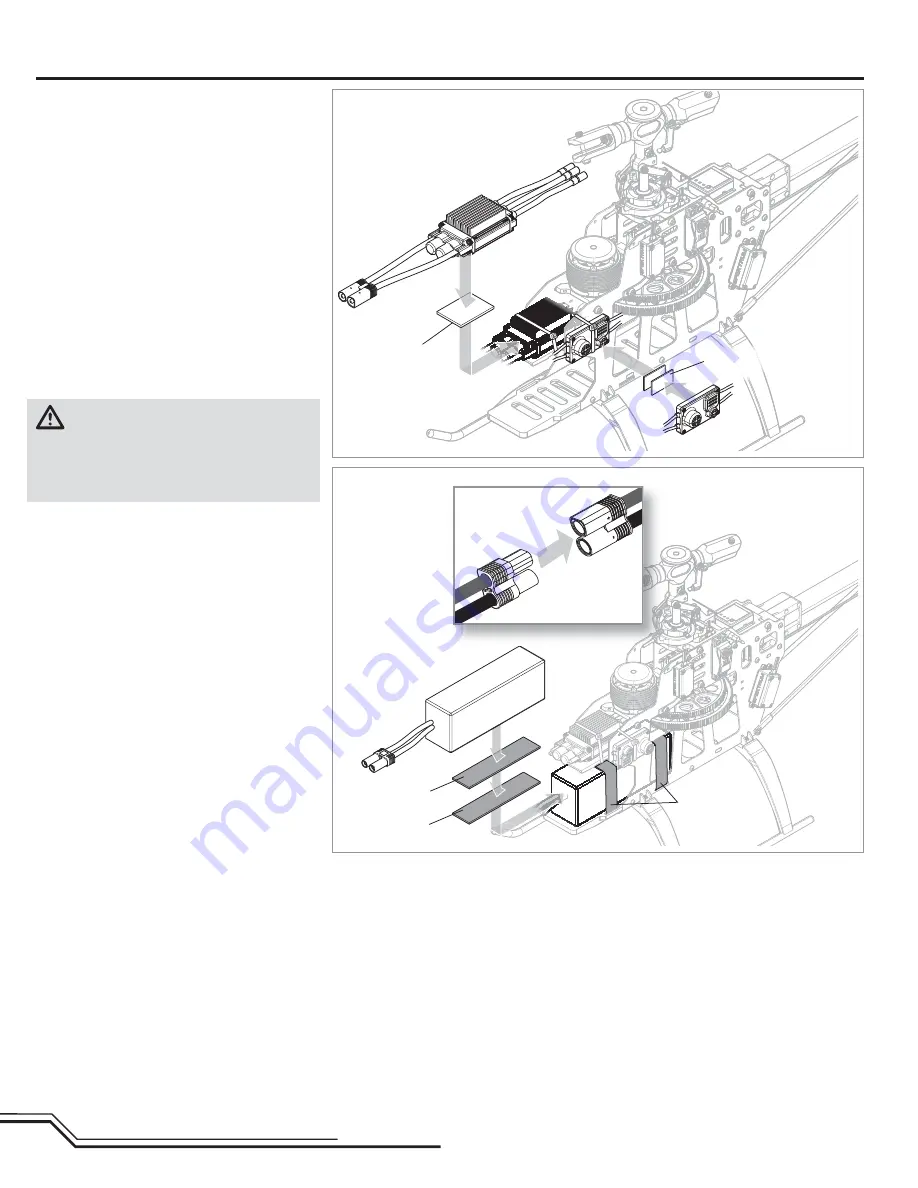
Speed control and BEC

Flight battery

AR7200BX Arming

1. Lower the throttle.
2. Power on the transmitter.
3. Center the throttle trim.
4. Turn throttle hold ON.
5. Attach hook material to the helicopter frame and 

loop material to the battery.

6. Install the fl ight battery on the helicopter frame. 

Secure the fl ight battery with a hook and loop 
strap. 

7. Connect the battery cable to the ESC.
8. Do not move the helicopter until the AR7200BX 

initializes.  The swashplate will move up and down, 
indicating that the unit is ready. The AR7200BX will 
also emit a solid BLUE Status LED when it is ready

9. The helicopter motor will emit a series of tones, 

indicating the ESC is armed.

CAUTION: 

 Always disconnect the Li-Po battery 

from the aircraft receiver when not in use to 

avoid over-discharging the battery. Batteries dis-
charged to a voltage lower than the lowest approved 
voltage may become damaged, resulting in loss of per-
formance and potential fi re when batteries are charged.

Double-sided foam tape

Loop material

Hook material

Hook and loop 
strap

Hook and loop
material

Содержание Blade 550 X Pro Series

Страница 1: ...Instruction Manual Bedienungsanleitung Manuel d utilisation Manuale di Istruzioni...

Страница 2: ...ng this product If you are unsure about ANY function or procedure described in this manual DO NOT operate Contact Horizon Product Support for assistance WARNING Always ensure you are operating the hel...

Страница 3: ...Amp Brushless ESC included included BEC 10 Amp BEC included included Battery 6S 22 2V 5000mAh 30C Li Po required required Charger DC Li Po Balancing Charger required required Component Kit Combo Trans...

Страница 4: ...eiver SPM9645 included with combo BLH5525C 1 Tail servo 1 H6080G servo SPMSH6080G included with combo BLH5525C E ite 200W charger EFLC3020 Dynamite Li Po Charge Protection Bag Large DYN1405 Control Ro...

Страница 5: ...hly with alcohol before installation Head Assembly H 2X Step H2 Step H1 parts bags H1 and H2 Step H2 parts bag H1 Step H3 parts bags H1 and H2 Step H3 Step H1 Center sleeve on the spindle 22mm Damper...

Страница 6: ...ing x2 Thrust washer 10 X 14 X 8 x2 Spindle bolt washer 4 X 12 X 1 x2 Step washer x2 M4 X 12 bolt x2 M3 X 14 bolt x2 M3 X 8 bolt x2 Control ball x2 A B A A B C C Larger inner diameter I D Smaller inne...

Страница 7: ...ing for the servos At any point where the servo wire is going to pass through or cross the frame plates use sandpaper to round the edge of the frame plate to prevent the wire from cha ng Cap head bolt...

Страница 8: ...rame and servo screws Step F3 parts bags F3 and F5 Step F4 parts bag F4 Setscrew M3 X 11 x2 Button head screw M3 X 12 x6 Cap head bolt M3 X 10 x4 Canopy mounting post x2 M3 Washer x6 M3 Recessed washe...

Страница 9: ...parts bag M1 6mm 14 tooth pinion gear Setscrew M3 X 4 x2 Cap head bolt M3 X 10 x8 M3 Recessed washer x8 Washer x1 One way sleeve x1 Shoulder cap head bolt M4 X 22 M4 Lock nut Counter sunk self tapping...

Страница 10: ...T1 Step T2 parts bag T1 Step T2 Hexagonal posts x6 Radial bearing 12 X 18 X 4 x2 Radial bearing 5 X 10 X 4 x2 Brass spacer Cap head shoulder bolt M3 X 18 x4 M3 Lock nut x4 Button head self tapping sc...

Страница 11: ...M3 X 10 x2 Cap head bolt M3 X 8 x4 Button head screw M3 x 10 x2 M3 Recessed washer x2 Tail blade bolt x2 Tail blade nut x2 Thrust bearing x2 Thrust washer x2 Control ball x2 M4 x 3 Set screw M3 X 8 Ca...

Страница 12: ...nto the bearings Use oil on the outside of the torque tube bearing holders to ease installation into the boom The stepped side of the washer faces the radial bearing Tail rotor blade removed for clari...

Страница 13: ...in the servo leads Cap head M3 X 10 x4 Recessed washer x4 Counter sunk screw M3 X 8 x2 Tail Assembly cont d Step T6b Step T6b parts bags T8 and T3 Self tapping screw M3 X 12 x4 Self tapping screw M2...

Страница 14: ...until the AR7200BX initializes The swashplate will move up and down indicating that the unit is ready The AR7200BX will also emit a solid BLUE Status LED when it is ready 9 The helicopter motor will e...

Страница 15: ...helicopter sideways but loose enough to swing freely if you move the helicopter and stop abruptly Main Rotor Blade parts 2X Main Rotor Blades Main blade shoulder bolt M4 X 30 x2 M4 Lock nut x2 Canopy...

Страница 16: ...r the Spektrum DX6i DX7 DX7se DX7s DX8 and DX18 The les for models using SpektrumTM transmitters with AirWare software are also available for download online in the Spektrum Community SETUP LIST Model...

Страница 17: ...X User de ned off low nor high nor low rev high rev G Cyclic response User de ned normal slightly increased increased high very high H Pitch boost User de ned off low medium high very high PARAMETER M...

Страница 18: ...18 EN Control Tests Mode 1 Neutral Viewed from left Neutral Viewed from back Mode 2 Collective pitch Swashplate set to 0 Neutral Positive pitch Viewed from left Negative pitch Viewed from left...

Страница 19: ...19 EN Mode 1 Mode 1 Mode 2 Mode 2 Elevator Aileron Forward elevator Viewed from left Back elevator Viewed from left Right aileron Viewed from back Left aileron Viewed from back...

Страница 20: ...hrottle collective stick is moved from the middle stick position to the low stick position Negative pitch allows the helicopter to y upside down and perform aerobatics Change between stunt and normal...

Страница 21: ...ncludes cracks burrs chips or scratches Replace dam aged parts before ying Gyro Make sure the AR7200BX is securely attached to the frame Replace the double sided tape when necessary The helicopter wil...

Страница 22: ...tick and lower the throttle trim The transmitter is not in normal mode or throttle hold is on Make sure the transmitter is in normal mode and throttle hold is off The motor is not connected to the ESC...

Страница 23: ...d service you in the event that you may need any assistance For questions or assistance please visit our website at www horizonhobby com submit a Product Support Inquiry or call 877 504 0233 toll free...

Страница 24: ...saint France 33 0 1 60 18 34 90 infofrance horizonhobby com China Horizon Hobby China Room 506 No 97 Changshou Rd Shanghai China 200060 86 021 5180 9868 info horizonhobby com cn Warranty and Service C...

Страница 25: ...C 2011 EN55024 2010 Signed for and on behalf of Horizon Hobby Inc Champaign IL USA Dec 21 2012 Steven A Hall Executive Vice President and Chief Operating Of cer International Operations and Risk Manag...

Страница 26: ...98 H2 H7 H1 H3 H5 H7 H2 H4 H4 H2 H11 H8 H12 H10 H9 H8 H6 B9 H6 H6 H2 H13 B1 B1 B3 B2 Exploded View Head Assembly Rotorkopf Assemblage de la t te Gruppo della testa...

Страница 27: ...ed View Frame Assembly Chassis Assemblage du ch ssis Gruppo telaio F5 F13 F19 F19 F9 F14 F4 F3 F1 F2 F17 E1 F16 F14 F18 F11 F14 F6 F6 F21 B4 E3 E6 E6 E5 E7 E4 E2 B4 F10 F10 B5 B10 F15 F10 F8 F7 F20 F1...

Страница 28: ...emblage de l anticouple Gruppo coda T15 T14 T10 T17 T16 T14 T13 T1 T9 B8 B3 B6 B6 B7 B7 B3 B5 B5 T12 T15 T11 B10 T4 T3 T7 T6 T6 T7 T2 T2 T6 T5 T5 T8 T9 T8 Exploded View Tailboom Assembly Heckausleger...

Страница 29: ...n 550mm FBL 3D Carbon Main Blades Revolution 550mm FBL Carbon Hauptrotorbl tter Revolution Pales en carbone FBL 3D 550mm Revolution Pale in Carbonio FBL 550 mm Parts List Ersatzteile Pi ces de rechang...

Страница 30: ...otor pitchhebel 550 X Support de renvois d anticouple Supporto squadrette coda 550 X T17 BLH5554 Tail Case Set 550 X Blade 550 X Leitwerkshalter 550 X Boitier d anticouple Set scatola coda 550 X Tail...

Страница 31: ...MX DX8 seul Solo trasmettitore DSMX DX8 DX6i DSMX Transmitter Only Spektrum DX6i DSMX Nur Sender metteur DSMX DX6i seul DX6i DSMX Solo trasmettitore DX7s Transmitter Only Spektrum DX7s nur Sender mett...

Страница 32: ...are trademarks or registered trademarks of Horizon Hobby Inc The Spektrum trademark is used with permission of Bachmann Industries Inc BeastX is a trademark of Markus Schaack and is used with permiss...

Отзывы: