background image

10

INTRODUCTION

IMPORT

ANT

PRECAUTIONS

ASSEMBL

Y

BEFORE

YOU 
BEGIN

TREADMILL

OPERA

TION

LIMITED

W

ARRANTY

TROUBLESHOOTING

MAINTENANCE

CONDITIONING

GUIDELINES

11

INTRODUCTION

IMPORT

ANT

PRECAUTIONS

ASSEMBL

Y

BEFORE YOU 

BEGIN

TREADMILL OPERA

TION

CONDITIONING GUIDELINES

TROUBLESHOOTING & 

MAINTENANCE

LIMITED WARRANTY

ASSEMBLY

 STEP 

ASSEMBLY

 STEP 2 

(CONTINUED)

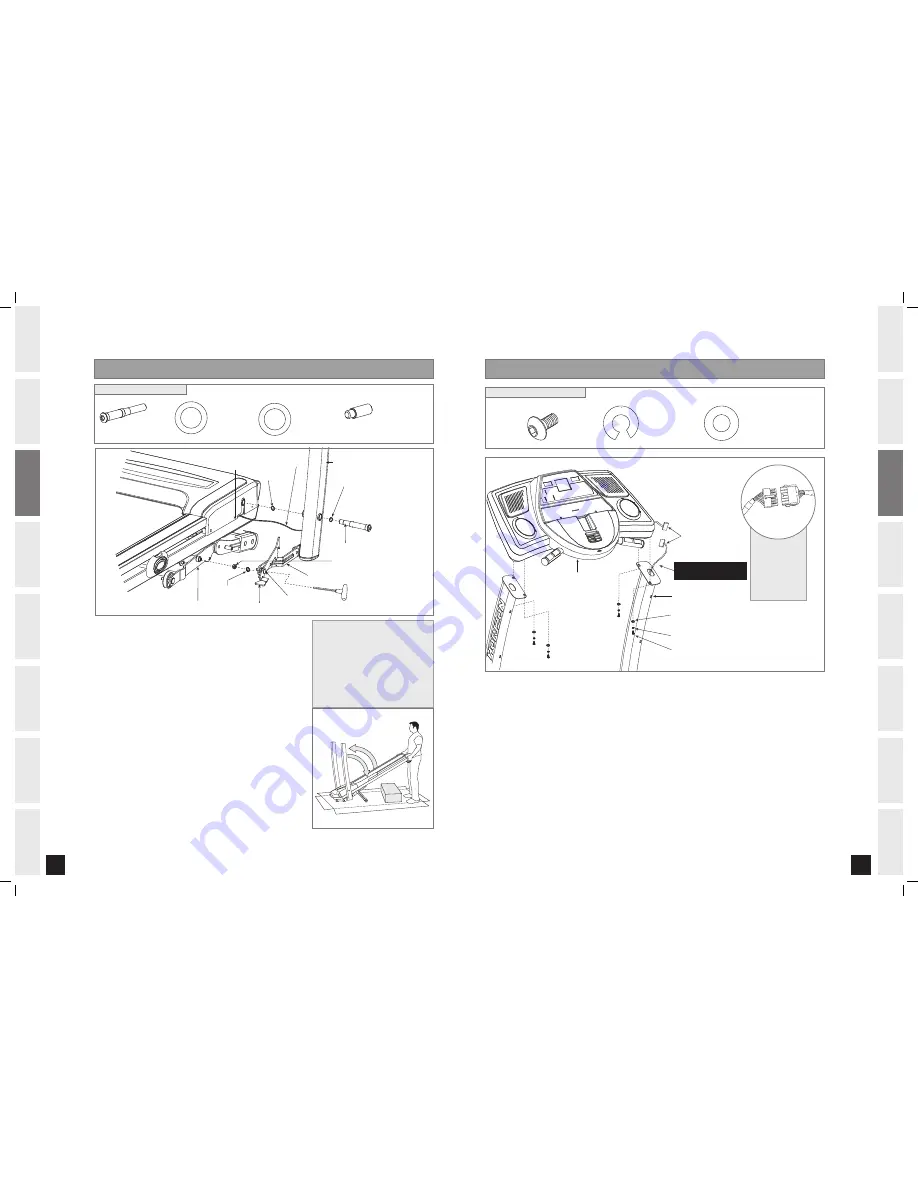
CONSOLE

FLAT WASHER (B)

CONSOLE MAST

SPRING WASHER (J)

BOLT (I)

DO NOT ATTACH

THIS SIDE UNTIL STEP 3-D

CONSOLE CABLES

FLAT WASHER (B)
20 mm
Qty: 4 

SPRING WASHER (J)
20 mm
Qty: 4 

BOLT (I)
20 mm
Qty: 4 

HARDWARE BAG  CONTENTS:

A  

Open 

HARDWARE BAG 

.

B  

With running deck in lowered position, place 

CONSOLE

 on upright masts. Align the brackets 

that are underneath the console with the top holes of the upright masts. 

C  

To assemble the

 LEFT CONSOLE MAST 

to the

 CONSOLE

, insert 1 

BOLT (I),  

SPRING WASHER (J)

 and 1 

FLAT WASHER (B)

 into the 2 holes in the  

LEFT CONSOLE MAST

 and lightly tighten.

D  

Gently lift 

RIGHT

 side of the 

CONSOLE

 to connect the 

CONSOLE CABLES

. Carefully tuck 

wires in mast to avoid damage. 

NOTE:

 Do not pinch console cable.

E  

Repeat 

STEP C

 above to attach the 

RIGHT CONSOLE MAST

 to the 

CONSOLE

.

* NOTE:

 Be 

careful not to 

pinch any 

wires while 

attaching the 

console.

FLAT WASHER (E)

BOLT (D)

RIGHT CONSOLE MAST

MAIN FRAME

WAVY WASHER (F)

ELEVATION FRAME

CONSOLE CABLE

PRE-ATTACHED BOLT

FOOT LOCK LATCH

RIGHT LINKAGE ARM

PRE-ATTACHED NUT

PRE-ATTACHED

TEFLON WASHER

1

3

2

NOTE:

 If you have attempted to 

move the treadmill from the box 
and the machine has sprung 
open and cannot be assembled, 
refer to the troubleshooting 
section in order to restore the 
treadmill to its proper position.

*

Insert 1 

BOLT (D)

 and 1 

FLAT WASHER (E) 

through 

RIGHT CONSOLE MAST 

followed by 1 

WAVY WASHER (F)


and attach to 

MAIN FRAME. 

Unscrew 

PRE-ATTACHED NUT

 and remove from 

RIGHT 

LINKAGE ARM 

and discard. Carefully move 

RIGHT LINKAGE 

ARM

 and 

PRE-ATTACHED TEFLON WASHER 

into position 

and attach to 

ELEVATION FRAME

NOTE: While holding 

RIGHT CONSOLE MAST

 in the 

upright position, tighten 

PRE-ATTACHED BOLT

 using  

T-wrench to attach 

RIGHT LINKAGE ARM

.

Cut band holding 

FOOT LOCK LATCH

 assembly. Lift the 

RUNNING DECK

 until lock latch on side of treadmill is 

fully engaged.
Remove 

CONSOLE

 from box and place out of the way.

Lower the treadmill

 RUNNING


DECK

 from the folded 

position by stepping on 

LOCK LATCH

 on lower right side.


HARDWARE BAG 2 CONTENTS:

LOCK LATCH PIN (G)
Qty: 1

WAVY WASHER (F)
29 mm
Qty: 1

BOLT (D)
Qty: 1

FLAT WASHER (E)
27 mm
Qty: 1

GS_1040T_Treadmill_Rev.1.7.indd   10-11

4/3/08   9:13:27 AM

Содержание GS 1040T

Страница 1: ...GOAL SERIES TREADMILL USER S GUIDE FOR MODEL GS 1040T GS_1040T_Treadmill_Rev 1 7 indd 1 4 3 08 9 13 06 AM...

Страница 2: ...ed to get stronger and healthier faster Because we re committed to designing fitness equipment from the inside out we use only the highest quality components It s a commitment we back with one of the...

Страница 3: ...The treadmill is not compatible with GFCI equipped outlets It is essential that your treadmill is used only indoors in a climate controlled room If your treadmill has been exposed to colder temperatu...

Страница 4: ...the upright folded position with the lock latch secure Unpack the unit where it will be used The enclosed treadmill is equipped with high pressure shocks and may spring open if mishandled Never grab h...

Страница 5: ...ease may aid in the installation of hardware Any grease such as lithium bike grease is recommended WARNING Open HARDWARE BAG 1 Cut banding straps Do not move or lift treadmill from packaging Move left...

Страница 6: ...ul not to pinch any wires while attaching the console FLAT WASHER E BOLT D RIGHT CONSOLE MAST MAIN FRAME WAVY WASHER F ELEVATION FRAME CONSOLE CABLE PRE ATTACHED BOLT FOOT LOCK LATCH RIGHT LINKAGE ARM...

Страница 7: ...vent or air openings The treadmill should not be located in a garage covered patio near water or outdoors DO NOT STAND ON THE BELT While you are preparing to use the treadmill do not stand on the bel...

Страница 8: ...latch secured Failure to follow these instructions could result in injury WARNING WARNING CENTERING THE RUNNING BELT The running belt has been properly adjusted at the factory before it was shipped A...

Страница 9: ...Weight PROGRAM SETTING KEYS Press to adjust program settings SET VIEW GOAL KEY Used to set and view goal information ACTIVATE DEACTIVATE KEY Used to turn off WEEKLY GOAL CENTER INCLINE ARROW Keys Used...

Страница 10: ...tes each and are included in program times PROGRAM INTERVALS MANUAL INTERVALS ROLLING WEIGHT LOSS GOLF COURSE RACE CUSTOM 1 CUSTOM 2 THR ZONE 1 THR ZONE 2 VALLEY TOUR Motivates with different combinat...

Страница 11: ...2 3 4 5 6 7 8 9 10 11 12 13 14 15 Cool Down Level 1 0 0 0 5 0 0 0 5 1 0 3 0 1 0 3 0 2 0 3 0 2 0 3 5 2 0 3 0 2 0 3 0 1 0 3 0 1 0 0 5 0 0 0 5 0 0 Level 2 0 0 0 5 0 0 0 5 1 0 3 0 2 0 3 0 2 0 3 0 2 5 3 5...

Страница 12: ...quipped with Horizon s exclusive Weekly Goal Center you ve taken an important step towards achieving your personal fitness goals Congratulations on your purchase decision Horizon s Weekly Goal Center...

Страница 13: ...is by monitoring your heart rate using the grip pulse handlebars and the second is by evaluating your perceived exertion level this is simpler than it sounds PERCEIVED EXERTION LEVEL A simple way to g...

Страница 14: ...LE STRETCH Sit on the floor with your legs together and straight out in front of you Do not lock your knees Extend your fingers towards your toes and hold for a count of 15 seconds Make sure that you...

Страница 15: ...program is to determine your goals Is your primary goal for exercising to lose weight Improve muscle Reduce stress Prepare for the spring racing schedule Knowing what your goals are will help you deve...

Страница 16: ...al tone of voice it is considered normal noise TROUBLESHOOTING TREADMILL Your treadmill is designed to be reliable and easy to use However if you experience a problem please reference the troubleshoot...

Страница 17: ...tions will give the technicians the ability to send proper replacement parts and the service necessary to get you and your Horizon Fitness treadmill running again MAINTENANCE WARNING DO NOT stand on r...

Страница 18: ...uential damages Horizon Fitness is not responsible or liable for indirect special or consequential damages economic loss loss of property or profits loss of enjoyment or use or other consequential dam...

Страница 19: ...ting Customer Tech Support To receive additional product information visit us at www horizonfitness com CUSTOMER TECH SUPPORT DO NOT RETURN TO THE RETAILER if you have any problems during assembly or...

Отзывы: