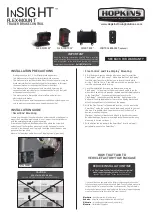


Black wire
– positive terminal (+) on battery
Red wire
– cold side of stop lamp switch or brake light
White wire
– ground/negative terminal (-) on battery
Blue wire
– trailer electric brakes
If your vehicle came equipped with a factory tow package, brake control
function wires may exist under the vehicle dash. Consult vehicle manual or
call your dealer for location. Purchase a vehicle specific Plug-in Simple!
®
brake control connector and simply plug into the factory tow package plug,
or splice the wires to the function wires under the dash.
REDUCE INSTALLATION TIME
Go to
http://www.HopkinsTowingSolutions.com/guides/
brake-control-connectors.html
to find your vehicle
specific Plug-In Simple!
®
brake control connector.
HOW TO ATTACH TO
VEHICLE FACTORY TOW PACKAGE
• Flex-Control
™
and Flex-Display
™
Mounting:
1. Sit in the driver’s seat and decide where you want to install the
Flex-Display™ and Flex-Control™. Make sure that the Flex-Display™
is within sight lines that will allow you to locate it easily while
driving. The Flex-Control™ should be mounted in a position that it
is within easy reach while driving.
2. Once the installation locations are determined, bring the
Flex-Display™ to the area it will be mounted and begin to run the
wire either behind vehicle panels or behind weather stripping down
to the Smart-Box™. Use double sided tape to secure the
Flex-Display™ to desired mounting location. Apply tape to the
bottom of the display bracket, or remove the display bracket and
attach the tape directly to the back of the display.
3. With the Flex-Control™ in the desired location, run the wire to the
Smart-Box™ using the vehicle’s dash seams and panels to conceal
the wire. Use double-sided tape to secure the Flex-Control™ to
desired mounting location.
[Optional: Use Control Bracket and attach to dash with screws or
double sided tape. Optional mounting bracket flexes to allow easy
mounting to curved surfaces.]
4. With all wires routed down to the Smart-Box™ location, plug all
peripheral wires into the Smart-Box™.
CAUTION
DO NOT MOUNT ON DASH
ONLY MO
UN
T ON KICK PANEL OR CENTRE CON
SO
LE
KICK PANEL
INSTALLATION GUIDE
• Smart-Box
™
Mounting:
Locate an area under the vehicle dash on center console or kick panel to
mount the Smart-Box, making sure it is not in a position that interferes
with the emergency brake or pedal operation.
Orientation of the Smart-Box Mount should be where the screw hole
extensions of the Smart-Box mount against the kick panel or centre
console. Allow enough room to plug in the brake control harness and
peripheral devices easily.
Mount with foam tape, cable ties or self-tapping screws (provided).
INSTALLATION PRECAUTIONS
• Braking capacity is for 2, 4, 6 or 8 trailer brake applications.
• This brake control will apply the trailer brakes while in reverse.
• This brake control is inertia activated. When the vehicle is not moving, the
brake control will not automatically apply the trailer brakes. In this event,
the manual brake must be depressed to actuate the brakes.
• This brake control is not reverse polarity protected. Reversing the
connection to the vehicle battery or the breakaway battery on the trailer
will damage the brake control.
• This brake control is designed to operate trailers with electric or
electric/hydraulic brakes.
• For best results when installing components with double sided tape, make
sure to prep the area by cleaning it with rubbing alcohol first.
IMPORTANT
Read the following instructions carefully before installing
and/or operating the brake control. If you have any concerns
with this product or the installation process, our technical
support team can assist you.
Call (03) 9761 1110.
F
LEX-
D
ISPLAY
™
C
ONTROL
B
RA
C
KET
(optional)
F
LEX-
C
ONTROL
™
SMART-
B
OX
™
I
N
SIGHT
FLEX-MOUNT
™
TRAILER
B
RAKE
C
ONTROL
™
SEE BACK FOR WARRANTY
www.HopkinsTowingSolutions.com


