background image

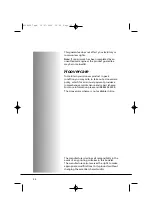
The water removed from the laundry during the
drying cycle is collected in a container at the
bottom of the dryer.
When the container is full the ‘

Full

’ indicator on

the control panel will light, and the container

MUST

be emptied. However, we recommend that

the container is emptied after each drying cycle.

NOTE: Very little water will collect during the
first few cycles of a new machine as an internal
reservoir is filled first.

To remove the container

1.

Gently pull the bottom of the kickplate so
that it unclips from the dryer. The top
section can then be unhinged allowing the
kickplate to be completely removed.

2. 

Pull firmly on the handgrip and slide the
water container out of the dryer.

Support the container with both hands. When
full, the water container will weigh about 4kg.

3. 

Open the lid located on the top of the
container and empty the water.

4. 

Refit the lid and slide the water container
back into position. 

PUSH FIRMLY INTO

PLACE.

5. 

Refit the kickplate by engaging the hinges
at the top and 'snapping' the lower clips
into place.

15

Water Container

40006007.qxd  02/07/2009  16:36  Page 15

Содержание 31100364

Страница 1: ...Instruction Book Condenser Tumble Dryer English 40006007 qxd 02 07 2009 16 35 Page 1...

Страница 2: ...10 Energy saving 10 Controls and indicators 11 Selecting the Programme 12 Door and Filter 14 Opening the door 14 Filter 14 Filter care indicator 14 Water container 15 To remove the container 15 Conden...

Страница 3: ...kaging and up one corner 2 Remove the polythene sleeve and lift the dryer off the polystyrene base 3 Check that no damage has occurred to the machine during transit If it has call for service by GIAS...

Страница 4: ...ppliance when hands or feet are damp or wet Do not lean on the door when loading the machine or use the door to lift or move the machine Do not allow children to play with the machine or its controls...

Страница 5: ...cket cut the mains power cable and destroy this together with the plug To prevent children shutting themselves in the machine break the door hinges or the door lock GIAS Service To ensure the continue...

Страница 6: ...e for disconnection after the appliance has been installed The wires in the mains lead are coloured in accordance with the following codes Blue NEUTRAL Brown LIVE Green and Yellow EARTH CE Appliance c...

Страница 7: ...e inlet and outlets should be kept free from obstructions To ensure adequate ventilation the space between the bottom of the machine and the floor must not be obstructed There should be a gap of at le...

Страница 8: ...o dry is suitable for drying in a tumble dryer as shown by the care symbols on each item Check that all fastenings are closed and that pockets are empty Turn the articles inside out Place clothes loos...

Страница 9: ...ng By amount and thickness Whenever the load is bigger than the dryer capacity separate clothes according to thickness e g towels from thin underwear By type of fabric Cottons linen Towels cotton jers...

Страница 10: ...time thus saving electricity ALWAYS Try to dry the maximum weight of laundry this will save time and electricity Check that the filter is clean before every drying cycle NEVER Exceed the maximum weigh...

Страница 11: ...n the water container is full Filter Care indicator lights when the filter needs cleaning Progress display DRY When the programme is selected the DRY indicator will flash when the programme starts the...

Страница 12: ...tems or pre dried fabrics with low moisture content use the timed programmes Set the programme between 30 and 75 minutes depending on the load size and dryness required and select high or low heat dep...

Страница 13: ...xample Garments may also become stiffened when dried outside on a washing line or inside on radiators This programme relaxes the creases in the fabric making ironing quicker and easier The rapid progr...

Страница 14: ...soft brush or your fingertips 4 Snap the filter together and push back into place Filter Care Indicator lights when the filter needs cleaning If the laundry is not drying check that the filter is not...

Страница 15: ...ner 1 Gently pull the bottom of the kickplate so that it unclips from the dryer The top section can then be unhinged allowing the kickplate to be completely removed 2 Pull firmly on the handgrip and s...

Страница 16: ...rs anti clockwise and pull out the condenser 3 Pull out the condenser unit 4 Gently remove any dust or fluff with a cloth then wash the unit by holding it under a running tap turning it so that water...

Страница 17: ...hine to change the setting 5 Press the Start Pause button The dryer will start automatically and the DRY indicator will be continuously lit 6 If the door is opened during the programme to check the la...

Страница 18: ...ean the filter and empty the water container after every drying cycle Regularly clean the condenser After each period of use wipe the inside of the drum and leave the door open for a while to allow ci...

Страница 19: ...f the dryer free from obstructions Has the Delicates option been selected from a previous cycle The dryer does not operate Is there a working electricity supply to the dryer Check using another applia...

Страница 20: ...e in working order Has not been installed in accordance with the installation instructions Has been used incorrectly HOOVER Spares Always use genuine Hoover spares available direct from GIAS Service G...

Страница 21: ...el number and serial number which you will find on the rating label 16 characters beginning with the number 3 found on the front of the appliance door area By doing this your enquiry will be responded...

Страница 22: ...oovercare policy which for an annual payment provides a comprehensive maintenance and repair scheme For more information please call 08444 995599 The Hoovercare scheme is not available in Eire The man...

Страница 23: ...23 40006007 qxd 02 07 2009 16 36 Page 23...

Страница 24: ...40006007 40006007 qxd 02 07 2009 16 36 Page 24...

Отзывы: