


Wi-Fi Antenna
IP CAMERA
Model: HT-IP212HDP
Advanced User Manual
For Windows
Quick User Guide
Ethernet Cable
Resource CD
Power Adapter
Base
Screws & Tool
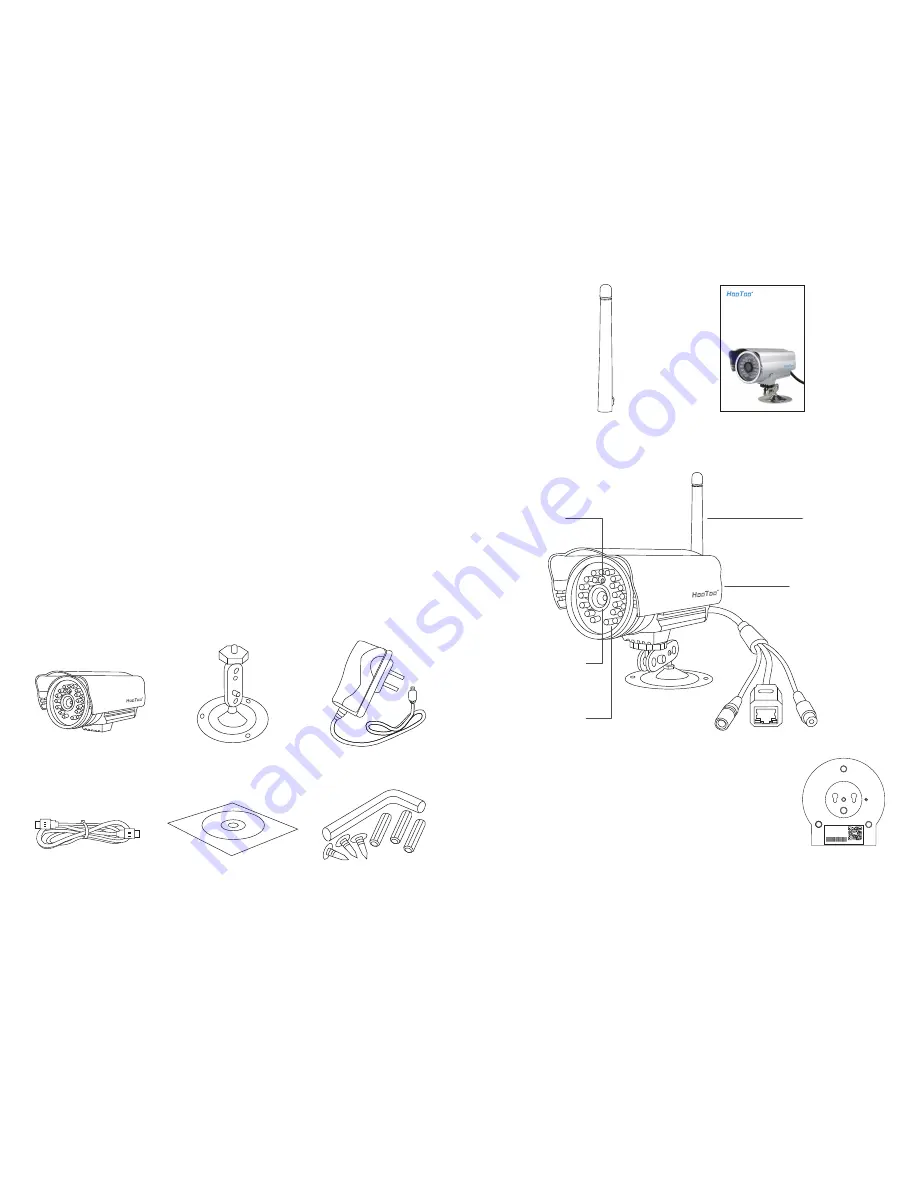
HT-IP212HDP
IP Camera
WI-FI Antenna
Waterproof and
protective shell
Light sensor
Fixed focus Lens
Night vision LEDs
1.Overview
1.1 Key Features
• H.264 Compressed video
• Support IR-CUT dual filter
• 1280 x 720 High definition CMOS Lens with clear and crisp image
• Connect from anywhere around the world via internet
•
Extra LED illuminators and IR light sensor provide clear night vision
in dark area automatically
• Motion detection with email alerts and FTP upload
• Supports IE/Firefox/Chrome/Safari browser or any other standard browsers
• Wi-Fi compliant with wireless standards IEEE 802.11b/g/n
• Multi-level users management with password protection
• Providing Central Management Software to manage or monitor
multi-cameras
1.2 Help
Please go through the detailed instructions in the guide to help you setup
the camera correctly. If you need any further assistance, please contact
our customer support team or email us at
1.3 Package Contents
1.4 Product Diagram
2. Access via local network
You can access the camera via wired or wireless
mode via local area network (LAN).
2.1 Wired Access
This camera supports HTTP and HTTPS protocols.
1) Assemble the camera and its antenna; connect camera to
your router with a network cable (the same router that is being
connected to your windows PC)
2) Find the Search IPCam Tool from the Installation CD. Copy the
installation file to your PC local drive.
Notes:
•
You can download the Search IPCam Tool software from
www.hootoo.com
• For FireFox or Chrome browser, in order to view live video, please
download and install “VLC media player” first. You can download
from:
http://www.videolan.org/vlc/index.html
• For IE browser, in order to view live video, please install “download
ActiveX”. You can download it on login page by clicking
“download ActiveX”.
•
We recommend IE browser for more stable performance
3) Double click on Search IPCam Tool to open it. Make sure camera it
connected with your router properly.
4) Click
“Search” to find your camera’s IP address.
5)
Select the IP address and double click on it. This will lead you to the
login page of the HT-IP212HDP web setting page. Click “download
ActiveX”
to install camera plug-in for future use:
6) Then login with default username & password.
Default Username: admin
Default Password: admin
Trouble Shoot
If you fail to find the camera’s IP address or fail to login after clicking the
IP address, try the following steps:
• Check the status of the camera’s Ethernet indicator LEDs. A flashing
yellow LED and a solid green LED means the camera is connected
properly. Otherwise, check the router and Ethernet connection
• Try the camera setup on a different network / router. Sometimes the
camera may not be compatible with your network setup
• Reset the camera to factory setting and try the setup again
2.2 Wireless mode
To setup the camera in wireless mode, you must successfully setup the
camera in wired mode first. Before you move any further, please make
sure you have followed the previous instruction to set the wired mode.
1)
After login the web setting page, click on “ ” at the top
of the page
2)
Click “Network Settings”, then click “Wireless” to scan nearby
wireless network
3)
Select the wireless network you wish to connect to. Enter the
password, and then click “Save”
4)
After the progress bar finish, wait about 60 seconds for device restarting,
then pull out the network cable from the connected camera
5) Open the Search IPCam Tool software again. Click “Search”
to find
the camera. It may take up to 10 seconds for the result to show.
6) Double click on the new IP address. This will lead you to the web login
page in your default browser.
7) Use the default username “admin” and password “admin” to login
8) If a WebCMS add-in pops up, please allow the computer to run it:
9) Now you have setup the camera in Wi-Fi mode
Note:
• When you fill in Wi-Fi password, please note that there should be no
special characters ( such as < > ‘ ’)
MEGAPIXEL IP CAMERA
LENS: 3.6MM LENS
Adapter Power: 5V/2A
IP Address: DHCP Mode
M62SAKKUD6Z2AXAN111A
2014. 12. 10
• If you fail to find the camera’s IP address while other IP addresses
show normally after searching, please fill in the SSID manually
• If the camera gets offline once you unplug the network cable,
please open your router’s webpage and then make proper
settings. For more details, please check Advanced User Manual
or FAQ in
www.hootoo.com
3. Control and Settings
3.1 Home Page
At home page, you can view live video footage from the camera,
record surveillance footage, and take snapshots photo.
Note:
• For Windows PC users, we recommend using IE browser. Some features
(such as video recording, snapshot) are not available on FireFox,
Chrome and other browser
• Mac OS can only allow very limited control features for the camera
3.1.1 Video Quality
You can choose between “Main stream” and “Sub Stream”.
• Main Stream setting plays video at maximum resolution of 1280x720,
but if your connection bandwidth is limited, you may experience
some delay.
• Sub Stream play video at lower resolution, but it comes with much less
delay than Main Stream option. You can choose video resolution
(see section 3.3.2.2 Video Coding)
Note
:
Because of H.264 compression, Main Stream should be you default
setting in normal circumstances. Only change to Sub Stream when you
are experiencing significant delay.
3.1.2 Snapshot
To take a snapshot and save it to your PC, please click the snapshot
button (located beside the record button).
3.1.3 Video Recording
Click the red record button to start recording. Recording will
automatically stop if you perform any other operation during recording.
3.2 Replay Setting
You can search and play previously recorded video
• Image
:
This allows you to get image ration at Full / 4:3 / 16:9 / 11:9
• Storage: Please choose PC for now. SD card is not yet supported
• Type
:
Filter out different types of records
• Date
:
The date which the recording is made
3.3 Video Parameter
3.3.1 Local Config
• Preview Mode - “Real Time” mode offers clear picture but cost more
network bandwidth and need more storage space; “Fluency” mode
cost less bandwidth and less storage, but picture is not as clear as
“Real Time”
• Record file size - Select the size of each recording
• PC Record File Path - Select path where you wish to store the
video recording
3.3.2 Video Settings
3.3.2.1 OSD Settings
Title
:
Change name of the camera
Color
:
Color of the camera name and time stamp
Arrows: four arrows indicates which position the title / Date / Time should
appear: Top / Bottom / Left / Right
3.3.2.2 Video Coding
You can change settings for “Main Stream” and “Sub Stream”.
3.3.2.3 Video Mask
Privacy Mask allows you to block part of the image from appearing
on video/photo. Check the “Enable Mask” box to enable video
mask. Click on the “Mask area set” to select the area which you
wish to mask from the video.
3.3.2.4 Video Parameter
You can adjust video and image setting on this page.
3.3.3 Network Settings
3.3.3.1 LAN Setting
Two different IP address allocation options are available:
DHCP: Camera get an IP address from router automatically;
Fixed IP: Assign IP address, Mask, Gateway, and DNS manually.
Notes:
• If you do not tick the “DHCP Enable” box, you have choose “Fixed IP”
• If you want to set a fixed IP for the camera, please keep the camera
in the same subnet of your router or computer.
3.3.3.2 Email
If the camera is triggered by motion detection, you can get an email
sent to your specified email address. Please test the email setting to
make sure it works.
• SMTP server: Please refer to the email service provider website
or Google it
• To: Your email account to receive alerts
• From: your email account used for send out alerts
Notes:
• Please remember to enable motion detection to get email alert
3.3.3.3 FTP
FTP server is used to upload camera snapshot captured by motion detection
to your assigned FTP address. Test after all FTP parameters filled in.
Note:
When connection to Main Server fails, the camera will attempt to save
at Sub Server and its specified path.
3.3.3.4 DDNS
This feature is used for port forwarding that enables you to access
camera via Internet or external network.
1)
Register a private DDNS account from assigned provider. Since there is no
built-in DDNS account for the camera, please go to the third party DDNS
website (such as
www.dyndns.org) to apply a new DDNS account.
2)
Go to your router’s configuration page →
port forwarding
→
input your camera’s IP address and the HTTP port number.
Once DDNS connection and port forwarding is finished,
you will be able to view the camera remotely through the
URL
http://yourdomain.Dyndns.org:port.
Notes:
• If the DDNS connection fails, please double check if you have
input the correct hostname, user name, and password, and
try to redo the settings
• The DDNS default status is off
3.3.3.5 P2P
Here you can get your UUID code. With this code, you can add and
view camera remotely from internet or external network. You will need
to use the UUID code when
“Add Camera”
on smart phone app or on
HooToo IPCamClient software in another Windows PC.
3.3.4 Storage Settings
3.3.4.1 Record Setting
You can set up to 2 scheduled time for automatic recording.
3.3.4.2 Schedule Snapshot
You can setup the camera to take continuous snapshot during certain
time of the day. If you tick the “E-mail” or “FTP” box, snapshots will be
sent to your email or uploaded to your FTP path.
3.3.5 Alarm Settings
3.3.5.1 Motion Detect
To activate motion detection:
1) Click on
“Motion area set”
2) Select motion area on live screen by dragging you mouse
3) Make the “Enable”
and
“Time1” ticked, then you can select the time
to activate motion detection
4)
Sensor can only be triggered by movements within the set motion
detection area
3.3.6 System
3.3.6.1 System info
You can change the Device Name and system language. You can also
check other system information.
3.3.6.2 System Time
You can set the system time manually or to be the same as NTP service /
local computer.
3.3.6.3 User Manage
You can create up to 2 guest accounts. Each guest account user can
use all functions in the home page of the camera, and check camera’s
device info. However guest account cannot access parameters setting
page or change other system settings.
Note:
•
P2P password is required when accessing the camera via P2P software
• The username for administrator is fixed as admin, but you can
change the password
3.3.6.4 Upgrade
If any system upgrade is made, you can install upgrades or firmware.
3.3.6.5 Device Info
In this page, you can check camera information and status
3.3.6.6 System Log
In this log page, you can search all operation record of this camera.
4. Remote Viewing on Windows PC
When you are out for travel or business, you can view your camera via
Internet remotely. To do so, please follow the following tips:
1) Go to
www.hootoo.com, download the “IPCamClient” software and
install it on a windows PC.
2) Open it, click “Add”
3) Enter the UUID code of your camera manually, and fill in other blanks,
click
“Next”
then
“Finish”
4) Se
lect your camera, click “Play”, and then you can view the live video.
Notes:
• The camera’s UUID is essential for remote viewing on both smartphone
and PC. Please make sure you remember or have a record of the UUID
with you when planning to access the camera remotely
•
Your camera needs to be connected to an internet enabled network
5. Specification
General
Item HooToo HT-IP212HDP Outdoor IP Network Camera
Device Type 1.0 Megapixel CMOS sensor
Size 1/4
Day and Night YES
Min Illumination [email protected]
(
IR ON
)
Infrared sensitivity Support
Filter IR-CUT
IR-led YES
LENS
Lens 6MM
Focus Fixed Lens
Aperture Fixed Aperture
Video
Compression H.264
Picture Resolution Main Flow: 1280*720@25fps
Minor Flow: 640*360@25fps
Flow Type Dual Stream encoding
Bit Rate 128-8192kbps
Bit Rate Type CBR/VBR
S/N Ratio >50DB
Image enhancement Auto White Balance, Backlight compensation,
Brightness,
Contrast, Saturation adjusted
Subtitles input Support channel name, date/time
Flip Configuration Up/down, Left/right
6. Warranty and Support
6.1 HooToo Warranty
This HooToo IP Camera is covered with 12 months limited product
warranty from date of its original purchase. If it becomes defective
during its warranty period, please contact HooToo or your seller for
warranty cover. The following are not covered by our warranty:
• 2nd hand purchase or purchase from a non-authorized seller/distributor
• Damages resulted from abuse, fire, poison and moisture
• Damages resulted from natural disaster
• Product been dismantled
Notes:
•
Successful product registration at
www.hootoo.com/productregistration
will add an additional 6 month of warranty cover, making a total of
18 months warranty cover from the date of original purchase.
• Please do not return the product without contacting HooToo first
• We can only provide warranty cover for products sold by HooToo
authorized distributor
6.2 Contact
For any inquiries or comment concerning our products, please contact
us via below methods. If you have an order number, please include it as
reference. We will try to respond to your inquiry as fast as possible.
01/02


