background image

Installation Guide

69-2199—05 6

HEAT PUMP

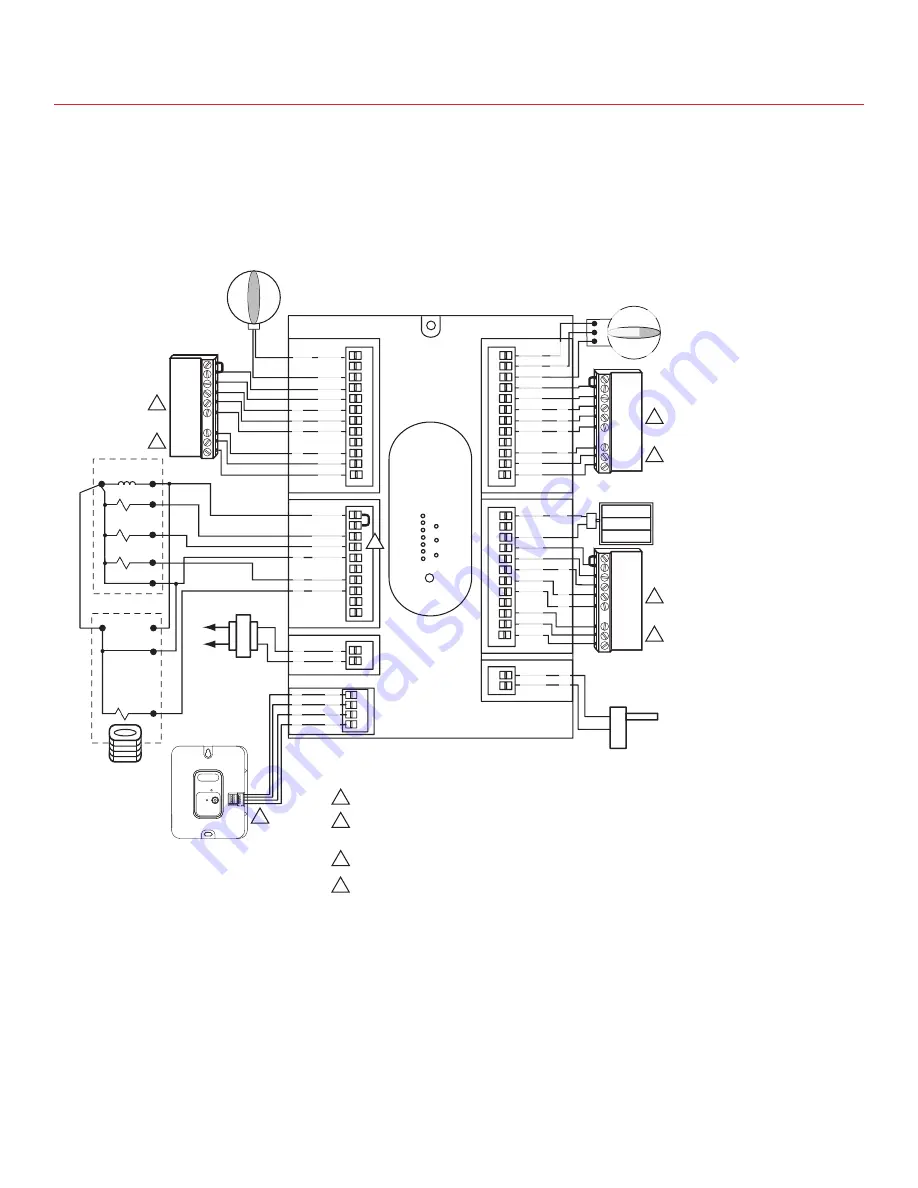
Fig. 12. Zone panel wiring—heat pump with electric auxiliary heat.

Use the following diagram for wiring a heat pump with electric auxiliary heat.

NOTE:

 You can use a conventional thermostat for a heat pump system; however, em heat can only be controlled by 

heat pump thermostats. The diagram below shows a heat pump thermostat used with a heat pump system.

1

2

1

2

1

2

RC

R

C

E

AUX

Y

G

O/B

L

RC

R

C

E

AUX

Y

G

O/B

L

RC

R

C

E

AUX

Y

G

O/B

L

1 ALTERNATIVELY LABELED W2 ON SOME THERMOSTATS.

2 FOR THERMOSTATS WITH SEPARATE O AND B TERMINALS,

ATTACH O FOR COOL CHANGEOVER OR ATTACH B

FOR HEAT CHANGEOVER.

3 IF HVAC EQUIPMENT USES THE SAME SOURCE OF HEAT FOR

AUXILIARY AND EMERGENCY HEAT, JUMPER W1/E AND W2.

4 ABCD TERMINALS FOR THE THM4000R WIRELESS ADAPTER ONLY NEVER 

WIRE A THM5320R WIRELESS EIM TO THESE TERMINALS

4

M4 OPEN

M6 CLOSED

M1 COMMON

M28020

R

C

L1

(HOT)

L2

AIR

HANDLER

FAN RELAY

EM. HEAT

AUX. HEAT

G

Y

24 VOLT TRANS.

C

R

E

W2

C7735A1000

DATS

HEAT PUMP

Y

C

R

DEDICATED

TRANSFORMER

ARD OR ZD DAMPER SPRING-OPEN POWER-CLOSED

ARD OR ZD DAMPER SPRING-OPEN

POWER-CLOSED

RRD OR MARD DAMPER POWER-OPEN

POWER-CLOSED

REVERSING VALVE

RH

RC

W1/E

W2

Y1

Y2

G

O

B

DS/BK

HZ322

HEAT 1

HEAT 2

COOL 1

COOL 2

FAN

PURGE

EM HEAT

ZONE 1

ZONE 2

ZONE 3

EMERGENCY

HEAT

M1

M4

M6

R

C

W1/E

W2

Y1

Y2

G

O/B

L

ZONE 

1

DAMPER

THERMOST

AT

M1

M4

M6

R

C

W1/E

W2

Y1

Y2

G

O/B

L

ZONE 

2

DAMPER

THERMOST

AT

SENSO

R

DATS

DATS

EQUIPMEN

T

R

C

POWE

R

M1

M4

M6

R

C

W1/E

W2

Y1

Y2

G

O/B

L

ZONE 

3

DAMPER

THERMOST

AT

3

A

B

C

D

WIRELESS

ADAPTER

WIRELESS

CONNECT

POWER

THM4000R

CONNECTED

WIRELESS SETUP

Содержание TRUEZONE HZ322

Страница 1: ...HZ322 TrueZONE Zone Panel Professional Installation Guide 69 2199 05 ...

Страница 2: ...90 RH non condensing Temperature Ratings Shipping 20 to 150 F 29 to 66 C Operating 40 to 165 F 40 to 74 C Dimensions See below Emissions Complies with FCC Class B part 15 requirements Read and save these instructions Need Help For assistance with this product please visit http customer honeywell com and or call Honeywell Zoning Hotline toll free at 1 800 828 8367 U S Registered Trademark US Patent...

Страница 3: ...r Zone 100 F 38 C 28 8 160 F 71 C 16 8 Use an SDCR Slave Damper Control Relay for addi tional dampers Maximum dampers per panel is limited by transform er size Ensure transformer is large enough to power the panel 7 5 VA and dampers Table 5 Accessories Accessory Description 40 VA transformer AT140A1042 75 VA transformer AT175A1008 Discharge Air Temperature Sensor DATS C7735A1000 SDCR Slave Damper ...

Страница 4: ...se and use the base as a template to drill mounting holes Attach the base to the wall stud roof truss or duct with appropriate screws not included Use two screws for attaching to a stud or roof truss or four screws for duct or drywall plaster installations Fig 2 Fig 3 SUPPLY DUCT DATS AT LEAST 3 FT FROM PLENUM DATS ALTERNATE LOCATION TrueZONE PANEL MOUNTED ON RETURN DUCT TrueZONE PANEL MOUNTED ON ...

Страница 5: ...zone panel To connect wire to the panel strip approximately 1 4 in of insulation and push wire into terminal To release wire press the button on top of the terminal In retrofit applications trim end of wire if not straight 3 Install dampers using instructions provided with dampers Connect dampers to zone panel NOTE Multiple dampers can be wired in parallel 4 M28023 Rc R C W W2 Y Y2 G M1 M4 M6 R C ...

Страница 6: ... assistance with the DATS see the Discharge Air Temperature Installation Instructions Form Number 69 1521 5 Connect equipment as shown here and on page 5 and 6 6 C7735A1000 M28024 SENSOR DATS DATS 8 Connect a dedicated transform er as shown DEDICATED TRANSFORMER R C M24806 R C POWER L1 HOT L2 RH RC W1 E W2 Y1 Y2 G O B DS BK M28025 HVAC FAN RELAY 24 VOLT TRANS G Y Y2 C R W COMPRESSOR RELAY W2 EQUIP...

Страница 7: ...C W W2 Y Y2 G RC R C W W2 Y Y2 G RC R C W W2 Y Y2 G RH RC W1 E W2 Y1 Y2 G O B DS BK HZ322 HEAT 1 HEAT 2 COOL 1 COOL 2 FAN PURGE EM HEAT ZONE 1 ZONE 2 ZONE 3 EMERGENCY HEAT M1 M4 M6 R C W1 E W2 Y1 Y2 G O B L ZONE 1 DAMPER THERMOSTAT M1 M4 M6 R C W1 E W2 Y1 Y2 G O B L ZONE 2 DAMPER THERMOSTAT SENSOR DATS DATS EQUIPMENT R C POWER M1 M4 M6 R C W1 E W2 Y1 Y2 G O B L ZONE 3 DAMPER THERMOSTAT A B C D WIR...

Страница 8: ...LIARY AND EMERGENCY HEAT JUMPER W1 E AND W2 4 ABCD TERMINALS FOR THE THM4000R WIRELESS ADAPTER ONLY NEVER WIRE A THM5320R WIRELESS EIM TO THESE TERMINALS 4 M4 OPEN M6 CLOSED M1 COMMON M28020 R C L1 HOT L2 AIR HANDLER FAN RELAY EM HEAT AUX HEAT G Y 24 VOLT TRANS C R E W2 C7735A1000 DATS HEAT PUMP Y C R DEDICATED TRANSFORMER ARD OR ZD DAMPER SPRING OPEN POWER CLOSED ARD OR ZD DAMPER SPRING OPEN POWE...

Страница 9: ... CONVENTIONAL NON HEAT PUMP THERMOSTATS OPTIONS TSTAT TIMER ZONES OFF ADVANCED CONFIG NO YES SAVE CHANGES NO YES COMPRESSOR STAGES 1 2 1 2 3 1 AUX HT ENABLED YES NO SET TO YES IF WIRELESS RADIO FREQUENCY THERMOSTATS AND THM4000R ADAPTER ARE USED 2 YES OPTIONS 1 2 3 ZONES INSTALLED 3 OPTIONS 1 2 3 ASKS THIS FOR EVERY ZONE ZONES INSTALLED 3 RF YES ALLOWS YOU TO VIEW CHANGE THE ADVANCED CONFIGURATION...

Страница 10: ...imit DAT HIGH LIMIT 110 F 180 F 160 F 110 deg F 180 deg F High temperature limit DATS Low Limit DAT LOW LIMIT 30 F 60 F 40 F 30 deg F 60 deg F Low temperature limit OT Temp Enabled OT SENSOR NO YES Disabled Enables or disables wireless outdoor tempera ture sensor If Disabled the Multistage OT Temp Lockout setting is Disabled NO YES Enabled OT Trip Point for Multistage Lockout OT LOCKOUT TEMP 0 F 5...

Страница 11: ...til the Check out LED lights up Use the Adjust Setting and Next buttons to work through the checkout menu as listed below See the Configuration section on page 7 for instructions on using these buttons Steps 3 10 cycle through heating and cooling stages and open and close dampers to verify proper operation of the equipment and dampers These steps energize the equipment and damper terminals Steps 1...

Страница 12: ...our 24 months from date of installation unless specified otherwise Variable frequency drive devices VFD and accessories new products for thirty six 36 months and factory refurbished drives for twelve 12 months from date of installation when start up and commissioning is performed by Honeywell VFD Authorized and trained personnel All VFD warranty return products must have prior authorization Form N...

Отзывы: