Honeywell Tradeline C7089A Скачать руководство пользователя страница 3

69-0896—1

3

C7089 OUTDOOR SENSOR

OPERATION

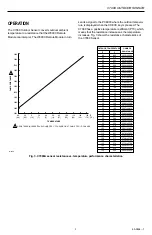
The C7089 Outdoor Sensor converts outdoor ambient
temperature to a resistance that the W8900 Remote
Module can interpret. The W8900 Remote Module in turn

sends a signal to the PC8900 where the outdoor tempera-
ture is displayed when the CHECK key is pressed. The
C7089 has a positive temperature coefficient (PTC), which
means that the resistance increases as the temperature
increases. Fig. 3 shows the resistance characteristics of
the C7089 Sensor.

OHM RESISTANCE

°F
(°C )

M6358

RESISTANCE INCREASES 4.84 OHMS PER 1°F CHANGE OR 8.7 OHMS PER 1°C CHANGE.

1

1

3800

3900

3700

3300

3400

3500

3600

3200

 TEMPERATURE

-40

(-40)

-20

(-29)

0

(-18)

20

(-7)

40
(5)

60

(16)

80

(27)

3100

2900

3000

2800

100
(38)

120
(49)

140
(60)

160
(79)

-40

-35

-30

-25

-20

-15

-10

-5

0

5

10

15

20

25

30

35

40

45

50

55

60

65

70

75

80

85

90

95

100

105

110

115

120

120

130

135

140

145

150

-40.0

-37.2

-34.4

-31.7

-28.9

-26.1

-23.3

-20.6

-17.8

-15.0

-12.2

-9.4

-6.7

-3.9

-1.1

1.7

4.4

7.2

10.0

12.8

15.6

18.3

21.1

23.9

26.7

29.4

32.2

35.0

37.8

40.6

43.3

46.1

48.9

51.7

54.4

57.2

60.0

62.8

65.6

2929 to 2905

2953 to 2929

2978 to 2953

3002 to 2978

3026 to 3002

3050 to 3026

3074 to 3050

3099 to 3074

3123 to 3099

3147 to 3123

3171 to 3147

3195 to 3171

3220 to 3195

3244 to 3220

3268 to 3244

3292 to 3268

3316 to 3292

3341 to 3316

3365 to 3341

3389 to 3365

3413 to 3389

3437 to 3413

3462 to 3437

3486 to 3462

3510 to 3486

3534 to 3510

3558 to 3534

3583 to 3558

3607 to 3582

3631 to 3607

3655 to 3631

3679 to 3655

3703 to 3679

3728 to 3703

3752 to 3728

3776 to 3752

3800 to 3776

3824 to 3800

3849 to 3824

OUTDOOR TEMPERATURE

OHMS OF

RESISTANCE

°F

°C

Fig. 3. C7089A sensor resistance vs. temperature performance characteristics.

Содержание Tradeline C7089A

Страница 1: ...in the instructions and on the product to make sure the product is suitable for your application 3 Installer must be a trained experienced service technician 4 After installation is complete check out product operation as provided in these instructions CAUTION Disconnect power supply before connecting wiring to prevent electrical shock or equipment damage Location and Mounting Fig 1 Mount the sens...

Страница 2: ...t dimming circuits electric motors or welding equipment b Avoid poor wiring connections c Avoid intermittent or missing building earth ground CAUTION Disconnect the power supply before connecting the wiring to prevent electrical shock or equipment damage Wiring must comply with applicable codes ordinances and regulations 1 Wire the C7089 Outdoor Sensor to the terminals marked OUT on the W8900 Remo...

Страница 3: ...5 30 25 20 15 10 5 0 5 10 15 20 25 30 35 40 45 50 55 60 65 70 75 80 85 90 95 100 105 110 115 120 120 130 135 140 145 150 40 0 37 2 34 4 31 7 28 9 26 1 23 3 20 6 17 8 15 0 12 2 9 4 6 7 3 9 1 1 1 7 4 4 7 2 10 0 12 8 15 6 18 3 21 1 23 9 26 7 29 4 32 2 35 0 37 8 40 6 43 3 46 1 48 9 51 7 54 4 57 2 60 0 62 8 65 6 2929 to 2905 2953 to 2929 2978 to 2953 3002 to 2978 3026 to 3002 3050 to 3026 3074 to 3050 ...

Страница 4: ...ess the CHECK key on the PC8900 until the display shows OUT followed by the temperature reading See Fig 4 The PC8900 reading should match the reading taken outdoors To verify the resistance of the sensor remove one wire from one of the C7089 wiring terminals Use an ohmmeter to measure the resistance across the sensor Then verify sensor accuracy with the temperature resistance curve of Fig 3 CALIBR...

Отзывы: