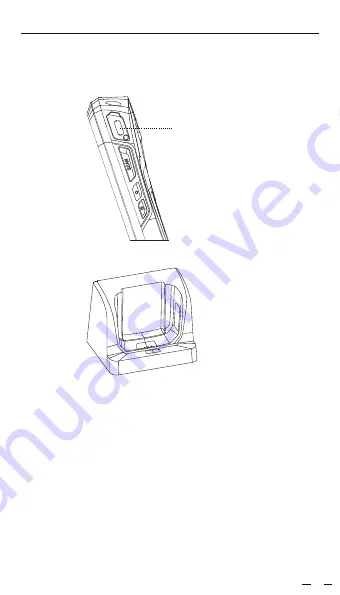
Honeywell T80 Скачать руководство пользователя страница 7

EQUIPMENT CHARGING

Type-C interface

6

1. Pull out the waterproof USB plug on the right side with the Type-C

   USB cable that comes with the device.Insert the Type-C USB cable.

2. Use cradle to charge. (Cradle comes seperately)

DEVICE CHARGING:

1. 

Battery is fully charged after 4 hours of charging, and the standby 

time is over 48 hours.

2. 

Cradle can charge 1 battery and 1 terminal simultaneously.

3. 

The left indicator light is the battery charging indicator, when the 

battery is charging, it will appear red. Light will display green once 
fully charged.

4. 

The right light is the power on indicator. Green for when power is 

on, and indicator is off when power is off.

*

To prevent the battery from being over-consumed, please charge
the device when the battery power is less than 20%. If the battery
displays over-comsumption state, please charge the device for 
20-30 minutes. This then will display a normal charging status.

Содержание T80

Страница 1: ...Quick Guide ...

Страница 2: ...n window Flash lamp Camera Card Reading area Power Button Scan Return F1 Key Microphone Type C interface Power Button Battery cover HOME Hot button Custom button 1 Screen capture power Volume 2 Custom button Setting Feature Custom Key 3 Letter input switching Press 1 A on Keyboard 1 ...

Страница 3: ...STRAP INSTALLATION Buckle As Pic1 2 Following the direction of the above arrow push the strap buckle up to secure it ...

Страница 4: ... and negative insulation yellow sticker on the battery before turning on tne device 1 Push the battery cover button in anti clockwise direction As Pic1 2 Pull out the battery cover by using the hand position between the battery cover and the bottom case ...

Страница 5: ...REMOVING THE BATTERY 4 1 Lift the strap on the battery 2 Pull the battery belt to take the battery off on 45 obliquely upward ...

Страница 6: ...D TF slot PSAM slotx 2 Micro SIM slot 5 1 Insert the SIM card into the corresponding slots as shown in the figure below Note The handheld terminal only supports Micro SIM card the standard SIM card slot is for PSAM card ...

Страница 7: ...battery and 1 terminal simultaneously 3 The left indicator light is the battery charging indicator when the battery is charging it will appear red Light will display green once fully charged 4 The right light is the power on indicator Green for when power is on and indicator is off when power is off To prevent the battery from being over consumed please charge the device when the battery power is ...

Страница 8: ...out Scan key Scan window Reset scan Function setting Enter Tab Append prefix suffix Pic1 7 1 Find the scanner app and open it As Pic 1 2 In the scan interface press scan button to scan the barcode IF PDA COMES WITH SCAN FUNCTION OPERATE AS BELOW ...

Страница 9: ... 2 8 1 Find the NFC app and open it As Pic 1 2 In the NFC interface please read the card by NFC reading area IF PDA WITH NFC FUNCTION OPERATE AS BELOW Note NFC function is optional feature you should make sure PDA includes NFC function ...

Страница 10: ...1 Select Settings About phone 2 Press System update and enter into the updating firmware interface 3 Press Check now to update the OS OUR PDA SUPPORT OTA UPDATE ONLINE FUNCTION YOU CAN UPDATE THE LATEST FIRMWARE BY OTA OPERATE IT AS BELOW ...

Страница 11: ... then please reset the scan demo for twice and operate OFF ON 5 The device cannot scan the code 1 Check each scan button can be used normally 2 Check the scan engine supports the bar code 3 Check the scanning lens and bar code is clear and unobstructed 4 Check the scan setting and reset 6 The device does not charge 1 Check the device adapter and charging port are good 2 If the device is not used f...

Страница 12: ...COMMITTED TO THE WORLD OF THINGS CREATING A SMART LIFE ...

Отзывы: