Honeywell T7560A Скачать руководство пользователя страница 4

T7560A,B,C DIGITAL WALL MODULES

95-7620-4
EN1B-0146GE51 R0303

4

CONFIGURATION (T7560A,B)

After installation, the T7560A,B DWM must be configured in
order to perform as desired. This is done by using the
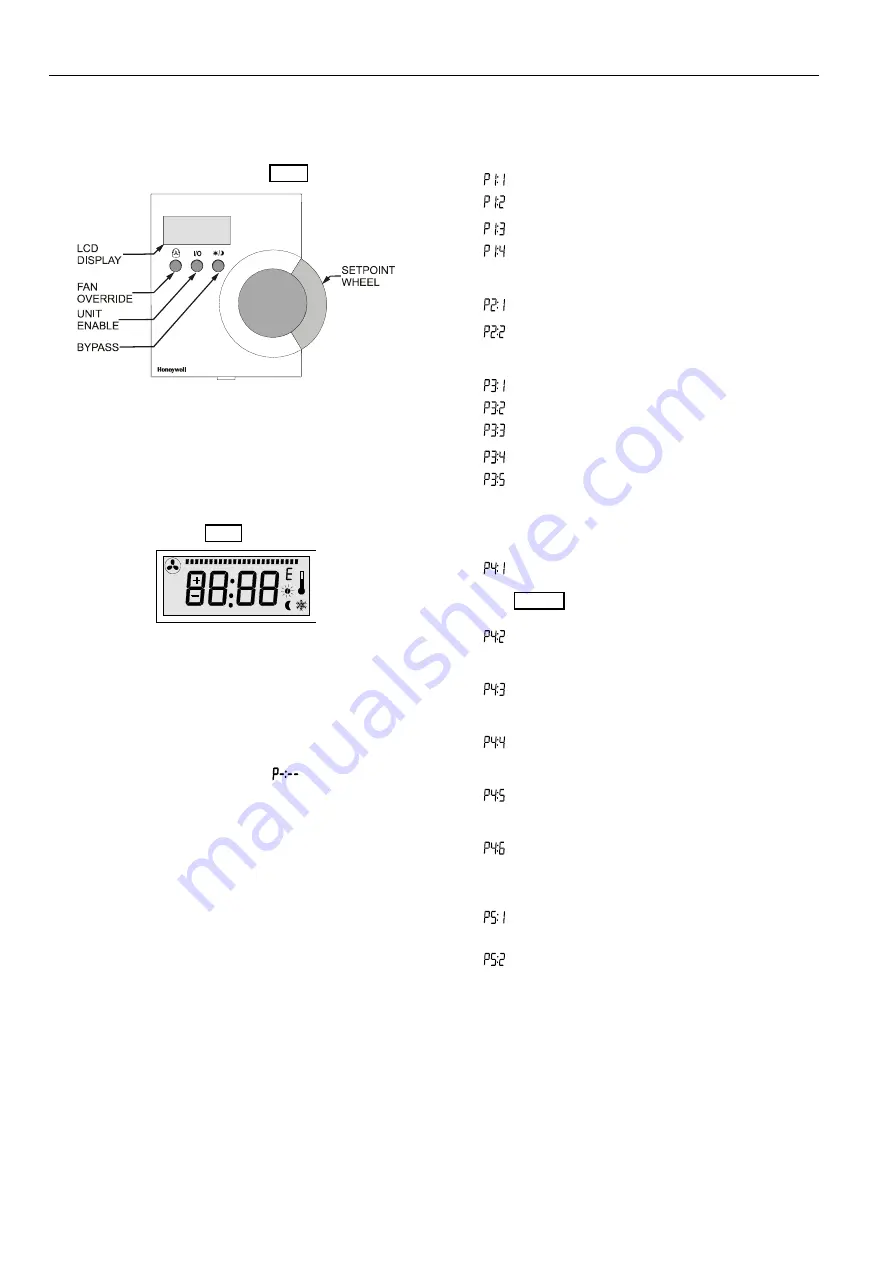
buttons and the setpoint wheel (see Fig. 7).

Fig. 7. Control elements of T7560A,B DWM

Normal Operating Mode

After the DWM is powered up by the controller, it will display
the room temperature and will operate as configured by
default; the respective default setting is marked with an
asterisk in the following.
After power-up, all display segments are switched on for
approx. one second (see Fig. 8).

AUTO

MANU

PROG

Fig. 8. Display of all segments after power-up

Entering Configuration Mode

1.  

Press FAN OVERRIDE for at least 5 seconds.

2.  

Press UNIT ENABLE, then release FAN OVERRIDE,
hold UNIT ENABLE for at least 5 seconds.

3.  

Release UNIT ENABLE.
RESULT:

The display shows 

 and the DWM is

ready for configuration (see below).

4.  

Press and hold FAN OVERRIDE while turning the
setpoint wheel to select the parameter number.
RESULT:

The parameters with their currently set

values are displayed; the 

 behind the

value indicates the currently set value (see
below for values).

5.  

Release FAN OVERRIDE and turn the setpoint wheel to
select the parameter value.

6.  

Confirm selection by pressing UNIT ENABLE.

7.  

Repeat steps 4 to 6 to configure next parameter, or
press BYPASS to leave the configuration mode.

NOTE:

After approx. 10 seconds without further action, the
DWM automatically falls back to normal mode.

P1 Setpoint Type Setting

Scale Type Setting


Fahrenheit relative


Fahrenheit absolute


Centigrade relative


Centigrade absolute

P2 Room Temperature Setting


Do not display room temperature (setpoint, only)


Display room temperature

P3 Bargraph Use Setting


No Fan


Auto, Off, On


Auto, Off, 2 Speeds


Auto, Off, 3 Speeds


Bargraph shows humidity (each segment
represents 4% rel. humidity; no fan speed
available)

P4 Controller Type Setting


New LCD signaling from controller
(only with controllers and SW versions as listed in
Table 2 or higher; set Excel 10 controller to
LCD_DISPLAY)


LED override mode from controller,
US signaling (100 ms pulses);
with contr. W7750, W7751, W7753, W7761, XL12


LED override mode from controller,
European signaling (500 ms pulses);
with contr. W7752, W7762, W7763, XL12


LED occupancy mode from controller,
US signaling (“Japan Mode”; set Excel 10
controller to LED_OCCUPANCY)


LED occupancy mode from controller,
European signaling (500 ms pulses);
with contr. W7752, W7762, W7763, XL12


Excel 500 signaling from controller
(10 V, 8 V, 6 V)

P5 Pin 4 (Bypass/Fan) Grounding


Pin 4 not shorted to GND if override is pressed 
(UV-controller, W7753)


Pin 4 shorted to GND if override is pressed

Содержание T7560A

Страница 1: ...t 50 m Twisted pair wire is recommended for wire runs longer than 100 ft 30 5 m CAUTION EMI Noise Introduction Risk of erratic system operation Keep wiring at least one ft 305 mm away from large inductive loads such as motors line starters lighting ballasts and large power distribution panels During installations try to avoid areas of high EMI noise Run wall module wiring separately from 50 Vac or...

Страница 2: ...ers listed in Table 2 and if a SW version listed in Table 2 or higher is installed If the DWM is powered via terminal 5 the Excel 10 controller must be configured for LCD_DISPLAY LED output continuously ON NOTE The 24 Vac power supply is needed only with the T7560B DWM for the humidity sensor Alternatively a DC voltage source with 5 12 V can be connected to terminal 5 see IMPORTANT note above Alte...

Страница 3: ...ring of DWM NOTE If connected to W7753 UV Controller both terminals 4 and 6 must be connected W7761 Remote I O Controller supports only terminals 2 temperature 7 humidity and 1 common as well as terminal 8 as voltage supply Wiring with terminal 8 is not necessary if An FCU or CHC controller with software is connected see table 2 An Excel 500 with 6V 8V 10V signaling from the controller is used The...

Страница 4: ...ameter value 6 Confirm selection by pressing UNIT ENABLE 7 Repeat steps 4 to 6 to configure next parameter or press BYPASS to leave the configuration mode NOTE After approx 10 seconds without further action the DWM automatically falls back to normal mode P1 Setpoint Type Setting Scale Type Setting Fahrenheit relative Fahrenheit absolute Centigrade relative Centigrade absolute P2 Room Temperature S...

Страница 5: ...cupied 01 enable FAN Key enable Setpoint Key 02 enable FAN Key disable Setpoint Key 03 disable FAN Key enable Setpoint Key 04 disable FAN Key disable Setpoint Key To disable means to switch back to FAN auto Setpoint offset zero and disable operation To enable means to make normal operation possible no action if unoccupied Unoccupied means Effective Unoccupied moon on continuously or Override Unocc...

Страница 6: ... connected to the 2 LON terminals Via the 3 5 mm jack plug a PC connection can be established Order quantity set with 5 pieces Fig 9 T7460LONJACK Mounting Remove the setpoint wheel and put in the LonJack as shown in the following Fig 10 Mounting T7460 LONJACK T7560 Blinds Same material and color as housing for covering non operational buttons Order quantity set of 50 pieces ...

Страница 7: ...T7560A B C DIGITAL WALL MODULES 95 7620 4 EN1B 0146GE51 R0303 7 ...

Страница 8: ...d Control Solutions Honeywell AG Böblinger Straße 17 D 71101 Schönaich Phone 49 7031 63701 Fax 49 7031 637493 http europe hbc honeywell com Subject to change without notice Printed in Germany Manufacturing location certified to EN1B 0146GE51 R0303 95 7620 4 ...

Отзывы: