


SmartPAC 2 with WPC Integration
1126800
Installing SmartPAC 2 and WPC
Chapter 2
page 67
Installing Flywheel Speed Sensor (Optional
Hardware Required)
WARNING
!
INJURY FROM MAGNETS THAT DETACH
Mount the magnets with the brass screws provided. If you mount them with plastic screws
or adhesive, the attaching means could fail and the magnets become dangerous projectiles,
especially from high-speed presses.
Failure to comply with these instructions could result in death or serious injury.
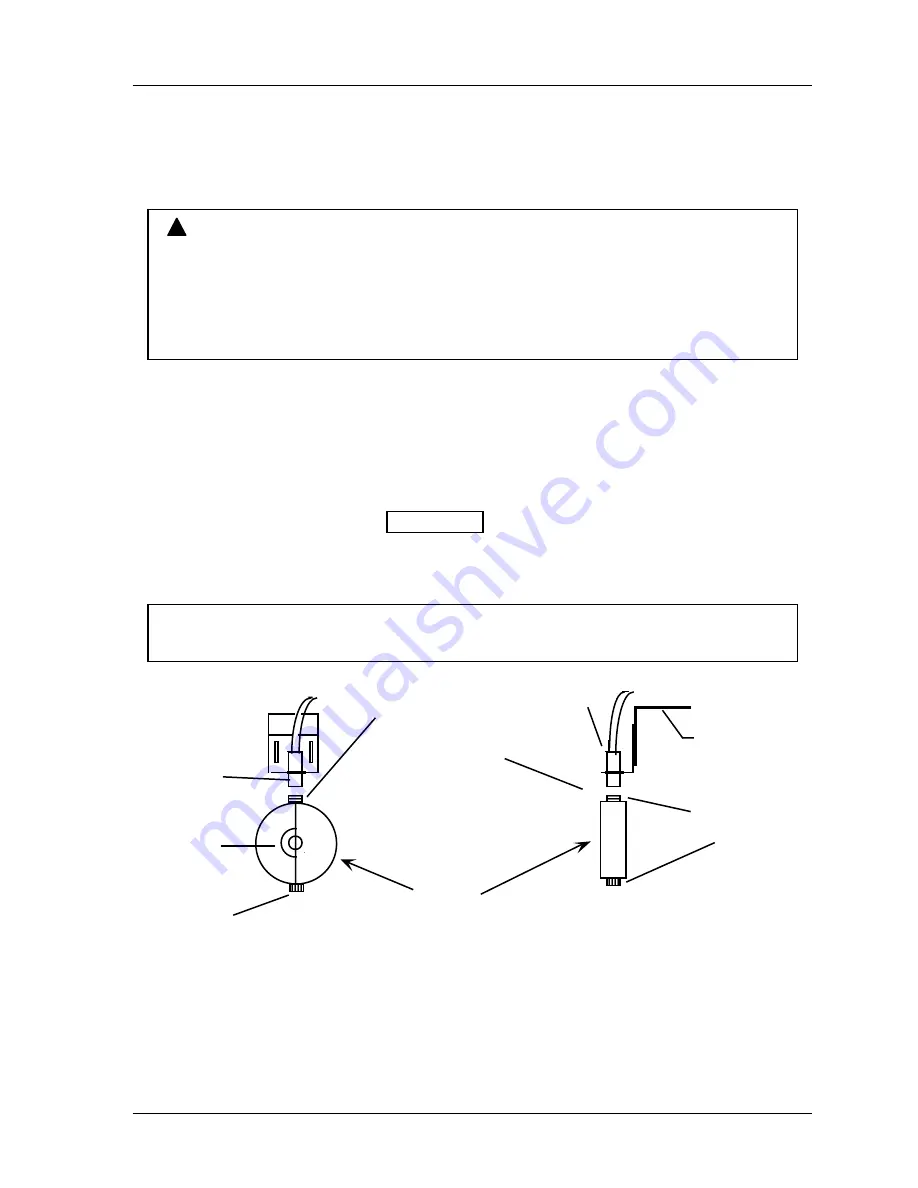
1. Select a mounting location for a Latching Magnetic Cam Switch (LMCS) and two
magnets so that the LMCS can detect the magnets as they rotate on the flywheel. The
magnets should be mounted approximately 180 degrees apart. This will ensure that the
LMCS turns from off to on once per revolution.
2. Fabricate a bracket to position the LMCS 1/16” to 1/8” from the face of the magnets. If
possible, make the bracket adjustable.
3. Install the LMCS as shown in Figure 2 - 16. To mount the magnets, make sure you use
non-magnetic brass or nylon screws, or epoxy adhesive. The magnets should be
installed plastic side up with a non-ferrous metal screw. It is important not to use a
ferrous screw because it could cause false signals. A brass screw is supplied.
NOTICE
Be sure to position the red and blue magnets on the flywheel approximately 180° apart.
Side View
rigid bracket to
press frame
LMCS sensor
Front View
mounted
dead center
1/16" to
1/8"gap
between
magnet and
sensor
±180° dwell
flywheel
Blue
magnet
Red magnet
Red magnet
Blue magnet
Figure 2 - 16. Installing the LMCS and Magnets
4. After the LMCS is installed, you are ready to wire it to the WPC main processor board.
Black wire goes to terminal 25; white goes to terminal 22; red goes to terminal 23.
Содержание SmartPAC 2
Страница 192: ...1126800 SmartPAC 2 with WPC Integration Page 170 Chapter 2 Installing SmartPAC 2 and WPC ...
Страница 222: ...1126800 SmartPAC 2 with WPC Integration Page 200 Chapter 3 SmartPAC 2 Keyboard Displays and Operating Modes ...
Страница 294: ...1126800 SmartPAC 2 with WPC Integration Page 272 Chapter 4 SmartPAC 2 Initialization Mode ...
Страница 342: ...1126800 SmartPAC 2 with WPC Integration page 320 Chapter 5 SmartPAC 2 Program Mode ...
Страница 404: ...1126800 SmartPAC 2 with WPC Integration Page 382 Chapter 6 SmartPAC 2 Run Mode ...
Страница 448: ...1126800 SmartPAC 2 with WPC Integration Page 426 Chapter 7 SmartPAC 2 Fault Messages ...
Страница 476: ...1126800 SmartPAC 2 with WPC Integration page 454 Appendix C Updating SmartPAC 2 Firmware ...
Страница 478: ...1126800 SmartPAC 2 with WPC Integration page 456 Appendix D SmartView Remote Viewing and E mail Setup ...
Страница 480: ...1126800 SmartPAC 2 with WPC Integration page 458 Appendix E Upgrade from Original SmartPAC to SmartPAC 2 ...
Страница 482: ...1126800 SmartPAC 2 with WPC Integration page 460 Appendix F Replacing SmartPAC 2 PC Board ...
Страница 492: ...1126800 SmartPAC 2 with WPC Integration page 470 Glossary ...