Rapid Eye Hybrid LT Unit:
Quick Setup
© 2013 Honeywell International Inc. All rights reserved. No part of this publication may be
reproduced by any means without written permission from Honeywell. The information in this
publication is believed to be accurate in all respects. However, Honeywell cannot assume
responsibility for any consequences resulting from the use thereof. The information contained
herein is subject to change without notice. Revisions or new editions to this publication may be
issued to incorporate such changes.
+1.800.323.4576 (North America only)
https://www.honeywellsystems.com/ss/techsupp/index.html
Document 800-07768V4 Rev A 01/2013
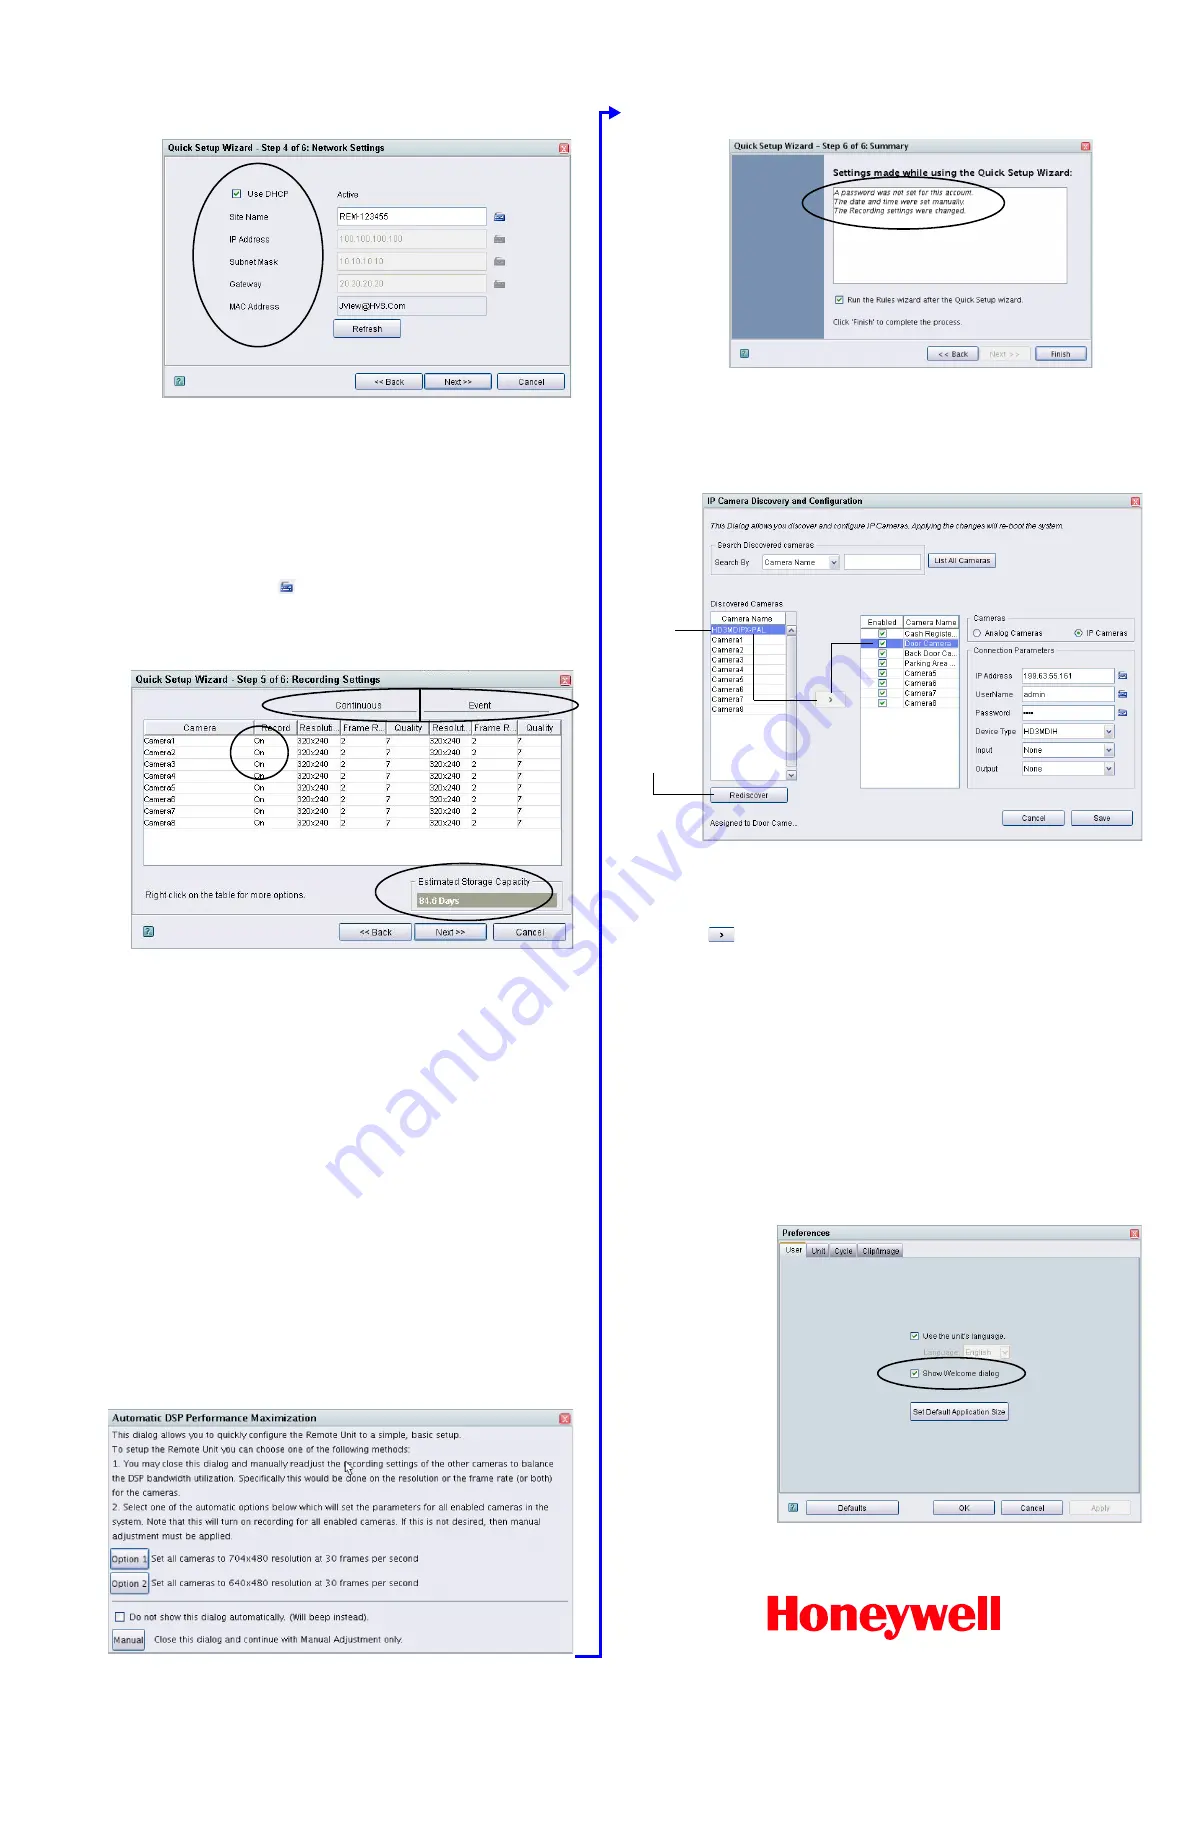
9 Network Settings
Standalone LocalView-Only Units
If the Rapid Eye Hybrid LT unit is not connected to a network,
leave the fields
blank
in step 4 of the Quick Setup Wizard and then click
Next
.
Using a Network Connection
Enter a name for the DVR using the
Site Name
text box. Your network
administrator will know whether
DHCP
should be used, or if a network
address for the unit needs to be manually input. For Network Address
Translation (NAT, the use of one IP address for many units), enter the
Internet router’s inside IP
address into the
Gateway
text box.
Click the keyboard icon (
) to open the virtual keyboard for each one of
these fields and enter the appropriate network values.
10 Recording Settings
Recording Continuous Video
Analog
Cameras
Connected analog cameras are detected automatically when the unit is
powered up or re-booted. Cameras are listed in a table. To record video, click
the cell in the
Record
column for a camera and select
On
. Video from that
camera is recorded using the settings in the Continuous
Resolution
,
Frame
Rate
and picture
Quality
columns. Click a cell to change the
Resolution
,
Frame Rate
or
Quality
values. See
12 IP Camera Discovery and Setup
for
more information on setting up and using IP cameras in the Rapid Eye Hybrid
LT system.
Event Video Recording
Set the Event recording settings to higher values than those for Continuous
recording. While monitoring video, an operator can then increase the video
recording settings, as needed.
Note
IP cameras can only adjust the Frame Rate setting for Event
recording. The Resolution and Quality settings are the same for
Continuous and Event recording.
Optimization
When setting values for Continuous recording, monitor the
Estimated
Storage Capacity
value to ensure that the length of the video archive meets
the needs of your organization.
On DVRs with many cameras that are inputting very high values on every
camera, suggestions for maximizing the performance of the unit can be
produced (see the image below). There can be more than the two
Option
buttons to select, depending on the number of cameras you are using.
11 The Report of the Wizard’s Activity
Before finishing the Quick Setup Wizard, you have the option of running the
Rules Wizard. The Rules Wizard is used to automate Event recording and is
explained in the LocalView online Help. Click
Finish
to close the Quick Setup
Wizard.
12 IP Camera Discovery and Setup
IP cameras must be added after the Setup Wizard has completed. Select
Cameras
on the
Configuration
tab of the leftmost pane of the LocalView
window. Click the
Camera Configurations
button.
The IP Camera Discovery and Configuration screen opens and lists auto-
discovered IP cameras. Select a discovered IP camera and click the arrow
(
) to assign it to the selected Rapid Eye channel. Channels that have an
IP camera assigned can be switched back to analog by selecting the
Analog
Cameras
radio button for that channel.
Confirm and modify (if needed) the IP camera’s Connection Parameters (
IP
Address
,
UserName
,
Password
, and so on). Click
Save
. If one or more
cameras have been changed from analog to IP, or from IP to analog, the Save
button becomes a
Save & Reboot
button. You will be warned that saving
these changes requires the unit to reboot. Make all of the camera changes
necessary (to avoid rebooting the DVR unit multiple times), then click
Save &
Reboot
to reboot the unit.
The IP cameras can now be viewed and recorded, once the unit has booted
back up. Now that the IP cameras have been assigned to a video channel, go
to the Recording Settings window to set up the recording resolution, frame
rate and quality settings for the IP cameras that you have assigned to the
Rapid Eye unit.
Access to the Quick Setup Wizard
Select a
Discovered
camera and
click the
arrow (
>
) to
assign it to
the selected
video channel
on the rapid
Eye unit
Click
Rediscover
to refresh the
list of
discovered IP
cameras.
The
Quick Setup
button
(and the Welcome to
LocalView window) are
hidden when the
Do not
show this dialog again
check box is selected (see
).
To make the
Quick Setup
button available again,
select the
Show Welcome
Panel
option in the
LocalView User
Preferences window (select
the drop-down arrow next
to the logged in user name
in the top right corner). You
can then run the Quick
Setup Wizard the next time
you log on to LocalView.


