background image

It is important that the installation instructions below are followed for successful installation of this 

portable air conditioner. Please call Customer Support if you have any difficulties or queries regarding 

these installation procedures.

1. Install the plastic hose with window bracket adapter and hose connector on both sides.

Ensure proper fit on both ends.

2. Adjust the window bracket as per width or

height of your window and insert the plastic pins
to fix at the desired position. There is a hole
where the Plastic Hose will be inserted later.
Make sure this hole is not blocked.

3. Connect the plastic hose to the hose

connector on back of the unit. Push-in until it
is locked in place.

4. Connect the window bracket to the opposite

end of the plastic hose. Ensure that all
connections are tight and installed properly.

Note:

After setting the window bracket to the size of your 

window, please remove it from the window and 

follow the instructions below.

INSTALLATION

1.
2.
3.
4.
5.

Window Bracket Kit.............................
Window Bracket Panel Adapter...........
Plastic Pin............................................
Hose Connector..................................
Plastic Hose........................................

Installation Kit:

Installation Steps:

1 Set
1 Piece
2 Pieces
1 Piece
1 Piece

Plastic Pin

Hole for Plastic Hose

20" to 47" (50.5cm to 119cm)

5. Connect the window bracket to the window.

6. The Portable Air Conditioner is now ready to use.

1

2

5

3

x 1

x 1

x 1

x 2

x 1

4

EN

3

Plastic Hose: 
Dia. 5" (12.7cm)
Length: 12" to 47" (30cm~120cm)

Содержание MN09 Series

Страница 1: ...09CHESWW MN10 Series MN10CES MN10CESBB MN10CESWW MN10CHES MN10CHESBB MN10CHESWW MN12 Series MN12CES MN12CESBB MN12CESWW MN12CHES MN12CHESBB MN12CHESWW MN13 Series MN13CES MN13CESBB MN13CESWW MN13CHES MN13CHESBB MN13CHESWW Refurbished Portable Air Conditioner User Manual Read and save these instructions before use EN ...

Страница 2: ...nit automatically evaporates the condensate through the air outlet hose There is no need to empty the drainage tank except in very humid conditions Read and follow the instructions carefully Follow installation instructions to set up the unit Plug the unit into a properly grounded circuit DO NOT plug into an extension cord Important Before installing the unit place it UPRIGHT for 1 hour before use...

Страница 3: ...se caution to prevent tripping on cord DO NOT use in areas where gasoline paint or other flammable goods are stored Basic safety precautions should always be followed when using electrical appliances This appliance has been manufactured for use in domestic environments and should not be used for other purposes Only use the installation kit provided to install this unit DO NOT attempt to extend the...

Страница 4: ...nect the plastic hose to the hose connector on back of the unit Push in until it is locked in place 4 Connect the window bracket to the opposite end of the plastic hose Ensure that all connections are tight and installed properly Note After setting the window bracket to the size of your window please remove it from the window and follow the instructions below INSTALLATION 1 2 3 4 5 Window Bracket ...

Страница 5: ...l it l Set 2 Window Bracket Panel Adapte 1 Piece 3 Fxhaust Hose Co11neclo1 L P1ecP Installation Steps xl 4 Hole Co e 5 Exlwus Hose xl xl Piece 1 Piece l Install the exl ausl hose with window bracket adapter and exhaust rooi connector 011 bolh sides l nsure proper tit on both ends L Tile Nrndow Br 1cke t clprroxm cJlley JO cm 19 i rnrlw lo 011 io r11 tall to vv1ndows und bdlco11y door of odfcrE nt ...

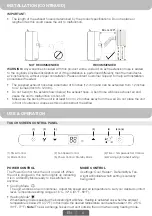
Страница 6: ...ent hose will block exhaust air and cause the unit to malfunction or shut off Make sure the back of the unit is at least 50 cm 20 inches away from the wall Do not place the unit in front of curtains or drapes as this could obstruct the airflow USE OPERATION TOUCH SCREEN CONTROL PANEL POWER CONTROL The Power Control turns the unit on and off When the unit is plugged in this button lights up indicat...

Страница 7: ...in air conditioning mode AUTO TURN ON When unit is in a standby mode plugged in with power light on then press the or button to select the number of hours until you want the unit to automatically start running TEMPERATURE TIMER SET CONTROLS WARNING LIGHT Condensed water may accumulate in the unit If the internal tank becomes full the Power Control light will flash and the unit will not operate unt...

Страница 8: ...vice complies with part 15 of the FCC Rules Operation is subject to following two conditions 1 this device may not cause harmful interference and 2 this device must accept any interference received including interference that may cause undesired operation This equipment has been tested and found to comply with the limits for a Class B digital device pursuant to part 15 of the FCC Rules These limit...

Страница 9: ... air conditioner from the power supply Remove the air filter and clean with water Dry the air filter and then reinstall onto the unit Disconnecting the Window Installation Kit Cover the air conditioner with a cloth plastic bag before storage to protect from dust and scratches collecting on the surface of the unit It is recommended to coil the power cord and store it away from the floor to ensure t...

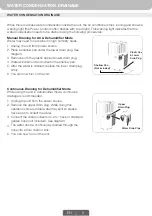
Страница 10: ...6 Unplug the unit from power source Place a shallow pan under the lower drain plug See diagram Remove both the plastic cap and lower drain plug Water will drain out and collect in the shallow pan After the water is drained replace the lower drain plug firmly You can now turn on the unit 1 2 3 4 5 Unplug the unit from the power source Remove the upper drain plug While doing this operation some resi...

Страница 11: ...d Connect exhaust hose as per instructions on page 4 Runs but not cooling A door or window is open The air filter is dirty The exhaust hose is detached Temperature setting is too high Air outlet or intake is blocked Make sure the window or door is closed Clean the air filter Reinstall exhaust hose properly refer to Installation section Reduce temperature setting on control panel Remove blockage Ex...

Отзывы: