

USING THE KEYPAD
The Lyric Smart Keypad can control the security functions of the Lyric Smart Controller. The keypad also has two menus for setting various
options (see Keypad Settings Menu below). Refer to the Lyric Smart Controller’s User Guide for more information about Security functions.
Keypad System Functions
To Access User Settings
1.
Press and hold the Select [1 ] key until the menu begins.
2.
Use the Scroll [0] key to scroll the settings.
3.
Use the Select key to choose the desired menu item.
4.
Use the Scroll key to toggle the menu options.
5.
Press the Select key to save your settings.
-- Press Cancel at any time to exit the menu.
User Settings Menu (brackets [ ] indicate default values; greater than
symbol “>” on keypad display indicates keypad’s current setting)
Options
Setting
Notes
Chime
[On]/Off
On: keypad beeps when a zone is faulted if
Chime mode is turned on at the control**
Off: keypad does not beep upon faulted zones
Exit Tone
(beeps)
[On]/Off
On: keypad beeps during exit delay period
Off: keypad does not beep during exit delay
Entry Tone
(beeps)
[On]/Off
On: keypad beeps during entry delay period
Off: keypad does not beep during entry delay
Voice
Volume
[Med]/High/Off
Adjusts the desired volume for keypad
announcements.
Off: mutes arm/disarm announcements;
alarms are always announced
Key Level
[Med]/High/Low
Adjusts the brightness of key lighting.
Display Level [Med]/High/Low
Adjusts the brightness of the display.
Backlight
(for display)
[Always On]
Auto Off
On Alarm Only
Always On: display remains always on
Auto-Off: display turns off after a period of
inactivity.
On Alarm display turns on when an
Only:
alarm occurs and remains lit until
the keypad is disarmed.
**
Residential Monitor Zone Type Note: If using Residential Monitor zone type and the
respective chime at the keypad is desired, the keypad must be set for Chime = ON,
Firmware Upgrades
Software upgrades may be available for this product. Upgrades can be
installed manually using the Lyric Smart Controller or can be done via
AlarmNet 360
™
.
To upgrade the keypad firmware using the Lyric Smart Controller, go
to the following Controller menu and follow the prompts:
Security > Tools > Master Code > Advanced > Upgrade Sensor Firmware
After performing the upgrade command, the keypad displays the
upgrade status then, when done, automatically resets twice. After the
keypad completes the reset, it returns to normal operation.
RF Exposure
Warning – The antenna(s) used for this device must be installed to provide a separation distance of at least 7.8
inches (20 cm) from all persons and must not be co-located or operating in conjunction with any other antenna
or transmitter except in accordance with FCC multi-transmitter product procedures.
Mise en Garde
Exposition aux Frequences Radio: L'antenne (s) utilisée pour cet émetteur doit être installée à une distance
de séparation d'au moins 7,8 pouces (20 cm) de toutes les personnes.
To Access the Advanced Menu
1.
Press and hold the [3] key until “Advanced Menu Use Scroll Key” is
displayed.
2.
Use the Scroll [0] key to scroll the menus.
3.
Use the Select key to choose the desired menu item.
4.
Use the Scroll key to view the information.
-- Press Cancel at any time to exit the menu.
Advanced Menu
Setting
Options
Notes
Firmware
Use Scroll to
choose firmware
components
App (version level)
Touch (touch screen)
Boot (boot loader)
RF6 (comm. protocol)
MAC (MAC ID)
Displays the various keypad
component firmware versions.
See Firmware Upgrades section for
details on upgrading the firmware.
MAC: displays the keypad’s MAC ID.
Default Keypad
Cancel/Delete
NOTE: After 24 hours,
the “Delete” function
is disabled. If selected
after 24 hours, “Must
use panel to delete” is
displayed. If keypad
removal is needed, the
keypad must be
deleted from the
associated controller
using the controller’s
programming options.
Delete: if used within 24 hours of
initial enrollment, allows keypad
reenrollment in a specific controller
in case enrollment in that controller
failed (i.e., the keypad inadvertently
enrolled in a different controller).
“Delete” resets the keypad to
factory default settings and
removes the communication link
data in the controller in which it is
enrolled, allowing the keypad to be
reenrolled in the desired controller.
Cancel: exits from Default Keypad
screen without making a change.
Reset Keypad
Cancel/Select
Use to manually reset the keypad.
FEDERAL COMMUNICATIONS COMMISSION & INDUSTRY CANADA STATEMENTS
The user shall not make any changes or modifications to the equipment unless authorized by the Installation
Instructions or User's Manual. Unauthorized changes or modifications could void the user's authority to operate the
equipment.
CLASS B DIGITAL DEVICE STATEMENT
This equipment has been tested to FCC requirements and has been found acceptable for use. The FCC requires the
following statement for your information: This equipment generates and uses radio frequency energy and if not
installed and used properly, that is, in strict accordance with the manufacturer's instructions, may cause interference
to radio and television reception. It has been type tested and found to comply with the limits for a Class B computing
device in accordance with the specifications in Part 15 of FCC Rules, which are designed to provide reasonable
protection against such interference in a residential installation. However, there is no guarantee that interference will
not occur in a particular installation. If this equipment does cause interference to radio or television reception, which
can be determined by turning the equipment off and on, the user is encouraged to try to correct the interference by
one or more of the following measures:
•
If using an indoor antenna, have a quality outdoor antenna installed.
•
Reorient the receiving antenna until interference is reduced or eliminated.
•
Move the radio or television receiver away from the receiver/control.
•
Move the antenna leads away from any wire runs to the receiver/control.
•
Plug the receiver/control into a different outlet so that it and the radio or television receiver are on different
branch circuits.
•
Consult the dealer or an experienced radio/TV technician for help.
INDUSTRY CANADA CLASS B STATEMENT
This Class B digital apparatus complies with Canadian ICES-003.
Cet appareil numérique de la classe B est conforme à la norme NMB-003 du Canada.
FCC / IC STATEMENT
This device complies with Part 15 of the FCC Rules, and RSS-210 of Industry Canada. Operation is subject to the
following two conditions: (1) This device may not cause harmful interference, and (2) This device must accept any
interference received, including interference that may cause undesired operation.
Cet appareil est conforme à la partie 15 des règles de la FCC & de RSS-210 des Industries Canada. Son
fonctionnement est soumis aux conditions suivantes: (1) Cet appareil ne doit pas causer d’interférences nuisibles. (2)
Cet appareil doit accepter toute interférence reçue y compris les interférences causant une réception indésirable.
SUPPORT & WARRANTY
For the latest documentation and online support information,
please go to: https://mywebtech.honeywell.com/
For the latest warranty information, please go to:
www.honeywell.com/security/hsc/resources/wa.
For patent information, see www.honeywell.com/patents
MyWebTech
Warranty
Patents
Ê800-19484V1vŠ
800-19484V1 11/15 Rev. D
2 Corporate Center Drive, Suite 100
P.O. Box 9040, Melville, NY 11747
Copyright
2015 Honeywell International Inc.
www.honeywell.com/security
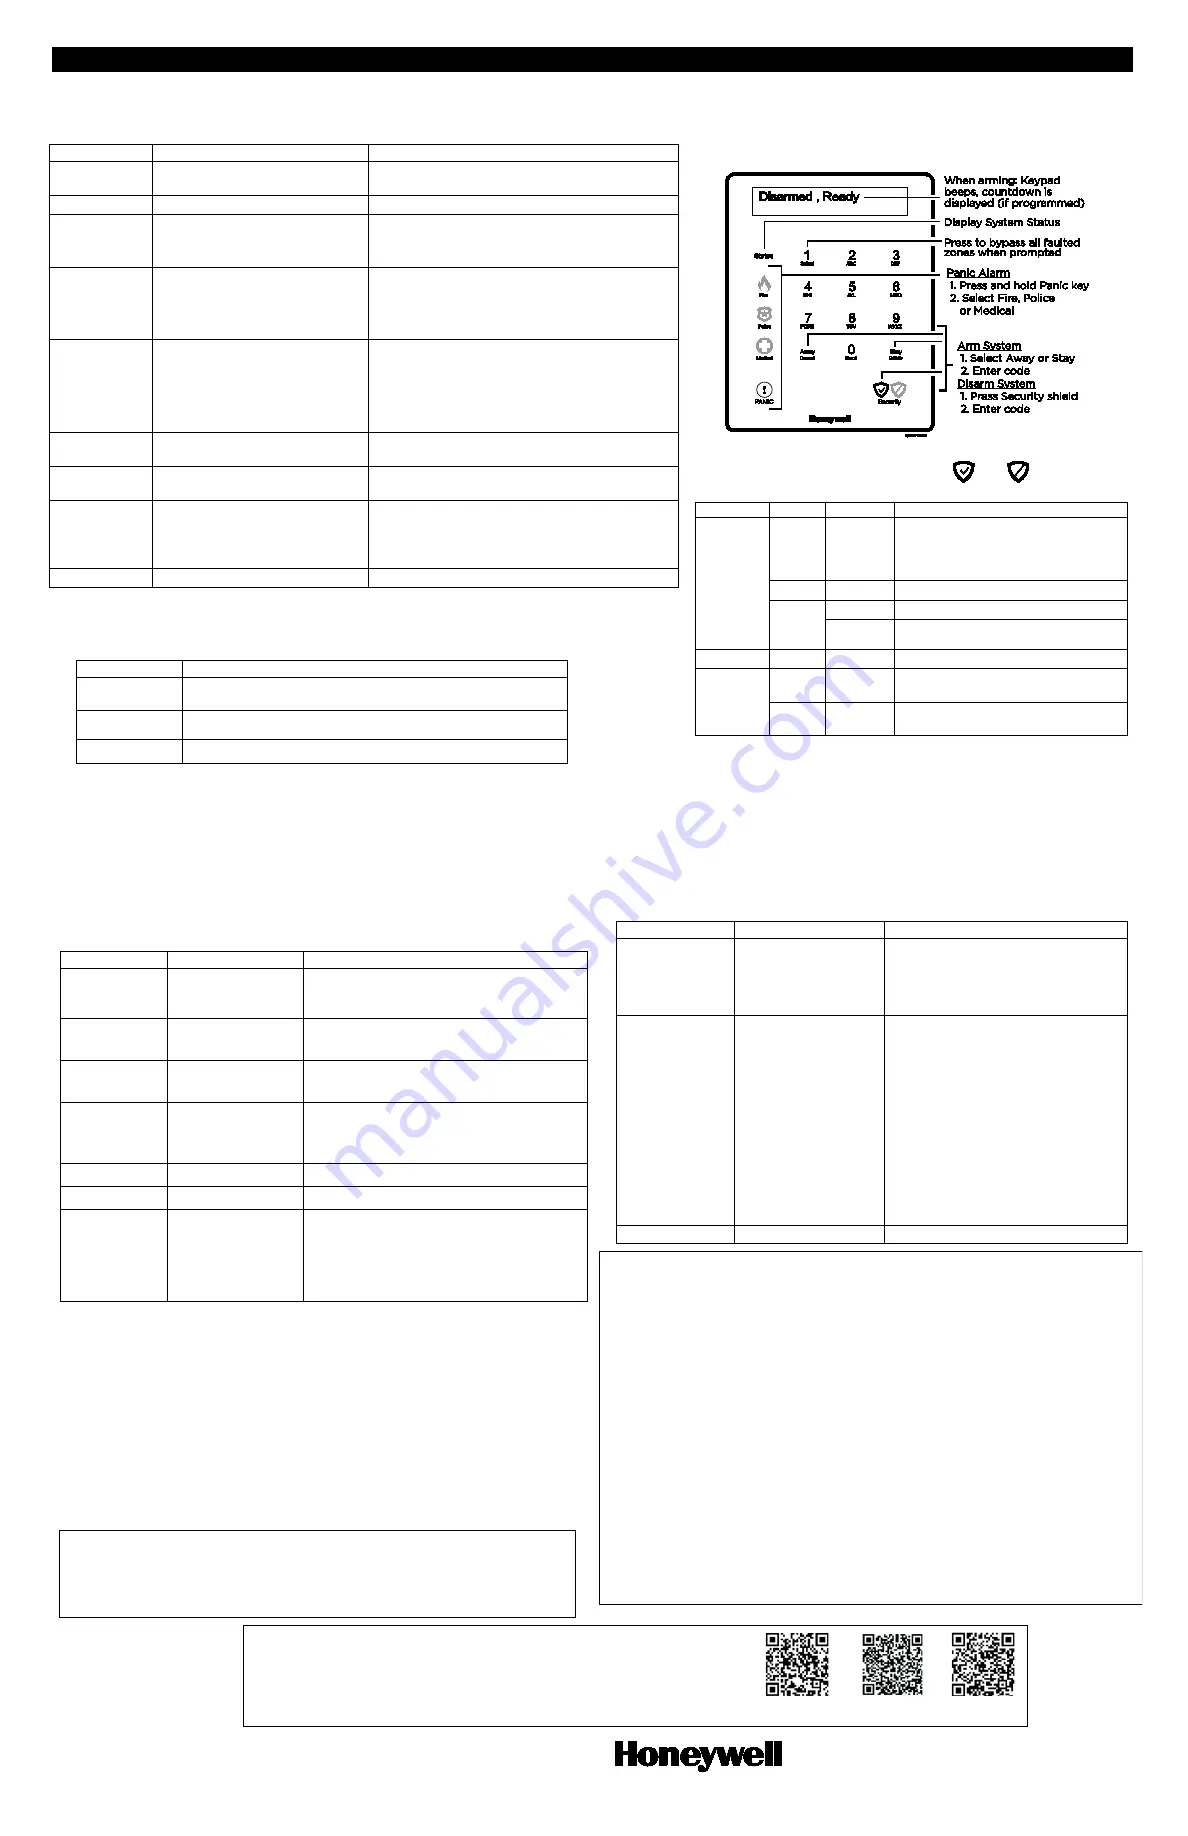
FUNCTION
PRESS
NOTES
Shield & Panic Indicators
The Security shield is a single key; the
and
icons are
not separate buttons. Security status is indicated by color:
Indicator Color
State
Meaning
Security
Shield
unlit
unlit
•
System disarmed, not ready to arm,
(press Status key to show faults)
•
Zone fault or zone trouble
•
AC loss or low battery
Green
lit steady
•
System ready to arm
Red
lit steady
•
System armed
blinking
•
Exit delay in progress, system
arming
Status
White
blinking
•
AC Loss or low battery
Panic
unlit
unlit
•
Not active.
•
AC loss or low battery
Red
lit steady
•
Active, waiting for selection of
panic alarm type.
Arm Away
Away then enter user code.
Exit delay begins. System arms in Away mode.
(see User Guide for Auto-Stay option, if enabled)
Arm Stay
Stay then enter user code.
Exit delay begins. System arms in Stay mode.
Quick Arm
(if programmed)
Hold Security Shield for 3
seconds, then select Away or
Stay arming mode.
Quick Arm allows arming the system without
entering a user code.
Exit delay begins. System arms in selected mode.
Bypass Zones
(if zones are
faulted)
With system not ready:
Away or Stay then enter user
code.
Press Select when prompted.
System automatically bypasses all faulted zones
and arms in the selected mode.
NOTE: Force Bypass must be enabled at the
controller for this feature to operate.
Panic
(if programmed)
Hold Panic key for 3 seconds,
then select:
•
Fire
•
Police (default = silent)
•
Medical
The 3 Panic keys light red until one is selected,
then:
•
An alarm signal is sent to the central station
•
Alarm sounding starts (if programmed to do so)
•
If the selected Panic function is programmed to
be silent, the keypad returns to normal state.
Disarm
Security Shield, then enter user
code.
System disarms.
Cancel Silent
Panic Alarm
Security Shield, then enter user
code.
Panic alarm is canceled.
Display
security status
Status
Displays the system’s current security status.
(Armed/Disarmed, Away/Stay/Custom
arming
mode,
exit countdown, Ready/Not Ready, Fault,
Trouble and Bypass conditions.)
Cancel
Cancel
Cancels the entry and returns to Status display.
Keypad Settings Menu
There are two Settings menus: User Settings and Advanced Menu. Use the Select,
Scroll and Cancel keys to navigate the menus.
Key
Function
Select [ 1 ]
Press and hold to start the Settings menu.
Also used to select menu options.
Scroll [ 0 ]
Press to scroll through the available menus and the settings
in menus.
Cancel (Away) Cancels the current entry and returns to Status display.


