background image

18

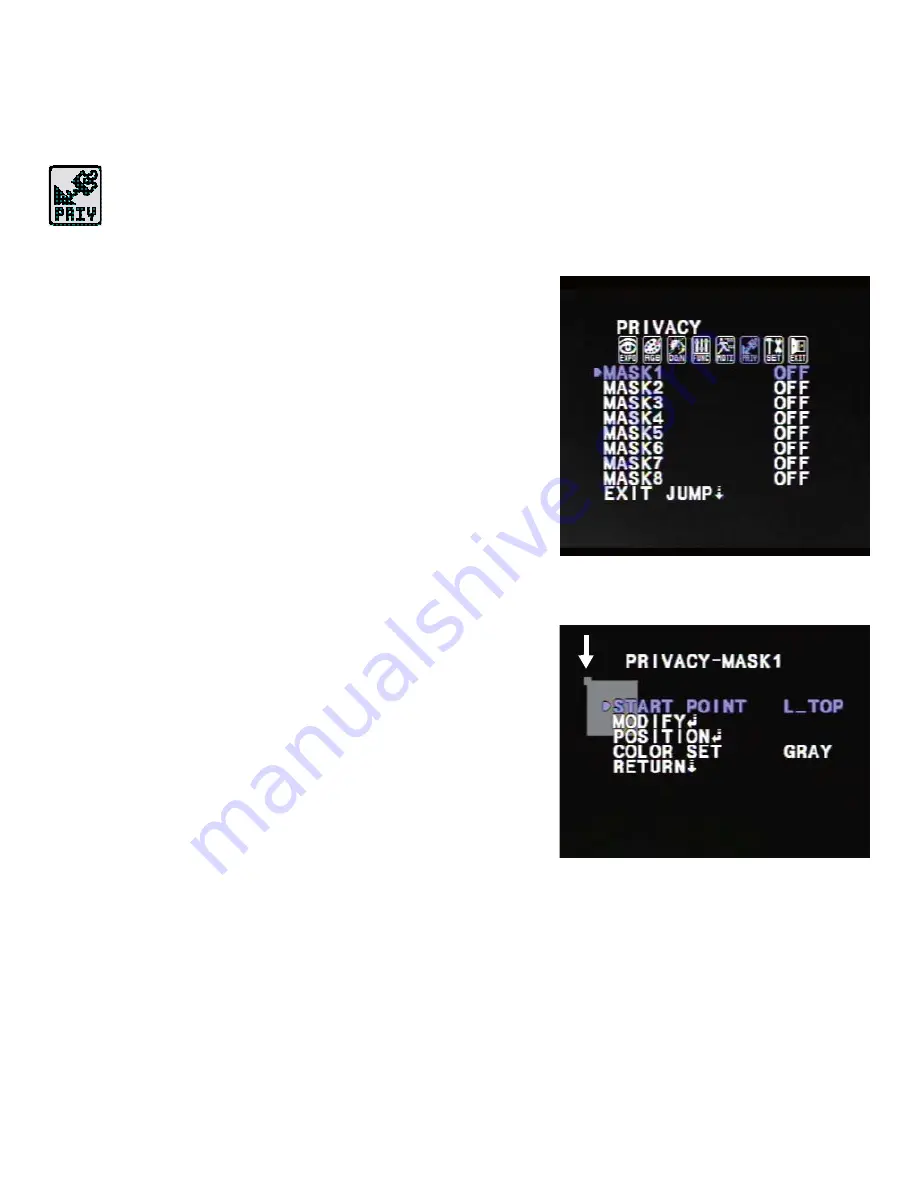
Privacy Menu

PRIVACY

  MASK 1 to MASK 8

You can hide some parts of the screen using 
privacy masking. Set 

PRIVACY MASK

 to 

ON

 or 

OFF

. You can create up to eight privacy masks. 

To set up a privacy mask

1.

Select a privacy mask and set it to 

ON

.

2.

Select 

ON

 to enter the mask submenu. In 

this submenu, you can set the area to be 
masked and the shape and color of the 
mask.

3.

To modify the shape of the privacy mask, 
select a 

START POINT

 (for example, 

L_TOP

), and then select 

MODIFY

. Drag the 

selected corner of the mask using the OSD 
controller joystick. Press and hold the 
joystick to return to the previous menu. 

4.

Continue modifying the mask until it is the 
desired shape.

5.

Select 

POSITION

 to reposition the mask on 

the screen using the joystick.

6.

Select 

COLOR SET

 to set the mask color. Privacy masks can be set to eight different 

colors: 

GRAY

BLACK

WHITE

RED

GREEN

BLUE

MAGENTA

, and 

CYAN

.

Содержание HD3DS

Страница 1: ...Document 800 13601V1 Rev A 05 2013 Configuration Guide 3 Inch Minidome High Resolution Indoor Minidome Camera HD3DS HD3DSX HD3HRS HD3HRSX ...

Страница 2: ...3 New document based on 800 13601 adding HD3DS X models TO REDUCE THE RISK OF ELECTRIC SHOCK DO NOT REMOVE COVER OR BACK NO USER SERVICEABLE PARTS INSIDE REFER SERVICING TO QUALIFIED SERVICE PERSONNEL CAUTION DO NOT OPEN RISK OF ELECTRIC SHOCK ...

Страница 3: ...ntents Introduction 4 Programming the Camera 4 Exposure Menu 6 Color Menu 10 Day Night Menu 12 Function Menu 14 Motion Menu 16 Privacy Menu 18 Setup Menu 19 Exit Menu 22 Troubleshooting 23 Specifications 24 ...

Страница 4: ...Installation Guide Programming the Camera The camera is programmed using the on screen display OSD menus You can connect a portable monitor during installation using the supplied adapter cable To show the OSD main menu press the OSD controller joystick located on the camera control board Move the joystick up or down to navigate through the menu options Move the joystick right to change a menu sett...

Страница 5: ...N EXIT JUMP 3 DAY NIGHT D N MODE NIGHT C NIGHT A EXIT JUMP 4 FUNCTION MIRROR SHARPNESS GAMMA SLC NIGHT UP EXIT JUMP 5 MOTION AREA SET SENSITIV SHOW INDI EXTER OUT EXIT JUMP 6 PRIVACY MASK 1 MASK 2 MASK 3 MASK 4 MASK 5 MASK 6 MASK 7 MASK 8 EXIT JUMP 7 SETUP TITLE DPC SET MONITOR LANGUAGE OSD COLOR COMMUNICA FACTORY SET EXIT JUMP 8 EXIT SAVE EXIT EXIT ...

Страница 6: ...ue from 1 to 100 100 brightest The default setting is 30 Set the FOCUS TARGET to the maximum value for a clear image 3 Select E SHUTTER to set the shutter speed You can select from 22 different shutter speeds from X1024 to 1 100000 DC AUTO is the default shutter speed for both indoor and outdoor use Select 1 100FLC to run the camera in flickerless mode Note The SENSE UP menu cannot be controlled i...

Страница 7: ...is selected you can adjust the BLC level in four areas of the scene TOP BOTTOM LEFT RIGHT 2 Select SET LEVEL to set the BLC level to LOWEST LOW MID or HIGH BLC Backlight Compensation prevents subjects in defined areas of the scene from appearing too dark when backlighting is present HME Highlight Masking Exposure masks bright areas of the scene to allow objects to appear clearly on the screen D WD...

Страница 8: ...efine MASK 1 indicated by the outline at the top left of the screen by adjusting TOP BOTTOM LEFT and RIGHT 5 Set up additional highlight masks if desired 6 Set MODE to ALL DAY or NIGHT 7 Select SET LEVEL to adjust the HME level Select a value from 001 to 100 The higher the number the darker the mask If D WDR is selected do the following Select SET LEVEL and select a value from 0 to 20 ...

Страница 9: ...ue from X2 to X1024 to set the frame integration level The default setting is X4 Increasing the shutter speed beyond X4 is not recommended as it may cause lagging Note The SENSE UP menu cannot be controlled if the E SHUTTER setting is above 1 60 EXPOSURE 3D DNR Digital Noise Reduction reduces the noise distortion on the screen in night mode allowing clear images in low light conditions Set 3D DNR ...

Страница 10: ...e Balance mode compensates for color temperature changes between 2500 K and 9500 K MANUAL Manual mode lets you manually adjust the red gain and blue gain levels M WB RED and M WB BLUE while monitoring the color of the image PUSH Push Lock mode fixes the white balance based on current lighting For best results place a white surface such as a piece of paper in front of camera during adjustment ...

Страница 11: ...etting is 128 COLOR BLUE GAIN BLUE GAIN adjusts the amount of blue in the image Select a value between 000 and 255 The default setting is 128 COLOR COLOR MODE Set COLOR MODE to NORMAL COOL or WARM The default setting is NORMAL NORMAL Color is similar to actual color COOL Color has more blue WARM Color has more red ...

Страница 12: ...ode Note Some DVRs require a burst signal to detect a camera 2 Select COLOR BW to set the light level at which the camera switches from day to night mode The higher the number the lower the light level AUTO Camera automatically switches between day and night mode depending on the light level COLOR Camera remains in day mode regardless of the light level BW Camera remains in night mode regardless o...

Страница 13: ...conds to 12 seconds Note SMART IR and EX_IR INT are not supported DAY NIGHT NIGHT C NIGHT C reduces color saturation in low light when D N MODE is set to COLOR Select a value for from 000 to 100 The default setting is 050 Note NIGHT C is not adjustable when 3D DNR is on DAY NIGHT NIGHT A NIGHT A reduces edge sharpness in low light when D N MODE is set to COLOR Select a value from 000 to 100 The de...

Страница 14: ...SS sets the sharpness of the image The higher the number the sharper the image Select a value from 000 to 030 The default setting is 015 FUNCTION GAMMA GAMMA sets the gamma level of the image Set GAMMA to 0 45 0 60 1 00 or MANUAL If MANUAL is selected select SET LEVEL and select a value from 0 to 16 The default setting is 0 ...

Страница 15: ...ighter image on the sides of the screen Set SLC to ON or OFF If ON is selected select SET LEVEL and select a value from 000 to 030 The default setting is 015 FUNCTION NIGHT UP NIGHT UP compensates for bright areas on the sides of the screen Set NIGHT UP to ON or OFF ...

Страница 16: ...ted Select AREA SET to set up motion detection areas You can set up to four motion detection areas To set up a motion detection area 1 Select the area and set it to ON A shaded box appears on the screen 2 Select ON to enter the area submenu Define the area by adjusting the TOP BOTTOM LEFT and RIGHT Do this for each area ...

Страница 17: ...detection Select a value from 001 to 030 The higher the number the greater the sensitivity of the motion detection The default setting is 020 MOTION SHOW INDI You can set the motion detection indicator to OFF ICON or TRACE MOTION EXTER OUT EXTER OUT is not supported ...

Страница 18: ...shape and color of the mask 3 To modify the shape of the privacy mask select a START POINT for example L_TOP and then select MODIFY Drag the selected corner of the mask using the OSD controller joystick Press and hold the joystick to return to the previous menu 4 Continue modifying the mask until it is the desired shape 5 Select POSITION to reposition the mask on the screen using the joystick 6 Se...

Страница 19: ...19 Setup Menu SETUP TITLE Set TITLE to ON or OFF If ON is selected you can display a title for the camera on the screen CLR clears the title POS lets you adjust the position of the title on the screen ...

Страница 20: ...255 The default setting is 150 2 Set BLACK THR to cancel defective black pixels Select a value from 000 to 255 The default setting is 030 3 Set DPC LEVEL to adjust the sensitivity level of the dead pixel cancellation Select a value from 000 to 255 The default setting is 030 Note Adjust the WHITE THR or BLACK THR and DPC LEVEL at the same time SETUP MONITOR Set MONITOR to MODE 1 or MODE 2 MODE 1 is...

Страница 21: ... Russian Spanish and Dutch SETUP OSD COLOR Set the OSD COLOR to YELLOW PURPLE GRAY BLUE GREEN CYAN RED or MAGENTA SETUP COMMUNICA Note COMMUNICATION is not supported SETUP FACTORY SET Set the FACTORY SET to NO or YES Select YES to reset the camera to its default factory settings Note FACTORY SET does not affect the LENS DAY NIGHT and DPC settings ...

Страница 22: ...22 Exit Menu EXIT SAVE EXIT Select SAVE EXIT to exit the OSD after saving the current settings EXIT EXIT Select EXIT to exit the OSD without saving ...

Страница 23: ... the power connection Check the video signal line connection Check the lens iris brightness level The video image is not clear Check if the lens is clean Clean the lens with a soft cloth if necessary Adjust the focus lever of the lens Adjust the contrast level on the monitor Make sure the camera is not pointed directly at a bright light source Move the camera if necessary The video image is flicke...

Страница 24: ...High Highest Automatic Electronic Shutter 1 60 to 1 100 000 s NTSC 1 50 to 1 100 000 s PAL Sense Up 2 to 1024 Off Lens Type 2 8 12 mm VFAI Gamma 0 45 3D DNR Off Low Mid High Smart Motion Detection 4 programmable zones Privacy Mask 8 programmable zones White Balance AWC ATW Manual Push Lock Highlight Masking On Off Backlight Compensation On Off Input Voltage 12 V DC 24 V AC Input Voltage Range 11 1...

Страница 25: ...NC coax Aux video 2 pin connector for video test cable Power input 2 1 mm power plug Temperature Operating 14 F to 122 F 10 C to 50 C Storage 4 F to 140 F 20 C to 60 C Relative Humidity 0 to 90 non condensing Emissions FCC Part 15 Class A EN 55022 Immunity EN 50130 4 Safety EN 60065 UL CSA 60065 ...

Страница 26: ...5 NW 112th Ave Miami FL 33178 USA www honeywellvideo com 1 305 805 8188 Honeywell Systems Pacific Level 3 2 Richardson Place North Ryde NSW 2113 Australia www honeywellsecurity com au 61 2 9353 7000 Honeywell Systems Asia 35F Tower A City Center 100 Zun Yi Road Shanghai 200051 China www asia security honeywell com 86021 5257 4568 Honeywell Security Middle East N Africa Post Office Box 18530 LOB Bu...

Отзывы: