background image

50

IP Camera Web-Client

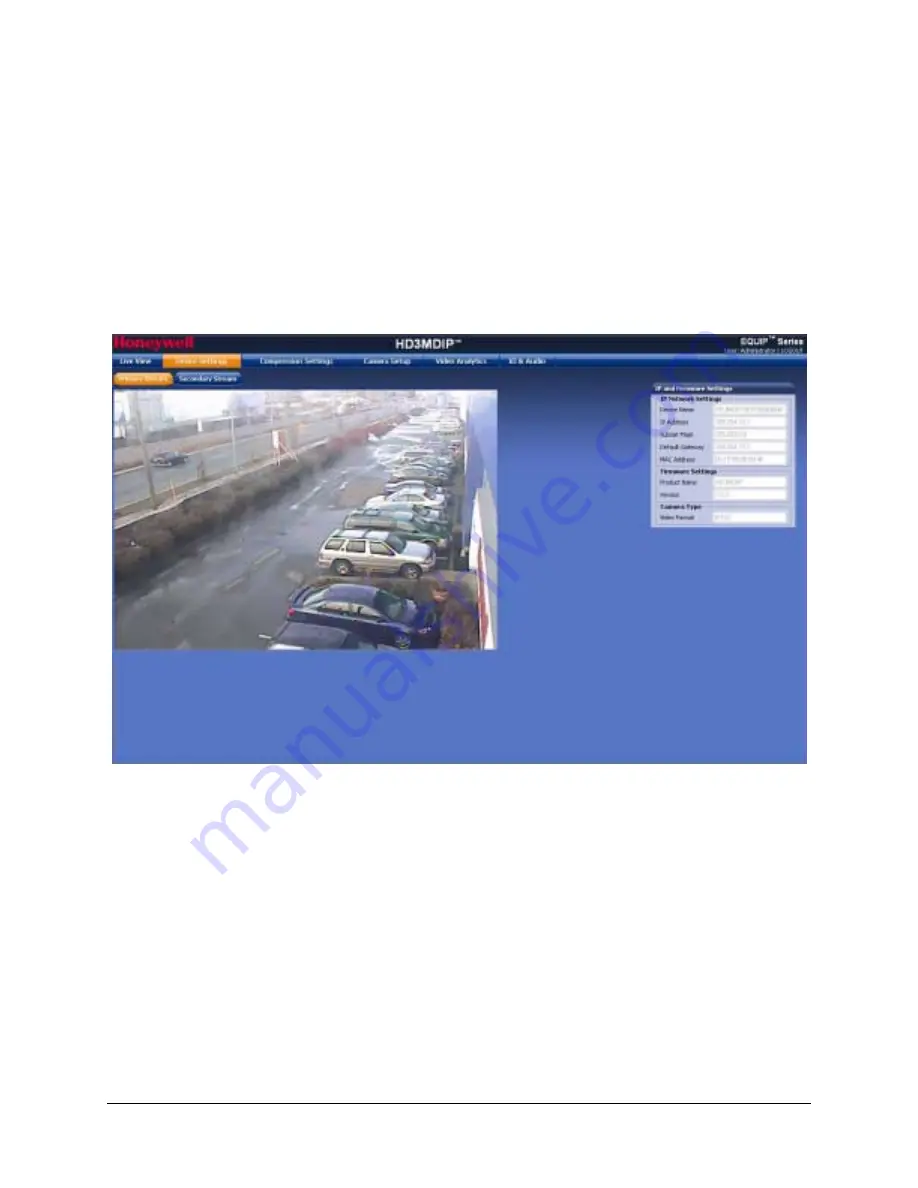
IP and Firmware Settings on the Device Information Tab

Depending on the hardware installation, there is a tab called either

 Device Information

 or 

Device Settings

. In both cases, the IP and Firmware Settings panel mirrors the information 

available in the Honeywell IP Utility. It provides read–only network settings, firmware 
settings, and video formats without having to access the IP Utility. 

The Device Settings are the same for the Primary and Secondary streams. 

Figure 4-5

Device Settings

Содержание EQUIP HD3MDIP

Страница 1: ...Document 800 04132V1 Rev A 01 10 User Guide EQUIP Series Indoor Fixed Mini Dome Network Camera NTSC PAL HD3MDIP HD3MDIPX ...

Страница 2: ...Revisions Issue Date Revisions A 09 09 New document for HD3MDIP X release Generally describes the functionality in the firmware of the HD3MDIP X camera V1 A 01 10 New version number and release date 2 ...

Страница 3: ... 24 Restore Factory Defaults 25 Adjusting the Camera FOV Field of View 25 Adjusting the Lens Focus 26 Securing the Enclosure Cover 27 3 Installing the Honeywell IP Utility and HD3MDIP X Web Client Software 29 About the Honeywell IP Utility and Web Client 29 About the Honeywell IP Utility 29 About the Web Client 30 User Profiles Honeywell IP Utility and Web Client 30 Step 1 Confirm Your System Requ...

Страница 4: ...avigating the User Interface 47 Live View 49 Device Settings 49 IP and Firmware Settings on the Device Information Tab 50 Compression Settings 51 Video Codec Settings Tab 52 Statistics Received Bit Rate and Frame Rate 54 Camera Setup 55 Auto Exposure 55 White Balance 57 Video Analytics 57 Sabotage Detection 58 Configuring Video Motion Detection 61 Alarm and Audio 62 Alarm Settings 62 Audio Setting...

Страница 5: ...ient from IP Utility 45 Figure 4 2 Web Client Window Layout Administrator Log On 47 Figure 4 3 Web Client Administrator User 48 Figure 4 4 Web Client Guest User 49 Figure 4 5 Device Settings 50 Figure 4 6 IP and Firmware Settings Device Information Tab 51 Figure 4 7 Compressions Settings Tab Primary Stream 52 Figure 4 8 Video Codec Settings Tab Available Functions 52 Figure 4 9 Video Codec Setting...

Страница 6: ...6 Figures ...

Страница 7: ...lient 30 Table 3 2 PC Minimum System Requirements 31 Table 3 3 Items Installed On Your System 31 Table 3 4 IP Network Device Setting Options 36 Table 4 1 User Roles and Privileges 44 Table 4 2 Tabs Views in the Web Client Application 48 Table 4 3 Compression Settings 53 Table 4 4 Auto Exposure Settings 56 Table 4 5 White Balance Settings 57 Table 4 6 Blur Threshold Values 59 Table 4 7 Blinding Thr...

Страница 8: ...8 Tables ...

Страница 9: ...s for installing cameras adjusting the lens and setting up a network camera environment Chapter 3 Installing the Honeywell IP Utility and HD3MDIP X Web Client Software describes how to install the Honeywell IP Utility and set up administrator privileges Chapter 4 IP Camera Web Client describes how to use the Web Client application to view video and configure the available settings for the network ...

Страница 10: ...nstallation This equipment generates uses and can radiate radio frequency energy and if not installed and used in accordance with the instruction manual may cause harmful interference to radio communications However there is no guarantee that interference will not occur in a particular installation CAUTION TO REDUCE THE RISK OF ELECTRIC SHOCK DO NOT REMOVE THE COVER NO USER SERVICEABLE PARTS INSID...

Страница 11: ...nt supplied with this guide conforms to UL 60950 1 and CSA C22 2 No 60950 1 Europe The manufacturer declares that the equipment supplied with this guide is compliant with the essential protection requirements of the EMC directive 2004 108 EC and the Low Voltage Directive LVD 20006 95 EC conforming to the requirements of standards EN 55022 for emissions EN 50024 for immunity and EN 60950 for Electr...

Страница 12: ...12 Prior authorization must be obtained for all returns exchanges or credits Items shipped to Honeywell without a clearly identified Return Merchandise Authorization RMA number may be refused ...

Страница 13: ...ital video streams simultaneously independently configurable Remote firmware updates Supports both Dynamic and Static IP address assignment Multiple levels of password protected remote access prevents unauthorized users from altering system settings Includes advanced IP locator software to make system setup easy Web server for remote setup of camera video and network parameters 24 VAC or PoE IEEE ...

Страница 14: ...14 Introduction ...

Страница 15: ...the items received match those listed on the order form and packing slip The HD3MDIP X packing box should include in addition to a Quick Install Guide One fully assembled HD3MDIP X camera including factory installed BNC connector for local video out aim and focus One adapter plate One HD3MDIP X hardware kit that includes mounting screws and screw caps One BNC cable for local video out aim and focu...

Страница 16: ...drivers Wire cutters Overview of Installation Procedure Note Please familiarize yourself with the installation procedure and complete each step in the exact sequence given The initial installation of an HD3MDIP X camera consists of the following steps Step See 1 Preparation page 18 2 Connect the wiring page 21 Mount the camera page 24 3 Adjust the camera angle position and focus for optimum image ...

Страница 17: ...a consists of a fully integrated enclosure with camera and lens The wiring can be completely concealed to reduce the risk of tampering Figure 2 1 HD3MDIP X Camera Components Interface board Bubble Turret bubble insert Base Gimbal assembly Gimbal base Skirt Camera Back box not supplied Flush Mount Surface Mount Adapter plate Cover plate ...

Страница 18: ...t and camera Preparing the Mounting Surface 1 Mark the mounting surface for screw holes and wire access hole Use the mounting template if you are surface mounting your camera See Mounting Template on page 65 Use the flush mount adapter plate as a template if you are flush mounting your camera Figure 2 2 Mounting Template Skirt Bubble Camera Turret Drill these holes for the mounting screws Cut this...

Страница 19: ...d make all the necessary alarm and audio connections 3 Connect a twisted pair UTP cable from each peripheral alarm contact to each alarm input on the terminal block Figure 2 3 Audio and Alarm PINs Connecting Audio The network camera supports bi directional audio There are two supported voice band channels that function in full duplex mode The camera can transmit audio from the camera to the client...

Страница 20: ...X triggers an alarm only when the normal alarm state open or closed changes Figure 2 4 Normal Alarm States See Alarm Settings on page 62 to configure the alarm inputs Connect external devices such as sirens or flashing lights to the alarm output connector to signal an activated alarm to camera users Figure 2 5 Alarm Connection The alarm output can be configured to provide normally open or normally...

Страница 21: ...r supply proceed to step 2 or Power over Ethernet IEEE 802 3af 48 VDC power supply Note If you are using PoE 802 3af power will automatically be supplied to the camera through the network cable 2 Connect to the power supply see Figure 2 6 on page 22 3 Plug the power supply into an appropriate power source The LED on the RJ45 jack illuminates when the camera receives power If it does not illuminate...

Страница 22: ...00Base TX cable See Connecting to a Network via an RJ 45 Ethernet Connector page 23 Also for Power over Ethernet PoE 802 3af Connector Strip Audio Input Output Alarm Input Output see Connecting Alarms page 20 Local video out connector for aim and focus RJ45 Ethernet Connector see Connecting to a Network via an RJ 45 Ethernet Connector page 23 Factory reset button ...

Страница 23: ...ed as needed during installation to position aim and focus the camera Use the provided BNC connector to connect the video from the camera to the video input connector on your video monitor Connecting to a Network via an RJ 45 Ethernet Connector The main video connection for your network camera will be made through your Ethernet network connection Connect the Ethernet connector on your camera to yo...

Страница 24: ...ing it into the skirt then twisting it clockwise until it clicks securely in place 5 Secure the camera assembly to the skirt by twisting it clockwise until it clicks securely in place 6 Adjust the camera s field of view see Adjusting the Camera FOV Field of View on page 25 7 Install the turret by clicking it into place 8 Install the bubble by placing it on the camera with the tabs to the left of t...

Страница 25: ...k securely into place Restore Factory Defaults Your network camera has a Factory Reset switch located inside the camera see Figure 2 6 on page 22 This switch restores your camera settings and passwords to their default settings Press and hold the Reset switch for three seconds This will reset the factory configured parameters such as the compression settings the camera tamper detection settings an...

Страница 26: ...ire a final adjustment after installation because the optical effect of the bubble might cause a slight defocusing of the lens TECH TIP To check the focus hold the bubble over the lens while making any adjustments To adjust the camera direction view angle and focus connect the local video out to the video monitor using the supplied BNC video cable Angle view Top view Setscrew loosen to adjust hori...

Страница 27: ...ou have set up your camera and completed the network connections see Chapter 3 Installing the Honeywell IP Utility and HD3MDIP X Web Client Software Place the enclosure cover on the camera with the tabs to the left of the slots then turn it clockwise until the tabs click securely into place Figure 2 9 Installing the Enclosure Cover ...

Страница 28: ...28 Installation and Setup ...

Страница 29: ...led from a CD or downloaded from the Honeywell Systems Group website www honeywellvideo com It is installed on a local workstation and primarily used by Administrators to configure the EQUIP Series of products residing on an IP network The IP Utility enables users to Discover device s on a network Configure the IP network settings name device s upgrade firmware change passwords Open individual Web...

Страница 30: ... at a time After the IP Utility software is installed you can change the Administrator or Guest passwords Table 3 1 User Profiles for Honeywell IP Utility and the Web Client Interface Administrator Guest Honeywell IP Utility View the list of available network devices and connect to the devices Configure the IP network settings Upgrade firmware Change the password to access the IP Utility applicati...

Страница 31: ...Client Table 3 2 PC Minimum System Requirements Component Requirement Operating System Windows XP or WINServer 2003 Processor Intel Pentium IV 3 1 GHz or faster RAM 1 GB RAM or higher Table 3 3 Items Installed On Your System Item Function Honeywell IP Utility software To enable use of the Web Client to configure cameras and view live video Bonjour software To enable the devices to discover cameras...

Страница 32: ...nload Center I Agree to reach the software downloads page c Locate your device in the list for example click Cameras for HD3MDIP X IP devices d Under Honeywell IP Utility download extract and open the Honeywell IP Utility Set up exe icon from where you extracted the file 3 When the Honeywell IP Utility InstallShield Wizard opens follow the instructions After the installation is complete a Honeywel...

Страница 33: ...row button The Honeywell IP Utility program searches for devices on the network and opens to the Honeywell IP Utility user interface 5 Automatically discover or manually refresh the list of devices on the network Use the manual refresh if a new device was added after you logged onto the system You do not need to do anything to discover devices When you log on to the IP Utility the devices on the n...

Страница 34: ...rsion installed The Status bar displays how many devices are on the network which one you are connected to and which user is logged in The Discovery pane lists the IP devices found on the network and groups by device type From the User tab Administrators can change the Web Client user passwords IP Network Setting assigns network settings automatically or manually Launch Browser to open the HD3MDIP...

Страница 35: ... Device In the Discovery pane select the device and click Disconnect Note If you disconnect the device without saving configuration details a warning dialog box displays Click Yes to save and disconnect or click Cancel to discard the changes and disconnect the device Configuring the IP Network Settings Automatically or Manually Note When you see the Limited No connectivity button you cannot fully ...

Страница 36: ...works can be divided into several smaller networks by subnetting When a network is subnetted you must specify a subnet mask which tells network devices which smaller network they belong to Note If the subnet mask is not properly configured the camera might not be able to communicate with other devices on the network Default Gateway The default gateway address that connects the device to the networ...

Страница 37: ...ght cause a failure when connecting to the device See Table 3 4 for definitions of each setting 1 In the Discovery pane select the device and click Connect 2 To assign a static IP address to the device from the System tab click to clear the Obtain an IP Address automatically check box 3 Enter a Device Name for example FrontLobby01 Note The MAC address is a factory assigned address that is unique f...

Страница 38: ...dministrator there is no time out until you click Logout To allow other Administrators to log on you must log out when the session is done Note After the IP Utility software is installed for the first time you can change the Administrator or Guest passwords and upgrade firmware Note It is important to click Apply in order to save any configuration change 1 Log onto the Web Client There are two way...

Страница 39: ...rsion of ActiveX control is installed when you use the Web Client to discover connected devices for the first time If you have a previous version of IP ActiveX is installed you are prompted to upgrade to Honeywell secure ActiveX control Figure 3 5 ActiveX Prompt Click Yes 4 Follow the InstallShield Wizard prompts to install the secure Honeywell IP ActiveX on your PC 5 The InstallShield Wizard Comp...

Страница 40: ...b Client Interface After Logging On Uninstalling IP Utility Bonjour or the ActiveX Plug in Software You can uninstall the IP Utility Bonjour or IP ActiveX software using The Start menu to uninstall IP Utility and Bonjour OR The Control Panel to uninstall IP Utility Bonjour and IP ActiveX ...

Страница 41: ... No to only uninstall the Honeywell IP Utility 4 Click Finish Uninstalling IP Utility or IP ActiveX Using the Control Panel 1 Click Start Settings Control Panel 2 Open Add or Remove Programs and select Honeywell IP Utility or Honeywell IP ActiveX from the Currently installed programs list 3 Click Change Remove The IP Utility Installation Wizard screen opens 4 Click Next Remove The Honeywell IP Uti...

Страница 42: ...42 Installing the Honeywell IP Utility and HD3MDIP X Web Client Software ...

Страница 43: ... Client features and functions Configuring compression settings Configuring camera settings Setting tamper detection Configuring audio and alarm settings Overview The network camera Web Client is a web based application that enables you to view video listen to audio and configure camera sabotage detection motion detection alarm and audio settings for the network camera Certain features of the IP C...

Страница 44: ...ou log on to the Honeywell IP Utility and any IP device web page for example the HD3MDIP X IP Web Client look very similar You can tell the difference between the two sites by the IP address in the web browser as well as the program name in the lower left corner of the window Table 4 1 User Roles and Privileges User Role Privileges Administrator View video and network settings Configure the alarm ...

Страница 45: ...er the case sensitive password The default Administrator password is 1234 Only one Administrator can be logged in at a time The default Guest password is guest 4 Click The Honeywell IP Utility program searches for devices on the network and opens to the Honeywell IP Utility user interface 5 In the Discovery pane double click the device you want to connect to OR Select the device and click Connect ...

Страница 46: ...b In the Password field enter the case sensitive password The default Administrator password is 1234 The default Guest password is guest c Click 3 The Web Client interface opens and live streaming video displays on the monitor Logging Out of the Web Client Note After you are logged onto the HD3MDIP X Web Client there is no time out until you click Logout To allow other Administrators to log on you...

Страница 47: ...eb Client Window Layout Administrator Log On The URL corresponds to the HD3MDIP X IP Address as configured in the IP Utility Click Logout to exit the program Confirm the user type logged in Each tab has a section for configuration and or navigation controls Click the tabs to access the available configurations and settings If logged on as a Guest only the Live View tab is available Administrators ...

Страница 48: ...rovide across the network based on priority mode settings This value is the threshold that you do not want the bit rate to exceed View received bit rate and frame rate statistics of the current image in real time Camera Setup Configure auto exposure and white balance for the camera Video Analytics Configure the camera sabotage detection settings and view video display Alarm and Audio Configure the...

Страница 49: ...ve video from the selected camera see Figure 4 4 Device Settings The Device Settings tab allows you to view the network settings and firmware details of the camera Logging on as a Guest limits users to Live View tab functions only See Live View for more details When an alarm is detected an alarm message appears here to notify an operator ...

Страница 50: ... Information or Device Settings In both cases the IP and Firmware Settings panel mirrors the information available in the Honeywell IP Utility It provides read only network settings firmware settings and video formats without having to access the IP Utility The Device Settings are the same for the Primary and Secondary streams Figure 4 5 Device Settings ...

Страница 51: ...ngs Stream Type Resolution Frame Rate Priority Quality or Bite Rate Compression Ratio if Quality is chosen as the priority Target Bit Rate if Bit Rate is chosen as the priority Maximum Bit Rate that the camera will provide across the network GOP number of frames Device Name as entered in the IP Utility program IP Address on the network DHCP Static APIPA Firmware Settings including product name and...

Страница 52: ...a lower frame rate than the Primary stream Video Codec Settings Tab Figure 4 8 Video Codec Settings Tab Available Functions Set the Resolution for NTSC or PAL video signals Set the Frame Rate the number of frames displayed on screen per second Set the Priority for Quality or Bit Rate Set the Compression Ratio when Quality is selected Set the Target Bit Rate the amount of data processed per second ...

Страница 53: ...t rate value based on priority mode settings This value is the threshold that you do not want the bit rate to exceed Compression Ratio Minimum Low Medium High Maximum When Quality is selected as the Priority select the Compression Ratio Minimum is the highest visual quality Maximum is the lowest visual quality Target Bit Rate kbps 400 5000 kbps Enter the Target Bit Rate in kbps kilobits per second...

Страница 54: ... requirements click Apply to save your settings Settings are not saved unless you click Apply Statistics Received Bit Rate and Frame Rate To view in real time the received bit rate and frame rate statistics of the current image 1 Click the Compression Settings tab 2 In the Statistics area select the Received check box Deselecting the check box disables the refresh rate Note The Received check box ...

Страница 55: ...ondary streams The following section explains Auto Exposure and White Balance setup Note You must click Apply after you make changes to any settings to save those changes Settings are not saved unless you click Apply Figure 4 10 Camera Setup Auto Exposure The camera lens lighting and true day night options can be configured as needed using the Auto Exposure settings Use Table 4 4 to set up Auto Ex...

Страница 56: ...er low light conditions increasing magnification may cause noise distortion Day Night Auto Day Night Set the moving mechanical IR filter within the camera to ensure true 24 hour surveillance Night Mode B W or Color Sets the color mode as B W monochrome or Color in Night Mode Day Night must be set to Night Detect Time 5 60 seconds Sets the time 5 60 seconds before the camera switches to Day or Nigh...

Страница 57: ...age and motion within a scene via the Video Analytics view see Figure 4 11 The Video Analytics tab enables a user to set the tamper detection threshold settings for blur blinding and scene changes Table 4 5 White Balance Settings Option Description AWC Auto Auto White Balance Control Mode A faster AWB mode with a wide operating range MWB Manual Mode Manual white balance mode Set the Red and Blue g...

Страница 58: ...video display and alarm signals are sent to DVRs NVRs see Figure 4 13 Sabotage Detection Figure 4 12 Tamper Detection Settings on the Video Analytics Tab EachTamperDetection Setting provides 3 threshold levels High 80 Medium 50 and Low 30 Set the Blur Threshold Blur can be affected by elements such as water for example Set the Blinding Threshold Blinding applies to obstacles in front of the camera...

Страница 59: ...nts such as water When this occurs video blurring in the field of view is detected and an alarm message appears see Figure 4 13 above the video display To detect video blurring 1 Click the Video Analytics tab 2 In the Blur Threshold list select one of the following options 3 Click Apply Note To turn off video blur detection select Disable in the Blur Threshold list Disable is the default value Not...

Страница 60: ...r you make changes to any settings to save those changes Settings are not saved unless you click Apply Configuring Camera Field of View Change Detection The Web Client application can detect tampering of the camera field of view and show an alarm message above the video display see Figure 4 13 To detect a camera field of view change 1 Click the Video Analytics tab Table 4 7 Blinding Threshold Valu...

Страница 61: ... the Region drop down menu then select a region from the five available 2 Click the VMD drop down arrow and select Enable The Regions appear in their default positions 3 Click Apply 4 Click and drag the box to resize and place it over the camera image 5 Select the sensitivity level High Medium Low Table 4 8 Scene Change Threshold Values Value To detect High 80 Maximum change in the camera field of...

Страница 62: ...g lights to the alarm output connector to signal users of the camera that an alarm is activated Set the Alarm Output as Normally Open or Normally Close See Connecting Alarms on page 20 for more information When alarm inputs are connected the camera triggers an alarm only when the normal state open or closed changes An alarm message appears on the Web Client screen see Figure 4 13 to notify the ope...

Страница 63: ...duplex mode Connect industry standard line level audio input and output to the back of your camera See Connecting Alarms on page 20 for more information Audio configuration for your network camera is straightforward Figure 4 15 Audio Settings To listen to or capture audio from the camera enable the Camera to Client PC check box To listen to audio from the client PC enable the Client PC to Camera c...

Страница 64: ...64 IP Camera Web Client ...

Страница 65: ...Document 800 04132V1 Rev A 65 01 10 A Mounting Template HD3DIP X Mounting Template Apply to clean dry surface free of dust and dirt 6 Holes Use recommended drill bit as per screws supplied ...

Страница 66: ...66 Mounting Template ...

Страница 67: ...n RMA number The RMA number must be clearly marked on all return packages and internal paperwork Problem Lens Out of Optical Focus Possible solutions 1 Verify that the lens cap has been removed from the camera 2 This can also be caused by dirt oil grease and fingerprints and so on that have accumulated on the lens or bubble Check the lens and bubble then clean them if needed Caution Use extreme ca...

Страница 68: ...cable from the camera is connected to both the camera and the network Ensure that the camera assembly board DIP switch settings are configured correctly Problem Cannot Connect to a Device When the following message Figure B 1 displays in the status bar of the IP Utility your device connection is limited Usually this warning indicates that your PC and the device your are connecting to are on differ...

Страница 69: ...0 000 sec Automatic Lens Iris Control DC Iris level 1 25 White Balance AWB AWC MWB Manual Mode AWC Push Lens Type 3 3 mm to 12 0 mm Vari focal Auto Iris F1 6 Audio Signal Specifications Audio Two Way Line in out Electrical Specifications Input Voltage 24 VAC PoE IEEE 802 3af Input Voltage Range 17 28 VAC Surge Suppression 1 5 kW transient Power Consumption 5 W max Mechanical Dimensions WxH See dia...

Страница 70: ...els with password protection Users 1 Administrator 1 Guest Video access from web browser Camera live view for 1 client Full control of all camera settings available to administrator Minimum web browsing requirements Pentium IV CPU 3 1 GHz or equivalent AMD 1 GB RAM Windows 2003 XP Installation Management and Maintenance Honeywell IP Utility software identifies the IP address checks the status of t...

Страница 71: ...C 2 HD3MDIP X Side View Dimensions without Skirt Figure C 3 HD3MDIP X Side View Dimensions with Adapter Plate Figure C 4 HD3MDIP X Bottom View with Dimensions 4 5 115 7 mm 3 9 97 7 mm 1 5 38 2 mm 6 4 161 5 mm 1 2 28 5 mm 4 9 125 1 mm 1 8 4 6 0 m m 2 88 73 10 mm 3 2 82 5 mm 3 50 89 0 mm ...

Страница 72: ...72 Specifications ...

Страница 73: ...tically provides a clear image under low light conditions increasing magnification may cause noise distortion Flickerless Eliminates the flicker that can appear in an image under certain lighting conditions for example fluorescent lighting This is usually caused by the interaction of the shutter with the AC frequency of the lighting The flickerless setting changes the camera shutter speed to a val...

Страница 74: ...chip Adjusts the light sensitivity of the camera A faster briefer shutter speed can arrest the motion of a fast moving object reduce image blur rendering it sharp Fast shutter speeds allow less light to all on the CCD and can darken the image For fast shutter speeds ensure there is adequate lighting Usually selected using DIP switches on the side of the camera Subnet Mask A number used to identify...

Страница 75: ...C auto white balance control mode 57 B bit rate 52 53 setting 51 53 viewing statistics 54 blinding threshold 57 60 blur threshold 57 59 Bonjour software 31 C cabling connecting 21 camera adjusting 25 components 17 installation 18 type 50 camera blinding 60 camera components 17 camera field of view change 60 camera settings AGC 56 ALC 56 AWC 57 DayToNight 56 detect time 56 flickerless 56 MWB 57 Nig...

Страница 76: ...group of pictures 52 53 group of pictures GOP 53 guest password default 33 guest user privileges 30 H HTTP server 33 I installation mounting template 65 installation procedure 16 installation steps 16 installed components 31 installing the camera 18 IP address 36 37 51 APIPA 36 DHCP 36 network settings 35 37 50 IP address 36 IP network settings 35 default gateway 36 IP address 36 MAC address 36 su...

Страница 77: ...r 31 profiles user 30 Q quality 53 quality priority setting 54 R RAM 31 refresh button 34 resolution 52 resolution setting 51 S scene change threshold 57 60 secondary stream resolution 53 security settings ActiveX 39 service 11 setting IP network 34 settings alarm 62 audio 63 auto exposure 55 software downloading from website 29 32 installing 31 32 uninstalling 41 version 34 software updates 15 st...

Страница 78: ...ion sabotage detection 58 scene change threshold 60 tamper detection 59 video blurring 59 video blurring 59 video monitor connecting 23 video motion detection 61 VMD 61 W warnings 10 21 warranty 11 web browser 31 web client compression settings 51 web client description 30 launching and logging on off 38 user types 30 website 29 32 wiring alarm connection 20 connections on board 22 ...

Страница 79: ......

Страница 80: ...l 31 299 410 200 Honeywell Security Group Deutschland Johannes Mauthe Straße 14 D 72458 Albstadt Germany www honeywell com security de 49 74 31 8 01 0 Honeywell Security Group France Immeuble Lavoisier Parc de Haute Technologie 3 7 rue Georges Besse 92160 Antony France www honeywell com security fr 33 0 1 40 96 20 50 Honeywell Security Group Italia SpA Via della Resistenza 53 59 20090 Buccinasco M...

Отзывы: