


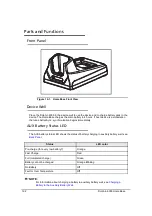
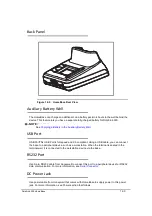


Dolphin 6000 HomeBase
12-7
Communication
0
USB
Dolphin 6000 devices support USB communications.
The HomeBase also supports USB communications via USB port located on back of cradle.
The HomeBase can be a USB device by interfacing USB signals of Dolphin 6000 device to
USB of host workstation. Using a standard USB cable, the HomeBase s USB interface lets
Dolphin 6000 communicate with a workstation.
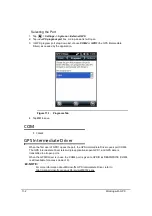
RS232
The HomeBase supports RS232 communications by RS232 Communications Port located on
back of cradle. This port lets Dolphin 6000 device communicate to a workstation, modem, or
any RS232 device when using a standard serial cable and communications software.
Requirements
0
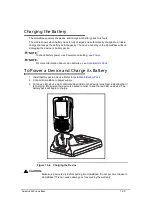
A HomeBase powered by a power cable and power adapter cable
For RS232 communications, use serial cable
For USB communications, use USB cable
ActiveSync v4.5 or above on the host workstation
Windows XP 2003 Server, Windows Vista, or Windows 7 on the host workstation.
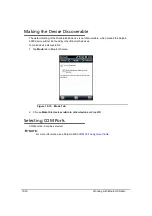
Connecting the Communication Cables
0
NOTE:
NOTE
:
ActiveSync 4.5 or higher must be used.
1. Plug in power supply and connect to back of HomeBase.
2. Plug USB or RS232 communication cable into back of HomeBase.
3. Connect communication cable into back of workstation.
NOTE:
NOTE
:
The hardware should be installed and operating. Workstation may need to be rebooted
to complete the installation process.
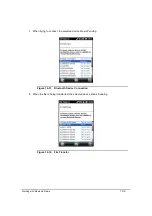
Establishing Communication
0
USB or RS232 communication with the device is usually auto-detected and set by ActiveSync
based on the communication cable. ActiveSync will usually set up a USB connection if using
a USB cable to connect to workstation. ActiveSync will normally set up a RS232 connection if
using a RS232 cable.
NOTE:
NOTE
:
For more details, see
ActiveSync Communication
.
Содержание Dolphin 6000
Страница 1: ...Dolphin 6000 Mobile Computers with Windows Mobile 6 5 Users Guide ...
Страница 8: ...viii ...
Страница 26: ...2 12 Getting Started ...
Страница 29: ...Hardware Overview 3 3 Front View 0 Figure 3 1 Front View 5 1 7 2 10 6 8 9 4 3 ...
Страница 31: ...Hardware Overview 3 5 Base View 0 Figure 3 2 Base View 5 4 3 2 1 9 8 7 6 ...
Страница 44: ...3 18 Hardware Overview ...
Страница 76: ...7 22 System Settings ...
Страница 102: ...9 16 Working with GSM GPRS EDGE ...
Страница 103: ...Working with Bluetooth Radio 10 1 Working with Bluetooth Radio Enabling the Bluetooth Radio 0 ...
Страница 123: ...Dolphin 6000 HomeBase 12 9 RS232 Pin Configuration 0 Figure 12 5 COM1 Properties ...
Страница 125: ...This methodology applies equally for T ratings The M mark is intended to be synonymous with the U mark ...


