


CLEANING & MAINTENANCE
13
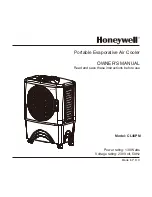
DRAINING AND CLEANING THE WATER TANK
CLEANING THE FILTER AND HONEYCOMB
Water Drain
Open Screws
Plug
•
•
•
•
•
•
•
•
•
•
•
Turn the power “off” and disconnect the air cooler from the
power supply.
Move the unit to a location where it can be drained. Remove
the cap from the water drain plug and allow the tank to empty
(see parts description on page 7).
After you have drained the water tank, please connect the water
drain plug to its original position.
Now refill the water tank up to Max level, wait for 5 min. and then
drain the entire water once again. Use clean water for this proce-
dure, so that maximum dust particles and remains are completely
removed.
If your cooler has not been used for a long duration, we advise
you to clean the water tank at least 2 times before it is used
again.
Turn off the unit, and unplug the power cord from wall outlet.
Rotate the unit facing the back panel, and locate the Rear Grill
Removal Screws (refer page 7., #15). Remove both the screws
with a screw driver.
Pull the rear grill panel upwards, until it is completely removed.
Now, the carbon filter and Honeycomb Media can be seen.
Clean both the filters with a clean cloth to remove all the dust
& dirt particles.
Once the cleaning has been completed, assemble the unit as
described above.
Plug into the power supply and turn on unit.


