Montage-Anschluss-Anleitung
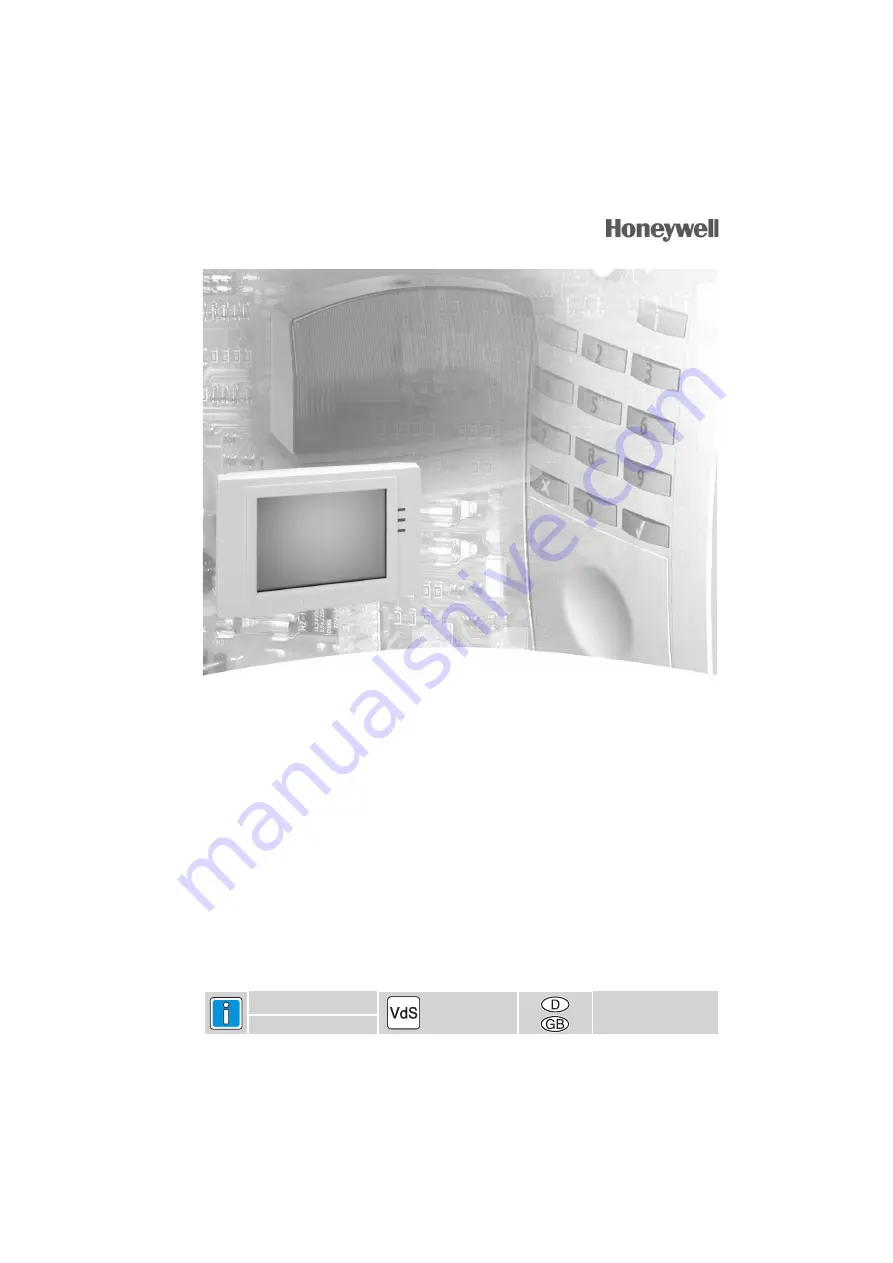
Grafik-BedienteilTouchCenter BUS-2Art.-Nr. 012577
P00455-10-002-01
Änderungen
vorbehalten
21.02.2008
Anerkennung
beantragt
Страница 1: ...Montage Anschluss Anleitung Grafik Bedienteil TouchCenter BUS 2 Art Nr 012577 P00455 10 002 01 Änderungen vorbehalten 21 02 2008 Anerkennung beantragt ...
Страница 2: ...verursacht werden Installation Programmierung sowie Wartungs und Reparaturarbeiten dürfen nur durch autorisiertes Fachpersonal durchgeführt werden Löt und Anschlussarbeiten innerhalb der gesamten Anlage sind nur im spannungslosen Zustand vorzunehmen Lötarbeiten dürfen nur mit einem temperaturgeregeltem vom Netz galvanisch getrennten Lötkolben vorgenommen werden VDE Sicherheitsvorschriften sowie di...
Страница 3: ...C Laptop mit dem Softwarepaket WINFEM Advanced WINFEM Advanced Zentralentypen Version 1 xx MB100 10 HB48 10 MB48 MB24 HB24 alle ab V05 xx Version 6 xx MB256 plus ab V03 xx Bei der Inbetriebnahme nach erstmaligem Anlegen der Betriebsspannung ist die BUS 2 Adresse einzustellen Die Einstellung der BUS 2 Adresse bleibt auch nach Wegnahme der Betriebsspannung dauerhaft gespeichert 4 1 Erforderliche Sof...
Страница 4: ...r Dokumentation des VdS Kit LED rot LED grün LED gelb Schirmanschluss für Beilaufdraht am Montagerahmen Befestigungslöcher Befestigungsloch für Abreißsicherung Nach Montage Kunst stoffstege mit Seiten schneider trennen Befestigungslöcher Montagemöglichkeit des Montagerahmens bei aP Montage über einer Schalterdose Beispiel Summer Einhängelöcher für Montagerahmen Einhängelöcher für Montagerahmen Sab...
Страница 5: ...ellbarer Adressbereich 01 bis 63 Anlegen der Betriebsspannung anschließend Sabotagekontakt 3 mal nacheinander betätigen Das Bedienteil zeigt das Menü zur Einstellung der BUS 2 Adresse Einstellbarer Adressbereich 01 bis 63 Bedienteil vorkonfigurieren Bei nicht installieren Geräten kann die Eingabe der BUS 2 Adresse bei angelegter Betriebsspannung durchgeführt werden Die Einstellung der BUS 2 Adress...
Страница 6: ...hlung Telefonkabel JY St nx2x0 8Ø Um eine optimale Störsicherheit zu erreichen sind die Anschlüsse folgendermaßen auszuführen 1 Leitungen abisolieren Beilaufdrähte abspalten 2 Ankommende und falls vorhanden abgehende BUS Leitung kürzen und in die Klemmen einschieben 3 Mit Hilfe von Kabelbindern die Kabel an den Zugentlastungen am Montagerahmen befestigen 4 Beilaufdraht Beilaufdrähte kürzen und am ...
Страница 7: ...größe des Logos kann zwar 320 x 240 Pixel betragen jedoch werden Teile des Logos von den Bedientasten überdeckt Alternativ kann eine Grafik mit 320 x 240 Pixel erstellt werden In dieser ist dann das Logo wie gewünscht zu positionieren 2 Die Farbe des Pixels in der linken oberen Ecke der Bitmapgrafik Logos wird transparent dargestellt d h diese Farbe wird nicht dargestellt 3 Die erstellte Grafik au...
Страница 8: ...Honeywell Security Deutschland www honeywell com security de Novar GmbH Johannes Mauthe Straße 14 D 72458 Albstadt P00455 10 002 01 21 02 2008 2008 Novar GmbH ...
Страница 9: ...Mounting and Connection Instructions TouchCenter Keypad BUS 2 Item no 012577 Subject to change without notice P00455 10 002 01 21 02 2008 Approval pending ...
Страница 10: ...turer cannot be held liable for damage resulting from use contrary to the designated purpose Installation programming maintenance and repair works must be carried out only by authorized trained persons Soldering and connecting works on the entire system may only be carried out when disconnected from mains Soldering works must only be performed with a temperature regulated soldering iron galvanical...
Страница 11: ...enter is carried out per PC laptop using the software package WINFEM Advanced WINFEM Advanced Type of control panel Version 1 xx MB100 10 HB48 10 MB48 MB24 HB24 all from V05 xx Version 6 xx MB256 plus from V03 xx During commissioning the BUS 2 address is to be set up after connecting the operating voltage for the first time The BUS 2 address will be stored permanently even when disconnecting the o...
Страница 12: ...he VdS Kit Item no 012578 must be used Please note the mounting hints of the documentation of the VdS Kit LED red LED green LED yellow Shield connection for tracer wire at the mounting plate Fixing holes Fixing hole for tear off protection After mounting please cutt off the plastic web with wire cutter Fixing holes Installation options for the mounting plate when surface mounted over a mounting bo...
Страница 13: ... address Adjustable address range is 01 to 63 7 1 1 Set up the BUS 2 address Connect the operating voltage Subsequently actuate the tamper switch 3 times the display shows the menue for set up the BUS 2 address Adjustable address range is 01 to 63 Pre configuration of the operating panel Set up of the BUS 2 address can be done even when the operating panel is not installed by connecting the operat...
Страница 14: ...ould be as follows 1 Insulate lines separate tracer wires 2 Shorten incoming and outgoing BUS lines in so far as they exist and insert in the terminals 3 Use cable ties to fix the cables at the pull reliefs on the mounting plate 4 Shorten tracer wire s and solder to the shield terminal soldering tab Keep the tracer wires of the shieldings as short as possible when soldering to the soldering tab of...
Страница 15: ...40 pixels but in that case parts of the logo might be covered by the operating buttons Alternatively a graphic of the size 320 x 240 pixels can be created on which the logo can be located at will 2 The colour of the pixel of the left upper corner of the bitmap logo will be displayed as transparent which means this colour will not be displayed 3 Copy the created graphic as bmp file to the root dire...
Страница 16: ...Honeywell Security Deutschland www honeywell com security de Novar GmbH Johannes Mauthe Straße 14 D 72458 Albstadt P00455 10 002 01 21 02 2008 2008 Novar GmbH ...