

6
6
2
2
9
9
0
0
W
W
T
T
o
o
u
u
c
c
h
h
s
s
c
c
r
r
e
e
e
e
n
n
H
H
o
o
m
m
e
e
S
S
e
e
c
c
u
u
r
r
i
i
t
t
y
y
S
S
y
y
s
s
t
t
e
e
m
m
Quick User Setup Guide
For additional information see the full User Guide [Part Number 800-24917 or higher] available online at:
https://mywebtech.honeywellhome.com
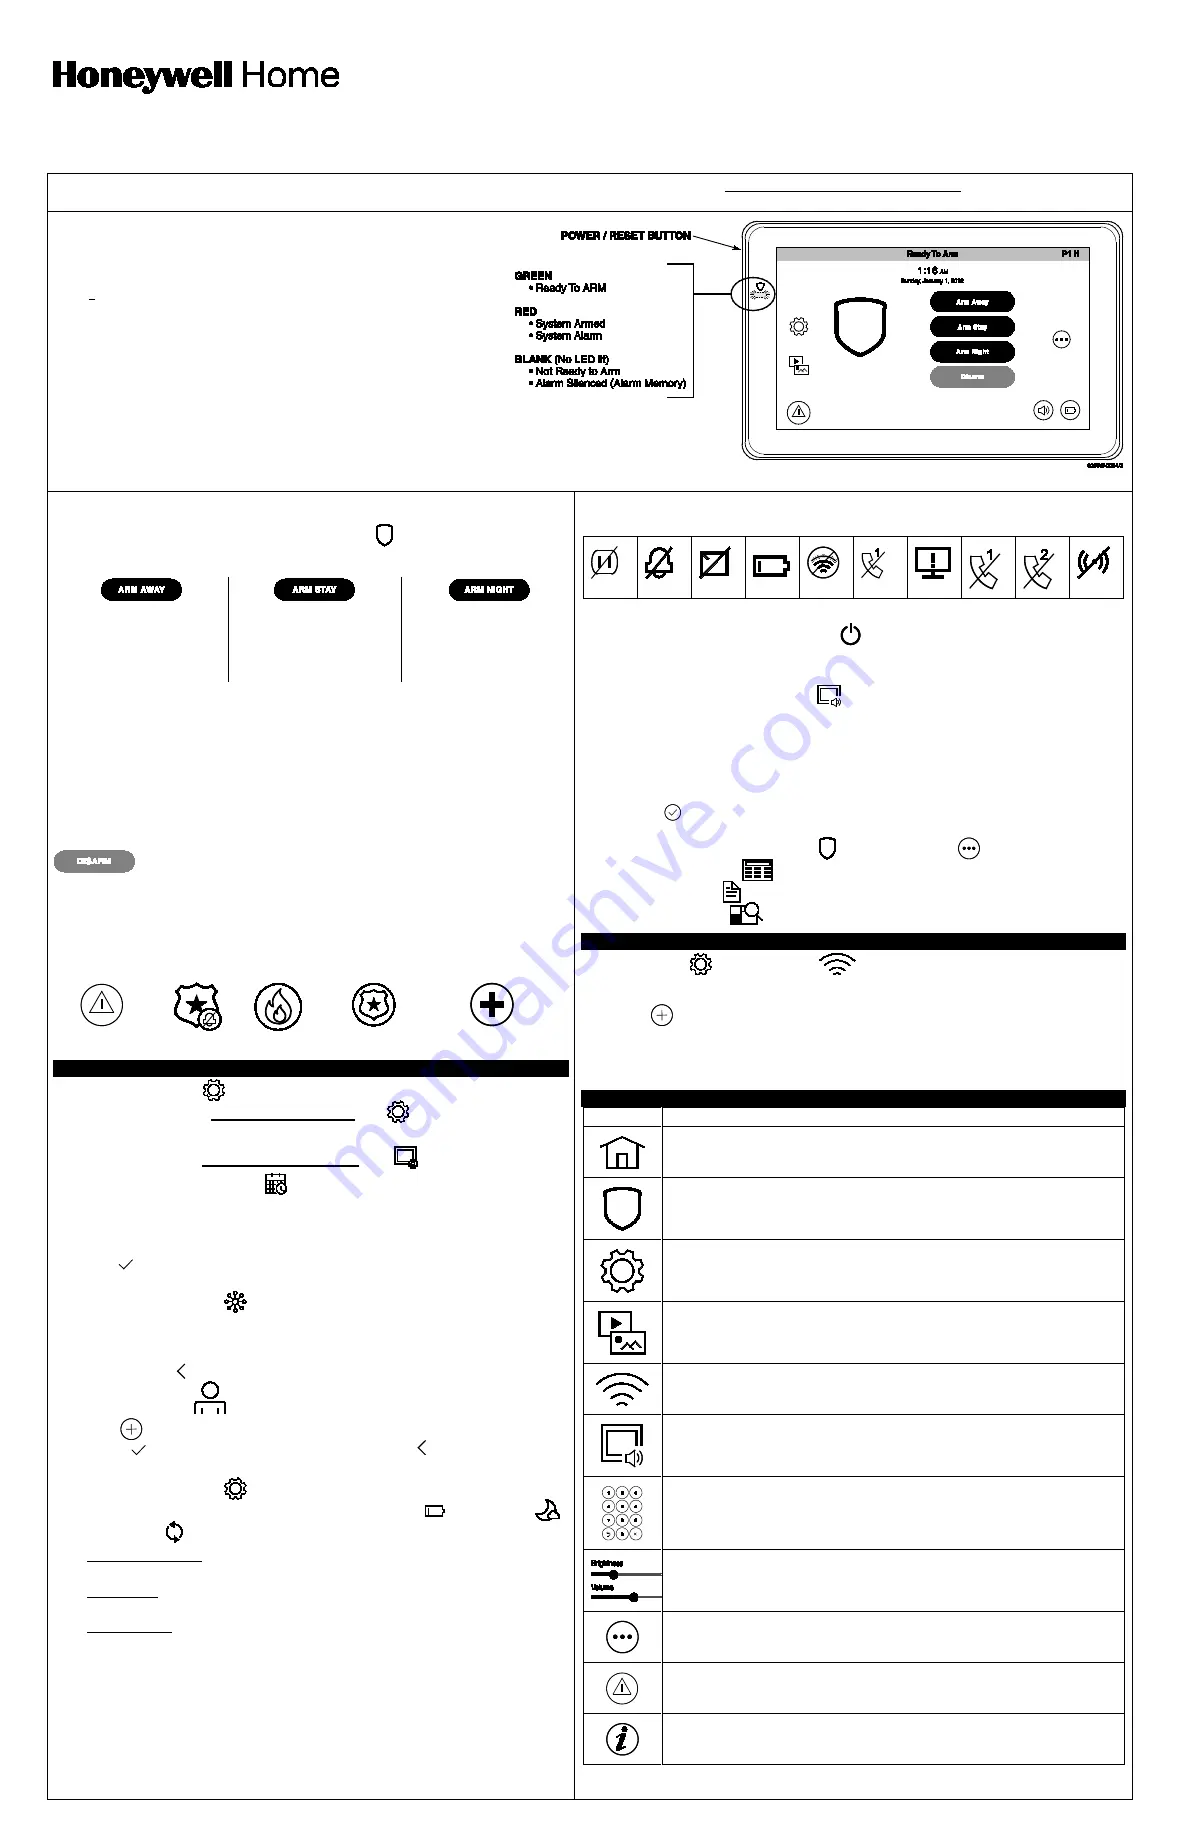
The 6290W Touchscreen allows you to perform system arming and disarming functions, as well as to monitor the status of your security system.
Home / Security Screen
ARMING THE SYSTEM
From the Home/Security Screen:
Select the Security icon
.
You can arm the system in one of three arming modes: Away, Stay, and Night.
Select the
Security
icon.
AWAY –
Select to arm
when no one is staying on
the premises.
STAY -
Select to arm
when you are staying
home, but might expect
someone to use the
entrance door later.
NIGHT -
Select to arm
when you are staying
home and do not expect
anyone to use the
entrance door.
IMPORTANT:
If you return to your home or business and the main burglary sounder
is on, DO NOT enter the premises, but call the police from a nearby safe location. If
you return to your home or business after an alarm has occurred and the main
sounder has shut itself off, the Touchscreen beeps rapidly upon entering, indicating
that an alarm has occurred during your absence.
LEAVE IMMEDIATELY and
CONTACT THE POLICE
from a nearby safe location.
DISARMING THE SYSTEM AND SILENCING ALARMS
To silence Alarms or Trouble conditions:
enter your 4-digit user code, select the
Clear
button, then enter your 4-digit user code again.
To disarm the system when already in the premises:
select the
Disarm
icon
and enter your 4-digit user code.
To disarm the system when entering the premises:
enter your 4-digit user code.
EMERGENCY MESSAGES
An emergency message for fire, police, or medical can be sent to the central
monitoring station from the
Emergency
screen. Select the
PANIC
icon (located in
the lower left corner of the screen). Select and hold (for at least 2 seconds) the
associated alarm icon.
PANIC
SILENT PANIC FIRE
POLICE
MEDICAL
SETUP
Select the Setup icon
.
Select the System Info
icon
.
1. View the latest Software Version, Interface name and MAC Address.
Select the System Setup icon
.
1. Select the
Time and Date
icon
.
2. Enter an Authorized Code.
a) If
Get Time
is selected,
the Touchscreen downloads the time/date from the
control panel and exits the “Set Time” screen.
b) Or, set the time/date from the
Set Time/Date
screen.
3. Select to save: A pop-up message displays
“Time Setting Confirmation”
,
select
Yes
or
No
.
Select the CS Setup icon
.
1. Enter an Authorized Code to access
ECP Address&Options
,
Screen Security
,
Device Events
,
Code Authority
and
Panel Config
and
enter the appropriate
information for each.
2. Select the
Back
arrow to return to the previous screen.
Select the User icon
.
1. Select
to add a User name and enter an Authorized Code for this user.
- Select to save User information or select the
Back
arrow to return to the
previous screen.
Select the Advanced icon
.
1. Enter an Authorized Code to access:
Power Mode
Setup
/
Night Setup
/
Keypad Reset
.
- Power Mode Setup: Select the desired power save mode (Turn-off Network /
Override Display Settings).
- Night Setup: Select the desired night setup mode (Away / Stay / Instant /
Maximum / Night).
- Keypad Reset: Processor reset; Select OK or Cancel.
The Security screen also displays an Icon(s) if a system trouble(s) occurs. If a Trouble
Icon is shown, contact your alarm company.
Touchscreen Reset:
To reset the Touchscreen, press and hold the side Power Button for
3 seconds and
then select the reset button
on the screen to start the reset function.
The Touchscreen can also be reset by pressing and holding the reset button for
approximately15 seconds until the touchscreen resets automatically.
Select the Disp & Audio Setup icon
1. Enter an Authorized Code.
Select the desired
Operating Mode: Chime Mode / Voice Mode / Voice Chime.
- Select “Backllight off After” to select the time increment for the backlight to be lit.
- Select “To Homepage After” to select the time increment for the homepage to be
displayed.
- Select “Auto Slideshow After” to select the time increment for viewing photos.
- Select
Apply
when done or select the
Back
arrow to return to previous screen.
To test the Alarm,
select the
Security
and
More Choices
icons.
-Select
Console Mode
and refer to the Control Panel User Guide for procedure.
-Select
Event Logs
to view events and partitions.
-Select
Show Zones
to set zones and select bypass zones.
SYSTEM Wi-Fi
(Supports 2.4GHz and 5GHz frequencies.)
1. Select
Setup
and
System WIFI
icons to view the list of available Wi-Fi
networks.
2. Select the Wi-Fi networks SSID and if required enter the password for the network.
3. Select
to add a new network address. Use the displayed keyboard to:
- enter a new Network name (enter the SSID).
– select the security type
- scroll down to select Advanced options. Proxy: None, Manual, Proxy Auto-Config.
When done, select
CONNECT
to activate or select
CANCEL
.
ICON DESCRIPTIONS
ICON
ICON TITLE/FUNCTION
Home/Security - Returns you to the Home/Security screen.
"Security”- Arm the system and access the three arming modes.
“Setup” -
Accesses System Info, System Setup, System WIFI, Disp &
Audio Setup and Brightness / Volume.
“Multimedia” -
Accesses Videos and Images.
“Wi-Fi” - Accesses Wi-Fi setup options.
“Disp & Audio Setup” – Accesses Operating Modes, Backlight, Homepage
and Slideshow options.
“Authorized Code” - Enter 4-digit authorized code.
Adjust screen Brightness and Volume.
“More Choices”- Accesses Event Logs, Console Mode and Show Zones
screens.
“PANIC” – Accesses Fire, Police and Medical emergency.
Control Panel Message – Alerts user to a control panel message.
Your Home/Security screen is the gateway to your
System.
From this screen, you can:
•
control your security system
•
control your multi-media applications such as video
and pictures
Your Home screen is displayed most of the time and can
be customized via the Multimedia application.


