Honda UMS425E1 Скачать руководство пользователя страница 2

2 EN

SAFETY INSTRUCTIONS

All the parts of your machine are potentially hazardous if it is used
incorrectly or if it is not properly maintained. Special attention should
be paid to sections preceded by the following words:

Warns against a risk of serious bodily injury or fatal accident if
instructions are not complied with.

CAUTION:

• Warns against a risk of bodily injury or equipment damage if

instructions are not complied with.

NOTE :

 Indicates a source of useful information.

This symbol warns you to be especially careful when
performing specific operations. See the safety
instructions on the following pages with reference to
the point or points indicated in the box.

TRAINING

A1.

Carefully read the instructions in this manual. Before using your grass trimmer,
familiarize yourself with how to use it correctly and with its controls. Make sure you
know how to stop the engine quickly.

A2.

Use the grass trimmer for its intended purpose, i.e.:
- Cutting grass with the nylon line attachment along flower beds, shrubberies,

walls, fences or lawns and to finish borders after mowing with a lawnmower.

- Using it for any other purpose could be dangerous or result in damage to the

machine.

A3.

Do not allow children or anyone unfamiliar with the instructions to use the grass
trimmer. Local legislation may stipulate operator age restrictions.

A4.

Do not use the grass trimmer in the following circumstances:
- When there are people, especially children, or pets nearby. Comply with the

safety perimeter of at least 15 metres between the machine and anyone who
may be in the vicinity. The grass trimmer is to be operated by one person only.

- If you have taken any medicine or substance which may affect your reactions

and judgement.

- If the machine is used with a nylon line type cutting head, make sure the line

cutter is correctly fitted to ensure correct line length.

- If safety devices such as the cutting attachment guard are missing or if the guard

is damaged.

A5.

Do not make alterations to your grass trimmer. By doing so, you could
compromise your safety and expose yourself to serious accident or injury.

A6.

Remember that the owner or operator is responsible for any accidents or risks to
third parties and their property.

PREPARATION

B1.

Do not use this equipment when barefoot or wearing sandals or when wearing
loose-fitting clothing that may become snagged on plants.
Long trousers, boots or protective footwear with anti-skid soles, goggles or a
protective visor, gloves (preferably leather)and ear defenders must be worn when
operating the machine.
A hard hat should be worn in areas where falling objects may be encountered
(such as branches or stones).

B2.

Make a thorough inspection of the area to be cleared and remove any objects
which could be thrown up by the machine (stones, pieces of wood, wire, bones,
etc.).

B3. WARNING: DANGER!


Petrol is extremely flammable.
- Store fuel in specially designed containers.
- Refuel the machine outdoors only, with the engine switched off. Do not smoke

during refuelling or while handling fuel.

- Never remove the fuel filler cap or fill up the fuel tank when the engine is running

or while it is still hot.

- Do not start the engine in the presence of spilled fuel. Move the grass trimmer

away from the area and avoid creating any source of ignition until the fuel has
evaporated and vapours have dispersed. Make sure that the caps are securely
fitted on the fuel tank and on the fuel can.

B4.

Replace faulty exhaust mufflers.

B5.

Each time the machine is used, before starting, perform a general inspection and
check, in particular, all attachments, cutting assemblies, deflectors and mounting
bolts to make sure that they are not worn, damaged or loose. Always check that
the gas throttle trigger and the Stop button operate correctly.

B6.

Check that the handles and harness attachment point are correctly positioned and
that the machine is properly balanced.
The correct positions and adjustments are specified in the section on “Preliminary
preparation and checks” in this manual.

B7.

Adjust the idle speed so that the cutting attachment stops turning when the throttle
control is released.
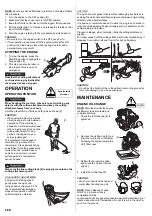
OPERATION

C1.

Do not run the engine in a confined space where toxic carbon monoxide fumes
may accumulate.

C2.

Work by daylight only.

C3.

As far as possible, avoid using the machine on wet ground.

C4.

When operating the machine, ensure compliance with the safety clearance of the
nylon line cutting head with respect to the harness attachment point.

C5.

Walk when you use the machine, never run, and stay in a stable position. Beware
of obstacles such as stones and tree stumps which could trip you.

C6.

Tread carefully on slopes. When working on slopes, always proceed crosswise:
never straight up and down.

C7.

Do not use the machine on slopes that are too steep. It is the operator’s
responsibility to assess the potential hazards of the terrain and to take every
necessary precaution for his or her own safety. This is especially important when
working on slopes or rough, slippery or loose ground.

C8.

Never modify the engine settings in such a way that it runs at excessive speeds.

C9.

Before starting the engine, make sure there is no-one within 15 metres of the
machine, that the cutting attachment is not touching the ground and that the
machine is in a stable position.

C10.

Take care when starting the engine. Comply with the safety instructions and stay
clear of the cutting attachment.

C11.

The engine must be stopped and the spark plug cap removed in the following
cases:
- Before performing any servicing action on the cutting system.
- Before cleaning, checking, adjusting or repairing the grass trimmer.
- The only adjustments to be carried out with the engine running are carburettor

and idle speed adjustments.

- During this operation, make sure the cutting attachment does not strike any

object and that the machine is in a stable position.

- If the cutting attachment strikes an object, inspect the cutting system and the

transmission shaft to make sure they have not been damaged. Make any
necessary repairs before resuming work with the machine.

- If the grass trimmer starts vibrating abnormally, look for the cause of the

vibrations immediately and take the necessary corrective action.

C12.

Stop the engine in the following cases:
- Whenever the grass trimmer is left unattended.
- Before refilling the fuel tank.
- When moving the machine from one area to another.

C13.

Using any attachments other than those recommended by Honda may cause
damage to your grass trimmer, and such damage will not be covered by your
guarantee.

MAINTENANCE AND STORAGE

D1.

Keep all nuts and bolts securely tightened to ensure safe operation. Regular
maintenance is required to ensure safety and optimal performance.

D2.

 Do not use the machine with damaged or worn parts. Parts must be replaced, not
repaired. Use genuine Honda parts. The cutting attachments must always be
marked with the manufacturer's brand, the reference and the maximum operating
speed. Parts of inferior quality may damage the machine and compromise
operator safety.

D3.

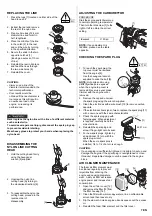
 Wear heavy gloves when removing and installing the cutting device.

D4.

Never store the grass trimmer with fuel in the fuel tank in a room where fuel vapour
could be ignited by a flame, a spark or a source of intense heat.

D5.

Store in a clean dry room, out of the reach of children.

D6.

Let the engine cool down before putting away the machine in any room.

D7.

To reduce fire hazards, remove leaves, grass cuttings and excess oil from the
grass trimmer, particularly from the cooling fins, the exhaust system and the fuel
storage area.

D8.

When the machine is stored or carried, the cutting blade must always be covered
by its transport guard to avoid any accidental injury.

D9.

If the fuel tank has to be drained, this operation must be performed outdoors when
the engine is cold.

D10.

To protect the environment, do not dispose of old engine oil or fuel by pouring it
down the drain, in the gutter or on the ground. Your local service station can have
oil and fuel safely recycled.

SAFETY

Содержание UMS425E1

Страница 1: ...ll your machine please make sure you supply this manual with it We recommend that your read the terms of guarantee so that you fully understand your rights and responsibilities The guarantee is a sepa...

Страница 2: ...tions and adjustments are specified in the section on Preliminary preparation and checks in this manual B7 Adjust the idle speed so that the cutting attachment stops turning when the throttle control...

Страница 3: ...ed with a nylon line cutting attachment only Do not use a circular saw blade or a metal disc 5 Cutting attachment rotation speed 6 The engine emits toxic carbon monoxide Do not run in an enclosed area...

Страница 4: ...explosive Fill the fuel tank in a well ventilated area with the engine switched off Do not smoke and avoid any flames or sparks in the area where filling is performed and where the fuel is stored Do n...

Страница 5: ...E COLD START The machine is considered to be cold if the engine has not been running for more than 5 minutes in the 10 minutes before starting up NOTE If the ambient temperature is warm enough summer...

Страница 6: ...neven surfaces where a lawnmower cannot be used Make sure the line cutting blade 4 is properly mounted on the cutting attachment guard LINE LENGTH ADJUSTMENT At maximum rotating speed gently press the...

Страница 7: ...le opposite CHECKING THE SPARK PLUG 1 To reach the spark plug the top cover must be removed from the engine 8 Use the hexagonal wrench supplied to undo the bolt 9 NOTE Hot parts and moving parts flywh...

Страница 8: ...2 Spring and clutch pads Check 2 Idle speed Check 2 Adjust 2 Engine oil Check Replace Replace after 10 service hours and then every 6 months or 50 service hours Fuel tank Clean Valve clearance Adjust...

Страница 9: ...spark plug check that it is clean and that the electrode gap is correct Pull the starter several times 2 We recommend that the spark plug be screwed down as far as possible by hand until finger tight...

Страница 10: ...camshaft single cylinder Displacement cc 25 Bore stroke mm 35 x 26 Net power ISO 8893 kW rpm 0 72 7 000 Net Torque max of engine SAE J1349 N m 1 0 5 000 Maximum speed rpm 10 000 Idle speed rpm 3 100...

Страница 11: ...lire la police de garantie pour bien comprendre vos droits et vos responsabilit s La police de garantie est un document s par fourni par votre concessionnaire Aucune reproduction m me partielle de la...

Страница 12: ...bon quilibrage de la machine Les positions et r glages corrects sont expliqu s au chapitre de ce manuel Pr paration et v rification avant utilisation B7 Veiller au r glage correct du ralenti afin que...

Страница 13: ...coupe fil de nylon Ne pas employer de lame de scie circulaire 5 Vitesse de rotation de l outil de coupe 6 Le moteur d gage du monoxyde de carbone qui est un gaz toxique Ne jamais le faire fonctionner...

Страница 14: ...ans un endroit a r moteur l arr t Ne pas fumer ne pas approcher de flammes ou d tincelles pr s du lieu o le plein est effectu et pr s du lieu de stockage du carburant Veiller ne pas trop remplir le r...

Страница 15: ...la bougie est en place MISE EN MARCHE ET ARR T DU MOTEUR D MARRAGE FROID La machine est consid r e comme froide si le moteur n a pas tourn plus de cinq minutes dans les dix minutes qui pr c dent la m...

Страница 16: ...fix e sur la protection du syst me de coupe MISE LONGUEUR DU FIL Au r gime maximum de rotation presser l g rement la t te fil nylon contre le terrain le fil sort automatiquement R p ter l op ration j...

Страница 17: ...DE LA BOUGIE D ALLUMAGE 1 Pour acc der la bougie il est n cessaire de d poser le cache sup rieur du moteur 8 D visser la vis 9 l aide de la cl six pans fournie NOTE Sous le capot du moteur se trouvent...

Страница 18: ...0 heures R servoir de carburant Nettoyer Jeu aux soupapes R gler 2 Vis et crous V rifier resserrer Incident Cause probable Page Le moteur ne d marre pas 1 Il n y a pas d essence 4 2 Le bouton marche a...

Страница 19: ...EMISAGE 1 Retirer la bougie d allumage v rifier si elle est propre et si l cartement des lectrodes est correct Tirer le lanceur plusieurs reprises 2 Il est recommand de visser la bougie la main aussi...

Страница 20: ...ocylindre arbre came en t te 4 temps Cylindr e cm3 25 Al sage Course mm 35 x 26 Puissance nette ISO 8893 kW tr min 1 0 72 7 000 Couple max net SAE J1349 N m 1 0 5 000 R gime maximum tr min 10 000 Rale...

Страница 21: ...eiterzureichen Lesen Sie bitte den Garantievertrag durch um alle Ihre Rechte und Pflichten in Kenntnis zu nehmen Beim Garantievertrag handelt es sich um ein getrenntes von Ihrem Vertragsh ndler gelief...

Страница 22: ...riffe und der Aufh ngpunkt des Tragegeschirrs richtig positioniert sind und das Ger t richtig ausgeglichen ist Die richtigen Positionen und Einstellungen sind im Kapitel Vorbereitungen und berpr funge...

Страница 23: ...immer nur mit einem Nylonfaden M hwerkzeug verwenden Keine Kreiss genbl tter oder Metall Trennscheiben montieren 5 Drehzahl des M hwerkzeugs 6 Im Abgas des Motors ist giftiges Kohlenmonoxid enthalten...

Страница 24: ...tten kann Benzin ist u erst feuergef hrlich und kann unter gewissen Umst nden Explosionen verursachen Den Tank an einer gel fteten Stelle bei abgestelltem Motor f llen An Stellen an denen Benzin geta...

Страница 25: ...betrachtet wenn er w hrend der zehn dem Starten vorangehenden Minuten nicht l nger als 5 Minuten in Betrieb war HINWEIS Bei hohen Temperaturen Sommer startet der Motor unter Umst nden besser ohne Chok...

Страница 26: ...Faden Schneidmesser 4 auf der Schutzvorrichtung des M hwerks richtig befestigt ist NYLONFADEN M HKOPF Die Zwischenscheibe auf die Antriebswelle setzen und den Nylonfaden M hkopf festschrauben Das Fes...

Страница 27: ...sen HINWEIS Unter der Motorhaube befinden sich hei e und bewegliche Magnet Schwungrad Teile Der Grastrimmer darf auf keinen Fall mit abgenommener Motorabdeckung betrieben werden 2 Den Z ndkerzensteck...

Страница 28: ...offtank Reinigen Ventilspiel Einstellen 2 Schrauben und Muttern Pr fen nachziehen Vorfall M gliche Ursache Seite Der Motor startet nicht 1 Der Tank ist leer 4 2 Der Stop Schalter befindet sich auf Pos...

Страница 29: ...da der Elektrodenabstand stimmt Das Anlasserseil mehrmals ziehen 2 Die Z ndkerze so weit wie m glich von Hand einschrauben dann mit dem Schl ssel noch um 1 8 bis 1 4 Umdrehung festziehen 3 Den lstand...

Страница 30: ...gende Nockenwelle Einzylinder Hubraum cm3 25 Bohrung Hub mm 35 x 26 Nettoleistung ISO 8893 kW U min 1 0 72 7 000 Nutzdrehmoment dei motor SAE J1349 N m 1 0 5 000 Maximale Drehzahl U min 10 000 Leerlau...

Страница 31: ...ivenduta Le raccomandiamo di leggere il certificato di garanzia per comprendere al meglio doveri e responsabilit Tale certificato un documento separato fornito dal concessionario Non sono ammesse ripr...

Страница 32: ...escritte al capitolo Preparazione e verifiche preliminari nel presente manuale B7 Controllare la corretta regolazione del minimo in modo che la rotazione dell attrezzo sia interrotta appena si rilasci...

Страница 33: ...it di rotazione dell attrezzo di taglio 6 Il motore rilascia monossido di carbonio che un gas tossico velenoso Non azionare in un luogo chiuso 7 La benzina estremamente infiammabile ed esplosiva Spegn...

Страница 34: ...e non avvicinare fiamme o scintille al punto in cui si sta effettuando il rifornimento e in prossimit del luogo di stoccaggio del carburante Non riempire eccessivamente il serbatoio di benzina non de...

Страница 35: ...AMENTO A FREDDO La macchina considerata fredda se il motore non resta in moto per almeno cinque minuti nei dieci che precedono la messa in marcia NOTA Se la temperatura ambiente sufficientemente eleva...

Страница 36: ...non uniformi che il tosaerba non riesce a trattare Verificare che la lama tagliafilo 4 sia fissata correttamene alla protezione del sistema di taglio REGOLAZIONE DELLA LUNGHEZZA DEL FILO A velocit di...

Страница 37: ...scherina superiore del motore 8 per accedere alla candela Svitare la vite 9 con la chiave esagonale in dotazione NOTA Sotto la copertura del motore sono presenti pezzi caldi e mobili volano magnetico...

Страница 38: ...ore successivamente ogni 6 mesi o 50 ore Serbatoio del carburante Pulizia Valve clearance Regolazione 2 Viti e bulloni Controllo Serraggio Problema Causa probabile Pagina Il motore non si avvia 1 Man...

Страница 39: ...za tra gli elettrodi sia corretta Esercitare ripetute trazioni sula maniglia di avviamento 2 Si raccomanda di avvitare manualmente il pi a fondo possibile la candela quindi di servirsi dell apposita c...

Страница 40: ...mme in testa Cilindrata cc 25 Alesaggio Corsa mm 35 x 26 Potenza netta ISO 8893 kW giri min 1 0 72 7 000 Coppia netto max dell motore SAE J1349 N m 1 0 5 000 Velocit massima giri min 10 000 Minimo gir...

Страница 41: ...verzoeken u de garantievoorwaarden zorgvuldig te lezen opdat u volledig op de hoogte bent vanuw rechten en verantwoordelijkheden Het garantiebewijs is een afzonderlijk document dat verstrekt is door...

Страница 42: ...UIK C1 Uitlaatgas bevat koolmonoxide een giftig gas Start de machine dus alleen binnen wanneer het lokaal goed geventileerd is C2 Werk uitsluitend bij daglicht C3 Werk zo min mogelijk op nat terrein C...

Страница 43: ...machine uitsluitend met de nylon trimmerkop en niet met cirkelzaag of andere bladen 5 Toerental snijgereedschap 6 De uitlaatgassen van de motor bevatten giftig koolmonoxidegas Laat de motor niet draa...

Страница 44: ...in een geventileerde ruime en altijd met uitgeschakelde motor Tijdens het navullen mag niet gerookt worden ook niet door omstanders Laat niemand met open vuur of met vonkgevaarlijk gereedschap in de b...

Страница 45: ...worden beschouwd wanneer hij in de afgelopen 10 minuten niet langer dan 5 minuten heeft gedraaid NB Als de omgevingstemperatuur te hoog is s zomers start de motor wellicht beter zonder gebruikmaking...

Страница 46: ...nteerd is SNOER AFWIKKELEN Is het snoer beschadigd dan kan een nieuw stuk afgewikkeld worden door bij maximumtoerental de kop licht aan de grond te tikken Herhaal dit tot de lengte van het snoer voldo...

Страница 47: ...Los de bout 9 met de meegeleverde zeskantsleutel NB Onder de motorkap bevinden zich hete en draaiende onderdelen vliegwielmagneet De trimmers mag in geen geval worden gebruikt zonder de motorkap 2 Ne...

Страница 48: ...Controleren 2 Koppelingsveer en voering Controleren 2 Ralenti Controleren 2 Nastellen 2 Motorolie Controleren Verversen Na de eerste 10 bedrijfsuren en vervolgens om de 6 maanden of 50 bedrijfsuren B...

Страница 49: ...voldoende 3 Kontroleer de smeerolie op vuil en vervolgens het oliepeil 4 Vul de benzinetank en start de motor NB Indien u voor winterberging olie in de cilinder heeft gegoten zal de motor even roken...

Страница 50: ...ttovermogen ISO 8893 kW Omw min 1 0 72 7 000 Max netto paar van de motor SAE J1349 N m 1 0 5 000 Maximumtoerental Omw min 10 000 Stationair toerental Omw min 3 100 Motorolie SAE 10W30 Inhoud oliecarte...

Страница 51: ...mendamos lea el seguro de garant a para conocer todos sus derechos y responsabilidades El seguro de garant a es un documento separado suministrado por su concesionario Est prohibido hacer cualquier re...

Страница 52: ...t est correctamente ajustado para que la herramienta se detenga al soltar el gatillo de mando de los gases B8 Instale la pantalla de protecci n de la cuchilla en la herramienta de corte de cuchilla mi...

Страница 53: ...s de metal 5 Velocidad de rotaci n de la herramienta de corte 6 El motor emite gas mon xido de carbono que es t xico y venenoso No lo tenga en marcha en un lugar cerrado 7 La gasolina es muy inflamabl...

Страница 54: ...fume no acerque llamas o chispas del lugar en que se efect a el llenado o del lugar en que se conserva la gasolina Procure no llenar demasiado el dep sito de gasolina no debe haber gasolina en el orif...

Страница 55: ...ina se considerada fr a si el motor no ha funcionado m s de cinco minutos en los ltimos 10 minutos anteriores a la puesta en marcha NOTA Si la temperatura ambiente es demasiado c lida verano es posibl...

Страница 56: ...r donde no puede pasar el cortac sped Verifique que la cuchilla cortahilo 4 est bien fijada en la protecci n del sistema de corte LONGITUD DEL HILO Cuando el cabezal est girando al m ximo golpee ste l...

Страница 57: ...ENCENDIDO 1 Para acceder a la buj a hay que sacar la tapa superior del motor 8 Destornille el tornillo 9 con la llave hexagonal suministrada NOTA Bajo el cap del motor se encuentran piezas calientes...

Страница 58: ...ar Cambiar el aceite al cabo de 10 horas y luego cada 6 meses o 50 horas Dep sito de carburante Limpiar Holgura en las v lvulas Ajustar 2 Tornillos y tuercas Verificar Apretar Problema Causa probable...

Страница 59: ...limpia y si la separaci n de los electrodos es correcta Tirar del lanzador varias veces 2 Se recomienda enroscar la buj a con la mano hasta el m ximo y a continuaci n utilizar una llave para buj as pa...

Страница 60: ...rbol de levas superior monocilindro Cilindrada cm3 25 int Carrera mm 35 x 26 Potencia neta ISO 8893 kW rev min 1 0 72 7000 Par motor neto SAE J1349 N m 1 0 5000 R gimen m ximo rev min 10 000 Ralent r...

Страница 61: ...l 385 1 2002053 Fax 385 1 2020754 http www hongoldonia hr jure hongoldonia hr ICELAND Bernhard ehf Vatnagardar 24 26 104 Reykdjavik Tel 354 520 1100 Fax 354 520 1101 http www honda is ROMANIA Hit Powe...

Страница 62: ...ud esindajana et alltoodud seadmed vastavad k ikidele Tehniliste seadmete direktiivin uetele Lisaks selle vastavad seadmed j rgmiste direktiivide n uetele M ratase v litingimustes EMC direktiiv 2 Sead...

Страница 63: ...ijving van de machine a Algemene benaming Trimmers b Functie Gras maaien c Type d Serie nummer 3 Geluidsemissie materiaal voor gebruik buitenhuis a Gemeten geluidsvermogen niveau b Gewaarborgd geluids...

Страница 64: ...RCS ORL ANS B 501 736 565...

Отзывы: