background image

SERVICING YOUR HONDA LAWN MOWER

29

MAINTENANCE SAFETY

Some of the most important safety precautions follow. However, we 
cannot warn you of every conceivable hazard that can arise in 
performing maintenance. Only you can decide whether or not you 
should perform a given task.

Safety Precautions

Make sure the engine is off before you begin any maintenance or 
repairs. This will eliminate several potential hazards:

Carbon monoxide poisoning from engine exhaust.

Be sure there is adequate ventilation whenever you operate
the engine.

Burns from hot parts.

Let the engine and exhaust system cool before touching.

Injury from moving parts.

Do not run the engine unless instructed to do so.

Read the instructions before you begin, and make sure you have 
the tools and skills required.

To reduce the possibility of fire or explosion, be careful when 
working around gasoline. Use only a nonflammable solvent, not 
gasoline, to clean parts. Keep cigarettes, sparks, and flames away 
from all fuel-related parts.

Remember that an authorized Honda servicing dealer knows your 
mower best and is fully equipped to maintain and repair it.

To ensure the best quality and reliability, use only new, genuine Honda 
parts or their equivalents for repair and replacement.

"

"

"

"

 WARNING

Failure to properly follow maintenance 
instructions and precautions can cause you to 
be seriously hurt or killed.

Always follow the procedures and precautions 
in this owner’s manual.

HRB216 TXA HXA.book  Page 29  Monday, March 26, 2001  1:06 PM

Содержание HRB216HXA Harmony

Страница 1: ...651 00X31 VE2 6510 IPC 15000 2001 03 POM53250 A PRINTED IN U S A 1997 2000 2001 American Honda Motor Co Inc All Rights Reserved Printed on Recycled Paper Owner s Manual Rotary Mower HRB216TXA HRB216HX...

Страница 2: ...ns or design at any time without notice and without incurring any obligation whatever lawn mower lawn mower The engine exhaust from this product contains chemicals known to the State of California to...

Страница 3: ...your mower other property or the environment We suggest you read the Distributor s Limited Warranty page 65 and Emission Control System Warranty page 66 to fully understand coverage and your responsi...

Страница 4: ...good judgment You will find important safety information in a variety of forms including Safety Labels on the lawn mower Safety Messages preceded by a safety alert symbol and one of three signal words...

Страница 5: ...R 28 THE IMPORTANCE OF MAINTENANCE 28 MAINTENANCE SAFETY 29 MAINTENANCE SCHEDULE 30 BLADES 31 ENGINE MAINTENANCE 34 FUEL 39 CONTROL CABLE ADJUSTMENTS 41 GRASS BAG CLEANING AND REPLACEMENT 46 STORAGE 4...

Страница 6: ...tones pieces of wire and other loose objects Never operate the blades over gravel Keep Shields in Place Guards and shields are designed to protect you from being hit by thrown objects and from hot eng...

Страница 7: ...er controls Never permit anyone to operate the mower without proper instruction Do not let children operate the mower If people or pets suddenly appear in front of the mower while it is in operation i...

Страница 8: ...abels warn you of potential hazards that can cause serious injury Read them carefully If a label comes off or becomes hard to read contact an authorized Honda servicing dealer for a replacement HRB216...

Страница 9: ...most frequently used controls HANDLEBAR SHIFT LEVER THROTTLE LEVER DISCHARGE GUARD FUEL TANK CAP CUTTING HEIGHT ADJUSTMENT LEVERS MUFFLER OIL FILLER CAP CUTTING HEIGHT ADJUSTMENT LEVER GRASS BAG HAND...

Страница 10: ...D FRAME SERIAL NUMBER LABEL FUEL VALVE AIR CLEANER CARBURETOR SPARK PLUG CAP BLADE CONTROL LEVER DRIVE CLUTCH LEVER RECOIL STARTER GRIP TRANSMISSION TYPE T 3 SPEED H HYDROSTATIC HRB216 TXA HXA book Pa...

Страница 11: ...ver The throttle lever controls engine speed and opens and closes the choke CHOKE Closes the choke use when starting a cold engine FAST For restarting a warm engine and for mowing SLOW For idling the...

Страница 12: ...lever operates like a traditional clutch and should always be fully engaged or released On the HX hydrostatic transmission model the drive clutch lever is used to adjust the ground speed by varying t...

Страница 13: ...the drive clutch lever fully engaged the mower will move very slowly or not at all SLOW Use a slow speed for mowing thick grass or maneuvering in small areas FAST For maximum self propelled speed in...

Страница 14: ...o maximize the service life of your lawn mower it is very important to take a few moments before you operate the lawn mower to check its condition Be sure to take care of any problem you find or have...

Страница 15: ...ns for refueling CHECK YOUR WORK AREA For your safety and the safety of others always inspect the area before operating the lawn mower Objects Anything which can be picked up by the blade and thrown i...

Страница 16: ...dlebar mounting brackets 4 Tighten the handlebar locking knobs securely Mulching Plug The mulching plug contours the mower deck for efficient mulching You can quickly remove the plug to install the gr...

Страница 17: ...and will eventually require replacement Grass bag replacement is explained on page 46 Installation 1 Raise the discharge guard Remove the mulching plug if it is installed Hook the grass bag onto the m...

Страница 18: ...ear levers To adjust cutting height pull each adjustment lever toward the wheel and move it into another notch If you are not sure what cutting height to select start with a high setting and check the...

Страница 19: ...operating the engine in an enclosed area such as a garage Your mower s exhaust contains poisonous carbon monoxide gas which can collect rapidly in an enclosed area and cause illness or death STARTING...

Страница 20: ...hen pull briskly Return the starter grip gently 4 If the CHOKE position was used during starting move the throttle lever away from the CHOKE position as soon as the engine warms up enough to run smoot...

Страница 21: ...ade rotation press the button on top of the blade control lever then push the lever forward quickly and hold it against the handlebar Release the blade control lever to stop the blades Operate the bla...

Страница 22: ...f propelled speed continue to fully hold the blade control lever against the handlebar This will help to extend the service life of the blade control mechanism Use the shift lever page 21 to change th...

Страница 23: ...lease the drive clutch lever before shifting gears For maximum mowing performance use 1st and 2nd gears for mowing and 3rd gear for transporting To avoid incomplete gear engagement be sure the shift l...

Страница 24: ...E ENGINE 1 Release the drive clutch and blade control levers 2 Move the throttle lever to STOP 3 When the mower is not in use turn the fuel valve to the OFF position BLADE CONTROL LEVER DRIVE CLUTCH L...

Страница 25: ...lebar to control the mower Slopes Mow across slopes not up and down Avoid steep slopes more than 20 and be careful when changing direction Mowing on a slope when the grass is damp or wet could cause y...

Страница 26: ...e engine immediately disconnect the spark plug cap and check for damage see page 31 Striking objects may damage the blades bend the crankshaft and or break the mower deck or other components Vibration...

Страница 27: ...If you look closely you ll see that most grass has stems and leaves If you cut off the leaves you ll scalp the lawn Let the grass recover between mowings Your mower will work better and your lawn wil...

Страница 28: ...wer deck and collect in clumps on the lawn Always wait for wet grass to dry before mowing Fallen Leaves Your mower can be used to pick up fallen leaves for disposal If using the mower to bag large amo...

Страница 29: ...ctions where you can use counterclockwise mowing patterns Bagging Use a clockwise mowing pattern This will give the best bagging performance leaving the least amount of clippings on the lawn Side Disc...

Страница 30: ...to normal operating conditions If you operate your mower under severe conditions such as sustained high load or high temperature operation or use in unusually wet or dusty conditions consult your ser...

Страница 31: ...the engine unless instructed to do so Read the instructions before you begin and make sure you have the tools and skills required To reduce the possibility of fire or explosion be careful when working...

Страница 32: ...bolt tightness check 31 Grass bag check 15 Engine oil check 35 change 1 34 Air cleaner check 36 clean 1 1 36 replace filter 36 Spark plug clean adjust 37 replace Spark arrester optional equipment clea...

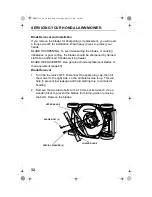
Страница 33: ...e can break causing blade pieces to be thrown from the mower When a blade needs sharpening or replacement take the lawn mower to an authorized Honda servicing dealer Or if you have a torque wrench you...

Страница 34: ...dealer BLADE REPLACEMENT Use genuine Honda replacement blades or their equivalent page 65 Blade Removal 1 Turn the fuel valve OFF Disconnect the spark plug cap then tilt the mower to the right side so...

Страница 35: ...rts 3 Tighten the blade bolts with a torque wrench Use a wooden block to prevent the blades from turning when tightening the bolts Blade bolt torque 36 43 ft lb 5 0 6 0 kg m 49 59 N m If you do not ha...

Страница 36: ...he used oil will drain through the filler neck Allow the oil to drain completely Please dispose of used motor oil and the containers in a manner that is compatible with the environment We suggest you...

Страница 37: ...oil level can cause engine damage 4 Screw in the filler cap dipstick securely Engine Oil Recommendations Oil is a major factor affecting performance and service life Use 4 stroke automotive detergent...

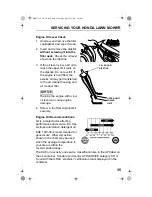
Страница 38: ...6 1 Press down on the cover tabs and remove the cover 2 Remove the filter from the air cleaner housing 3 Inspect the filter and replace it if damaged 4 Clean the filter by tapping the filter several t...

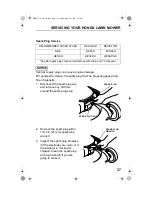
Страница 39: ...the spark plug with a 13 16 in 21 mm spark plug wrench 3 Inspect the spark plug Replace it if the electrodes are worn or if the insulator is cracked or chipped Clean the spark plug with a wire brush...

Страница 40: ...with a 13 16 in 21 mm spark plug wrench to compress the washer If reinstalling the old spark plug tighten 1 8 to 1 4 turn after the spark plug seats If installing a new spark plug tighten 1 2 turn af...

Страница 41: ...ight spark knock or pinging metallic rapping noise while operating under heavy loads This is no cause for concern If spark knock or pinging occurs at a steady engine speed under normal load change bra...

Страница 42: ...efuel the mower inside a building where gasoline fumes may reach flames or sparks Keep gasoline away from appliance pilot lights barbecues electric appliances power tools etc Spilled fuel is not only...

Страница 43: ...as required 3 Tighten the lock nuts and recheck free play 4 Start the engine outdoors Move the throttle to FAST Operate the blade control lever The blades should engage when you push the lever forward...

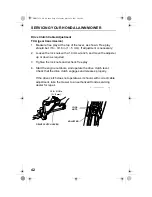
Страница 44: ...e adjuster up or down as required 3 Tighten the lock nuts and recheck free play 4 Start the engine outdoors and operate the drive clutch lever Check that the drive clutch engages and releases properly...

Страница 45: ...owly forward when the shift lever is moved one notch forward If the mower does not operate as outlined above go to step 5 If the mower does operate as outlined above adjustment is not required 5 Loose...

Страница 46: ...Loosen the lock nuts with a 10 mm wrench and move the adjuster up or down as required 2 Tighten the lock nuts and recheck lever alignment 3 Start the engine outdoors and operate the shift lever releas...

Страница 47: ...he FAST position 2 Remove the air cleaner cover see page 36 3 Use a feeler gauge and measure the clearance between the control choke arm and the control lever The clearance should be 0 0 04 in 0 1 mm...

Страница 48: ...acement Replace a worn or damaged bag with a Honda replacement bag or its equivalent page 65 Bag Removal 1 Unclip the plastic edges of the bag from the frame 2 Remove the bag from the frame Bag Instal...

Страница 49: ...t engine can cause damage If the engine has been running allow it to cool for at least half an hour before washing Mower Deck If using a garden hose or pressure washing equipment to clean the mower de...

Страница 50: ...emaining on the engine 4 Stop the engine and allow it to cool 5 After the lawn mower is clean and dry touch up any damaged paint touch up paint part numbers are on page 65 and coat other areas that ma...

Страница 51: ...ccur within a few months or even less if the gasoline was not fresh when you filled the fuel tank The Distributor s Limited Warranty page 66 does not cover fuel system damage or engine performance pro...

Страница 52: ...turn the fuel valve ON see page 9 This will allow fuel in the fuel tank to drain out through the carburetor bowl 3 After the fuel is completely drained reinstall the drain bolt Engine Oil Change the e...

Страница 53: ...linder Handlebar Folding The handlebar can be folded for storage or transport by loosening the handlebar locking knobs 1 Remove the grass bag You can place it on top of the engine with the bag opening...

Страница 54: ...use fuel or oil leakage The handlebar can be folded for compact storage page 51 With the engine and exhaust system cool cover the mower to keep out dust A hot engine and exhaust system can ignite or m...

Страница 55: ...move the grass bag LOADING AND UNLOADING If a suitable loading ramp is not available two people should lift the mower on and off the transport vehicle while holding the mower level Position the mower...

Страница 56: ...function ignition malfunction valves stuck etc Replace or repair faulty components as necessary Loss of Power Possible Cause Correction 1 Check throttle position Throttle not set to FAST Move throttle...

Страница 57: ...ion 1 Check that the throttle lever is in the FAST position Engine speed is too slow to cut well Move throttle lever to the FAST position page 19 2 Reduce forward speed Mower is moving too fast for la...

Страница 58: ...ormance can be improved by specific modifications to the carburetor If you always operate your lawnmower at altitudes above 5 000 feet 1 500 meters have your servicing dealer perform this carburetor m...

Страница 59: ...eep it functioning as designed 1 Allow the engine to cool and disconnect the spark plug cap to prevent accidental starting 2 Remove the three flange bolts and the heat shield Remove the two set screws...

Страница 60: ...10 by volume You may use gasoline containing up to 10 ethanol by volume Gasoline containing ethanol may be marketed under the name Gasohol MTBE Methyl Tertiary Butyl Ether 15 by volume You may use gas...

Страница 61: ...sion control systems The following instructions and procedures must be followed in order to keep the Honda engine emissions within the emission standards Tampering and Altering Tampering with or alter...

Страница 62: ...ormation relating the engine s emission durability period The descriptive term indicates the useful life period for the engine s emission control system See your Emission Control System Warranty page...

Страница 63: ...t of the original design and quality may impair the effectiveness of your emission control system A manufacturer of an aftermarket part assumes the responsibility the part will not adversely affect em...

Страница 64: ...5 kg HXA 91 5 lb 41 5kg Cutting Width 21 in 530 mm Approximate Cutting Height adjustable 3 4 in 18 1 in 25 mm 1 1 2 in 38 mm 2 in 51 mm 2 1 2 in 64 mm 3 in 77 mm Fuel Tank Capacity 0 29 US gal 1 1 lit...

Страница 65: ...Maximum Governed Speed 2 950 3 100 rpm Shop manual Blade Control Cable Adjust for 3 8 9 16 in 10 15 free play at blade control lever p 41 Drive Clutch Cable TXA Adjust for 1 16 3 16 in 1 5 mm free pl...

Страница 66: ...will give you additional information for maintaining and repairing your lawnmower You may order them from an authorized Honda servicing dealer Shop Manual This manual covers complete maintenance and o...

Страница 67: ...0 1 1 12 0 11 3 4 56 4 0 7 0 7 1 1 11 8 1 1 1 1 0 9 1 1 0 11 1 1 1 8 0 0 1 5 1 1 4 1 4 1 1 4 5...

Страница 68: ...roblem However if you should require further assistance write or call the Power Equipment Customer Relations Department of American Honda Motor Co Inc Refer to page 70 for contact information Exclusio...

Страница 69: ...gnition system and catalytic converter Also included may be hoses connectors and other emission related assemblies Manufacturer s Warranty Coverage The 1995 and later power equipment engines are warra...

Страница 70: ...uivalent to the original parts may impair the effectiveness of your engine emission control system If such a replacement part is used in the repair or maintenance of your engine and an authorized Hond...

Страница 71: ...TOR CO INC DISCLAIMS ANY RESPONSIBILITY FOR INCIDENTAL OR CONSEQUENTIAL DAMAGES SUCH AS LOSS OF TIME OR THE USE OF THE POWER EQUIPMENT OR ANY COMMERCIAL LOSS DUE TO THE FAILURE OF THE EQUIPMENT AND AN...

Страница 72: ...decision made by the dealership s management contact the Honda Power Equipment Customer Relations Office You can write American Honda Motor Co Inc Power Equipment Division Customer Relations Office 49...

Страница 73: ...s 62 Drive Clutch Lever Cable Adjustement HXA 43 Cable Adjustment TXA 42 Operation 20 E Emission Control System 59 Ethanol See Fuel Oxygenated Fuels F Filter See Air Cleaner Service Fuel Additive 49 C...

Страница 74: ...ications Dimensions 62 Engine 62 Maintenance 63 Tuneup 63 Speed Ground Speeds 63 Starting the Engine 17 Stopping the Engine 22 Storage Placing in Storage 52 Preparation 47 Removing from Storage 52 T T...

Страница 75: ...ns or design at any time without notice and without incurring any obligation whatever lawn mower lawn mower The engine exhaust from this product contains chemicals known to the State of California to...

Страница 76: ...31VE2652 00X31 VE2 6520 IPC 20000 2002 01 POM53250 B PRINTED IN U S A Printed on Recycled Paper EM3...

Отзывы: