background image

Wear heavy gloves when handling the

blades.

Disengage drive to attachments, stop the en-

gine and remove the ignition key before cleaning, checking or

working on the machine.

5.4 USING THE MACHINE

5.4.1 Starting

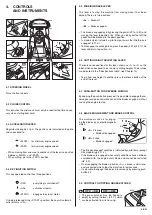
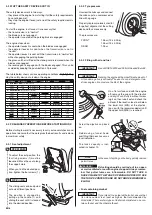
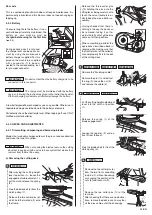
All starting operations have to be effected in

an open or well-ventilated area! ALWAYS REMEMBER THAT

THE ENGINE’S EXHAUST FUMES ARE TOXIC!

To start the engine:

– engage the parking brake (

4.5), on sloping ground;

– put the transmission into neutral («N») (

4.22 or 4.32/33);

– disengage the blades (

4.8);

– if started cold, use the choke (

4.2);

– position the accelerator lever (

4.3) between «SLOW» and

«FAST»;

– put in the key (

4.4), and turn to «ON» to make electrical contact,

then turn to «START» to start the engine;

– release the key once the engine has started.

When the engine has started, put the accelerator in the «SLOW» po-

sition and close the choke (if fitted).

The choke must be closed as soon as the engine

is running smoothly. Using it when the engine is already warm can

foul the spark plug and cause the engine to run erratically.

Should you have difficulties in starting do not per-

sist with using the starter motor as this can run down the battery or

flood the engine.Turn the key to the «OFF» position, wait for a few

seconds and then repeat the operation.Should the malfunction per-

sist, refer to chapter «7» of this manual.

Always bear in mind that the safety devices pre-

vent the engine starting when:

– the blades are engaged;

– the transmission is not in neutral («N»).

– the operator is absent with the parking brake disengaged.

In these cases, once the situation has been corrected, the key must

first be turned back to «OFF» before the engine can be restarted.

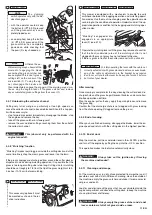
5.4.2 Forward drive and moving without mowing

This machine has not been approved for use

on public roads. It has to be used (as indicated by the High-

way Code) in private areas closed to traffic.

When moving the machine, the blades must be

disengaged and the cutting deck put at its highest position (posi-

tion «7»).

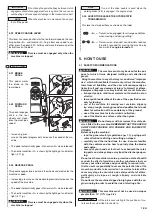
Put the accelerator control between the «SLOW» and «FAST» po-

sitions, and the gear change lever in the 1st speed position

(

4.22).

Keep the pedal pressed down and disengage the parking brake.

Slowly release the pedal which will turn from «brake» to «clutch»,

thus operating the rear wheels (

4.21).

HF2315SB•

WARNING!

WARNING!

NOTE

WARNING!

IMPORTANT

NOTE

IMPORTANT

DANGER!

Do not use mixtures containing more than 10% ethanol, or fuel con-

taining methanol (methyl or wood alcohol), which do not contain co-

solvents, or corrosion inhibitors for methanol.

In the case of a mixture containing methanol with addition of co-

solvents and corrosion inhibitors, limit the proportion to 5% of

methanol.

The guarantee does not cover damage caused to the fuel system

or engine performance problems resulting from the use of fuel

containing alcohol. Honda does not give its approval to the use of

fuels containing methyl alcohol since their suitability is not yet

proven.

5.3.4 Checking the braking system

Make sure that the machine’s braking capacity is adequate for the

conditions of usage.Avoid starting the machine if you have doubts on

the brake efficiency. If necessary, adjust the brake (

6.3.4). If you

still have doubts about its efficiency, contact your Dealer.

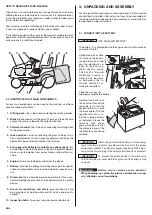
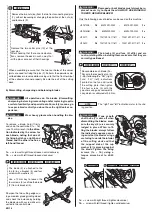
5.3.5 Fitting the protection devices at the exit

(grass-catcher or stone-guard)

Never use the machine without having fitted

the protection devices at the exit!

The protection devices must be fitted with the tipping levers low-

ered.

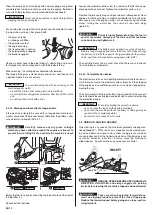
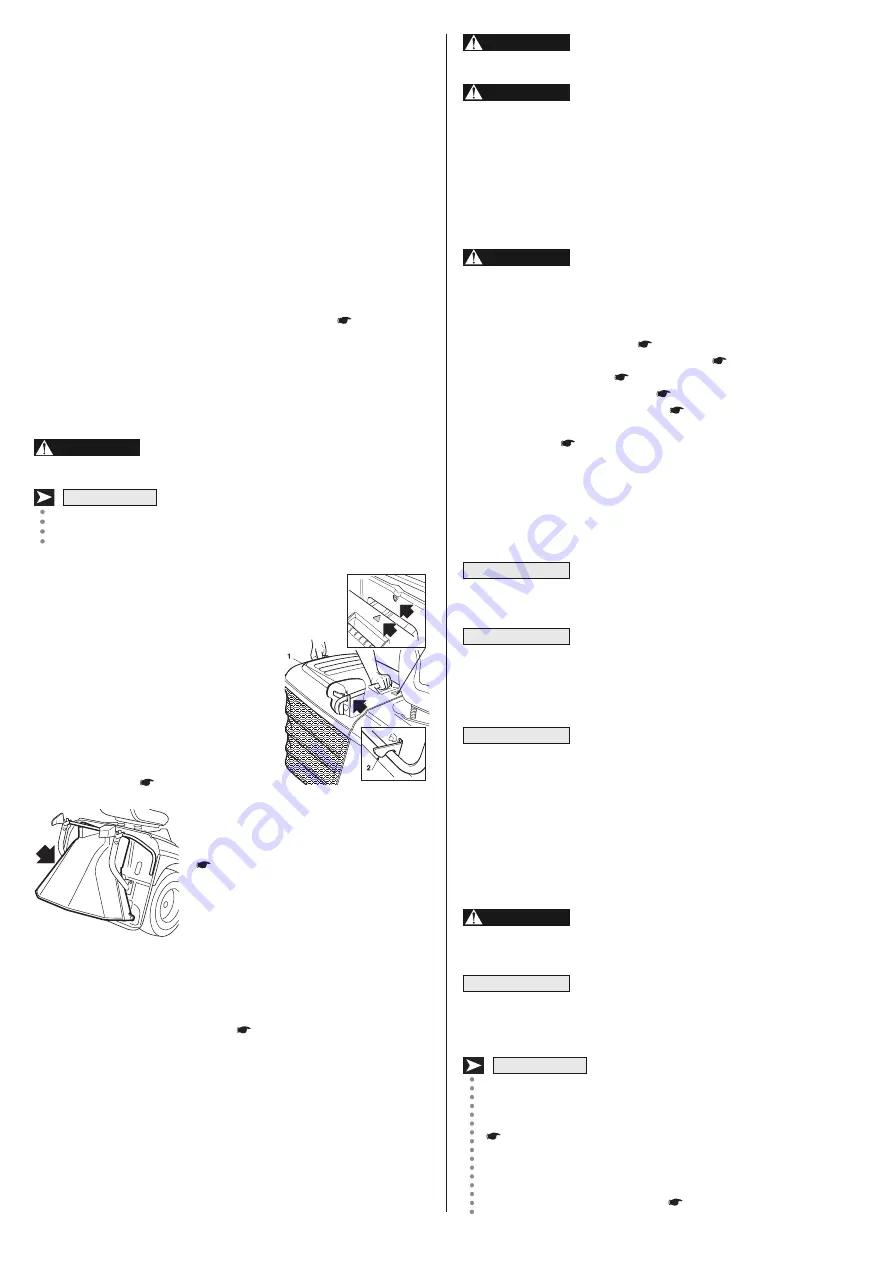
Attach the grass-catcher inserting the up-

per tube of the frame into the slots of the

2 brackets (1).

To centre the grass-catcher correctly, align

the two symbols on the grass-catcher and

on the back plate

Make sure that the lower tube of the open-

ing of the grass-catcher hooks onto the

pawl (2).

If the hook is too stiff or too loose, adjust

the return spring (

6

.3.6).

If you would like to mow without using the

grass-catcher, an optional stone-guard kit

(

9.2) is available on request.This has

to be attached to the rear plate as indi-

cated in the relevant instructions.

5.3.6 Checking the effectiveness of the safety devices

Check that the safety systems are working properly by simulating the

various situations of usage listed (

5.2) and making sure that the

indicated result is achieved for each situation.

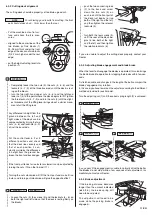
5.3.7 Checking the blades

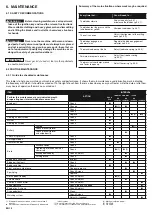
Check that the blades are sharpened properly and firmly fixed to their

hubs.

– A badly sharpened blade pulls at the grass and causes the lawn

to turn yellow.

– A loose blade causes unusual vibrations and can be dangerous.

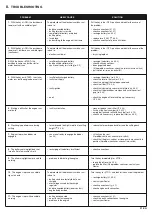
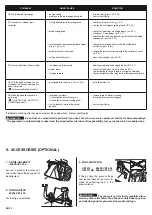
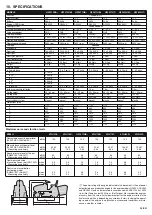
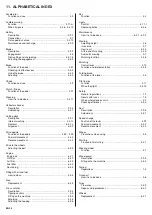
HF2•••HT•

WARNING!

9 EN

Содержание hf2315

Страница 1: ...15 6 4 Dismantling and renewing parts 18 7 ENVIRONMENTAL PROTECTION 20 It gives advice on machine use and respecting the environment 8 TROUBLESHOOTING 21 A help in quickly resolving any problems 9 ACC...

Страница 2: ...member there is no such thing as a safe slope Travel on grass slopes requires particular care To guard against overturning do not stop or start suddenly when going up or downhill engage the clutch slo...

Страница 3: ...Danger of cutting yourself Blades in movement Do not put hands or feet near or under the opening of the cutting plate 8 Warning Do not manipulate the microswitch 9 Avoid injury from getting caught in...

Страница 4: ...se and maintenance of a range of machines with many differing features are described in this manual It is therefore impor tant to clearly identify your machine s model in order to following all of the...

Страница 5: ...engaged The Blades engaged condition is indicated by a pilot lamp except SB models 4 11 c If the blades are engaged when safety conditions have not been complied with the engine shuts down and cannot...

Страница 6: ...gaging drive to the wheels and in the second part it acts as a brake on the rear wheels HF2315SB The grass catcher may be emptied by pressing the push button 4 9 2 keeping it pressed until the control...

Страница 7: ...pur pose for which it was designed cutting and collection of grass Using the machine in any other way is considered improper use which will invalidate the warranty relieve the manufac turer from all l...

Страница 8: ...3 3 Filling with oil and fuel Use oil SAE 10W30 and Petrol Unleaded Euro 95 Running the engine with an insufficient amount of oil can damage it very seriously The use of a non detergent or two stroke...

Страница 9: ...lease the pedal which will turn from brake to clutch thus operating the rear wheels 4 21 HF2315SB WARNING WARNING NOTE WARNING IMPORTANT NOTE IMPORTANT DANGER Do not use mixtures containing more than...

Страница 10: ...e done with the blades disengaged otherwise the engine stops pull out the lever 1 4 9 1 and tip up the grass catcher to empty it close up the grass catcher so that it hooks onto the pawl stop 2 and pu...

Страница 11: ...ual grass and earth Look for and eliminate all the grass that has accumulated inside the engine compartment and above the cutting deck to keep the machine at an optimal level of efficiency Always empt...

Страница 12: ...slide sideways tip over or otherwise cause loss of control REDUCE SPEED BEFORE ANY CHANGE OF DIRECTION ON SLOPES and always engage the parking brake before leaving the machine stopped and unattended T...

Страница 13: ...f the problem persists the probable causes are either badly sharpened blades or deformed wings 10 Be very careful when mowing near bushes or low kerbs which could distort the horizontal position and d...

Страница 14: ...screen Check Battery Charge Check electrolyte level Check electrolyte level and acide density Tires air pressure Check Cutting plate belt Check Transmission belt Check Brake Brake condition Check Tigh...

Страница 15: ...tery To ensure long life to the battery it is es sential to keep it carefully maintained The battery on your machine must be charged before using for the first time 3 4 During periods when it is not u...

Страница 16: ...e deck in such a way that all the pins come out of their housings When assembling ensure that the two rear holes of the corner joints are used for fixing the pins 7 Perform the operations de scribed a...

Страница 17: ...g good results from cutting the front part should always be 5 7 mm lower than the rear Put the machine onto a flat sur face and check the tyre pres sures aligned to the center lines of the two blades...

Страница 18: ...g this adjustment is by taking off the inspection hatch on the tunnel beneath the seat Loosen the nut 1 which holds the bracket 2 and turn the nut 3 un til the length of the spring is A 47 5 49 5 mm B...

Страница 19: ...the two air cleaner cover bolts 1a from the air cleaner cover and remove the cover Remove the paper element 3 from the air cleaner case Remove the foam element 4 from the air cleaner cover Pull the t...

Страница 20: ...and power circuits of the electronic card IMPORTANT NOTE IMPORTANT NOTE 2 15 Amps Blue protection of the recharge circuit 2 15 Amps Blue protection of the recharge circuit 3 10 Amps Red protection of...

Страница 21: ...and have the correct gap 6 4 5 check the engine oil level and top up if necessary 5 3 3 5 Starting is difficult or the engine runs erratically fault in carburation clean or replace the air filter 6 4...

Страница 22: ...14 Unusual vibrations while working the blades are imbalanced blades loose fixing bolts loose balance or replace the damaged blades 6 3 1 check that the blades are firmly fitted 6 3 1 remember the le...

Страница 23: ...res pressure 1 2 bar 1 2 bar 1 2 bar 1 2 bar 1 2 bar 1 2 bar 1 2 bar Fuel tank capacity 5 4 liters 5 4 liters 5 4 liters 8 5 liters 8 5 liters 8 5 liters 8 5 liters Weight 216 kg 215 kg 230 kg 234 kg...

Страница 24: ...o do so 5 3 3 Fuse Replacement 6 4 9 Grass catcher Description 2 2 4 Tipping controls 4 9 Fitting on the machine 5 3 5 Emptying 5 4 6 Adjusting the hooking 6 3 6 Key Function 4 4 Lights Control 4 11 l...

Страница 25: ...r paration de la machine indiqu es dans le pr sent manuel sont consid r s comme emploi impropre 5 1 dans ce cas la garantie perd tout effet le fabricant d cline toute responsabilit et reporte sur l ut...

Страница 26: ...es endommag es ou us es 7 Si le r servoir de carburant doit tre vidang effectuer cette op ra tion l ext rieur 8 Prendre garde au fait que la rotation d une lame entra ne la rotation de l autre lame 9...

Страница 27: ...TTES DE S CURIT Votre machine doit tre utilis e avec prudence Dans ce but des tiquettes destin es vous rappeler les principales pr cautions d utilisation ont t pla c es sur la machine sous forme de pi...

Страница 28: ...oupe c est le carter qui renferme les lames tournantes 2 Lames pi ces servant la tonte du gazon les ailettes situ es aux ex tr mit s favorisent le passage de la pelouse tondue vers la goulotte d jecti...

Страница 29: ...h Lames d clench es B D clench Lames enclench es La condition de Lames embray es est signal e par le voyant 4 11 c allum except mod les SB 4 11 c Si les lames sont embray es sans que les conditions de...

Страница 30: ...tionne l embrayage en activant ou en arr tant la rotation des roues sur la deuxi me elle agit en tant que frein sur les roues arri re HF2315SB Le renversement du bac pour le vider est ef fectu en mai...

Страница 31: ...RECOMMANDATIONS POUR LA S CURIT N utiliser la machine que pour effectuer ce quoi elle est destin e tonte et ramassage de l herbe Toute autre utilisation est consid r e comme un emploi impropre dans c...

Страница 32: ...et essence Utiliser de l huile SAE 10W30 et de l essence sans plomb Euro 95 Faire tourner le moteuravec une quantit d huile insuf fisante peut l endommager tr s s rieusement L utilisation d une huile...

Страница 33: ...qui passsera ainsi de la fonction frein la fonc tion embrayage et actionnera les roues arri re 4 21 REMARQUE ATTENTION IMPORTANT REMARQUE IMPORTANT DANGER ATTENTION ATTENTION HF2315SB Ne pas employer...

Страница 34: ...s contraire le moteur s arr terait extraire le levier 1 4 9 1 et renverser le bac pour le vider refermer le bac de fa on ce qu il reste fix au crochet de fixation 2 et rel cher le levier 1 ATTENTION H...

Страница 35: ...vider son bac et le secouer pour le d barrasser de tout r sidu d herbe ou de terre Rechercher et liminer toute accumulation d herbe sous le capot moteur et au dessus du plateau de coupe afin de maint...

Страница 36: ...le R DUIRE LA VITESSE AVANT TOUT CHANGE MENT DE DIRECTION EN PENTE et ne pas oublier d enclencher le frein de stationnement avant de laisser la machine l arr t et sans surveillance Sur les terrains en...

Страница 37: ...placement car celle ci peut tre excessive par rapport aux conditions du gazon si le probl me persiste les couteaux ne sont pas assez aiguis s ou le pro fil des ailettes est d form 10 Faire tr s atten...

Страница 38: ...cut e OP RATION ACTION INTERVALLE Proc der l entretien chaque intervalle d heures ou de mois de fonctionnement en fonction de celui qui aura lieu en premier CHAQUE UTILISATION 3 MOIS OU 20 HEURES 6 MO...

Страница 39: ...appoint 6 2 3 Batterie Un entretien soigneux de la batterie est un l ment essentiel pour garantir une longue dur e de vie La batterie de votre machine doit imp rativement tre charg e avant la pre mi r...

Страница 40: ...ateau en l extrayant de fa on ce que tous les pivots sortent de leur si ge Durant le montage veiller utiliser les deux trous post rieurs des querres pour la fixation des pivots 7 R p ter les op ration...

Страница 41: ...ri re Garer la tondeuse sur une surface plane et contr ler la bonne pression des pneus en correspondance avec la ligne m diane des lames placer deux cales 1 de 24 28 mm sous le bord avant du plateau e...

Страница 42: ...niveau correct Demander conseil au concessionnaire Honda agr quant la cl de filtre outil sp cial REMARQUE IMPORTANT L acc s au r glage est possible en tant le couvercle situ sur le tunnel la base du...

Страница 43: ...t attir s dans le moteur 1 D monter les deux boulons 1a de couvercle de filtre air du couvercle 2 de filtre air et retirer le couvercle Enlever l l ment en papier 3 du bo tier de filtre air Enlever l...

Страница 44: ...des signes vidents d usure UTILISER TOUJOURS DES COURROIES D ORIGINE REMARQUE IMPORTANT HF2622H HF23 HF24 5 Apr s avoir mis la bougie d allumage en place la serrer l aide d une cl bougie 1 pour compri...

Страница 45: ...6 4 5 v rifier le niveau d huile moteur et faire l appoint si necessaire 5 3 3 5 D marrage difficile ou fonctionnement irr gulier du moteur probl mes de carburation nettoyer ou remplacer le filtre air...

Страница 46: ...v e par rapport la hauteur de l herbe couper 5 4 5 engorgement de la goulotte le plateau de coupe est plein d herbe contr ler la pression des pneus 5 3 2 r tablir l alignement du plateau par rapport a...

Страница 47: ...1 8 m 1 8 m 1 6 m 1 6 m Hauteur de coup 30 80 mm 30 80 mm 30 90 mm 30 90 mm 30 90 mm 29 90 mm 29 90 mm Largeur de coupe 91 cm 91 cm 101 cm 101 cm 101 cm 122 cm 122 cm Capacit du bac de ramassage 280 l...

Страница 48: ...ion 5 4 8 Nettoyage Modalit s d ex cution 5 4 11 Pare pierres Description 2 2 5 Montage sur la machine 5 3 5 P dales embrayage traction Fonction des p dales 4 32 4 33 Marche avant 5 4 2 Marche arri re...

Страница 49: ...ng 5 1 der Maschine an gesehen und haben den Verfall der Garantie und die Ablehnung jeder Verantwortung sei tens des Herstellers zur Folge Dem Benutzer selbst dadurch entstandene oder Dritten zu gef g...

Страница 50: ...rheitsgr nden besch digte oder abgenutzteTeile 7 Falls der Tank zu entleeren ist muss dies im Freien erfolgen 8 Beachten Sie dass beim Drehen eines Messers sich auch das andere Messer dreht 9 Wenn Sie...

Страница 51: ...oder weniger 1 2 SICHERHEITSAUFKLEBER Bitte seien Sie bei der Benutzung Ihrer Maschine vorsichtig Um Sie daran zu erinnern haben wir auf der Maschine Aufkleber mit Symbolen ange bracht die Sie auf die...

Страница 52: ...s die rotierenden Messer aufnimmt 2 Messer Sind die zum M hen des Grases bestimmten Bauteile Die an den Au enseiten angebrachten Fl gel erleichtern die Zuf hrung des ge m hten Grases zum Auswurfkanal...

Страница 53: ...chaltet Der Zustand Messer eingeschaltet wird durch Leuchten der Kontroll lampe 4 11 c angezeigt ausgenommen die Modelle SB Wenn die Messer eingeschaltet werden ohne dass die vorgesehenen Si cherheits...

Страница 54: ...al wegs wirkt es als Kupplung und schal tet den Antrieb der R der ein oder aus und im zweiten dient es als Bremse die auf die Hinterr der wirkt HF2315SB Das Kippen des Auffangsacks zum Entleeren erfol...

Страница 55: ...f r die sie bestimmt ist M hen und Sammeln von Gras Jede andere Verwendung wird als unzweckm ige Verwendung der Maschine angesehen und hat den Verfall der Garantie und die Ablehnung jeder Verantwortu...

Страница 56: ...n und l Einf llen Verwenden Sie l SAE 10W30 und bleifreies Benzin Euro 95 Das Laufenlassen des Motors mit einer ungen genden lmenge kann zu einer schweren Besch digung des Motors f hren Die Verwendung...

Страница 57: ...osi tion 7 befinden Den Gashebel in eine Stellung zwischen LANGSAM und SCHNELL und den Schalthebel in die Stellung des 1 Gangs bringen 4 22 Bei ganz durchgetretenem Pedal die Feststellbremse l sen das...

Страница 58: ...chalteten Messern durchgef hrt werden andernfalls w rde der Motor abschalten eden Hebel 1 4 9 1 herausziehen und den Auffangsack umkip pen damit er sich entleert den Auffangsack wieder so verschlie en...

Страница 59: ...nd wenn m glich mit einer Plane abdecken Nach jedem Ge brauch ist die Maschine au en zu reinigen der Auffangsack zu leeren und auszusch tteln um ihn von Gras und Erdresten zu befreien Den Motorraum un...

Страница 60: ...sw die ein seitliches Abrutschen Umst rzen oder den Verlust der Kontrolle ber die Maschine verursachen k nnten VOR JEDEM RICHTUNGSWECHSEL AM HANG IST DIE GESCHWINDIGKEIT ZU VERMINDERN und wenn man die...

Страница 61: ...Rasens zu hoch sein Wenn das Problem anh lt sind schlecht ge sch rfte Messer oder verformte Messerfl gel wahrscheinliche Ursachen 10 Besondere Vorsicht ist beim M hen in bezug auf Str ucher und die N...

Страница 62: ...rgenommen worden ist eintragen k nnen ARBEITSGANG T TIGKEIT INTERVALL Die Wartung zu jedem Intervall in Betriebsstunden oder Monaten ausf hren je nachdem welches Intervall zuerst eintritt BEI JEDER VE...

Страница 63: ...darf keiner Wartung Sie unterliegt einer Dauerschmierung die weder Auswechselns noch Nachf llung bedarf 6 2 3 Batterie Es ist von grundlegender Bedeutung eine akkurate Wartung der Batterie vorzunehmen...

Страница 64: ...s ihren Sitzen sprin gen Bei der Montage sind die oben angegebenen Operationen in der umgekehrten Reihenfolge aus zuf hren dabei muss beachtet werden dass die beiden hinteren Boh rungen der Winkel f r...

Страница 65: ...eren immer um 5 7 mm tiefer liegt Die Maschine auf einer ebenen Fl che abstellen und pr fen ob der Reifendruck stimmt zwischen den Messern unter den vorderen Rand der M hwerks zwei Unterlagen 1 mit 24...

Страница 66: ...G h lt man durch ffnen der ber dem Tunnel unter dem Sitz angebrachten Klappe Mutter 1 welche B gel 2 h lt l sen und Mutter 3 so verstellen bis die L nge der Feder A 47 5 49 5 mm B 45 47 mm betr gt gem...

Страница 67: ...kel f hren zu einem be schleunigtem Motorverschlei 1 Die beiden Schrauben 1a des Luftfiltersdeckels losdrehen dann den Deckel entfernen Den Papiereinsatz 3 aus dem Luftfiltergeh use Den Schaumstoffein...

Страница 68: ...zeichen der Abnutzung aufweisen STETS ORIGINAL AN TRIEBSRIEMEN VERWENDEN HINWEIS WICHTIG HF2622H HF23 HF24 5 Nachdem die Z ndkerze aufsitzt sie mit einem Z ndkerzenschl ssel 1 anziehen um den Dichtrin...

Страница 69: ...en reinigen und Elektrodenabstand berpr fen 6 4 5 Motor lstand berpr fen und gegebenenfalls nachf llen 5 3 3 5 Anlassen erschwert oder Betrieb des Motors unregelm ig Vergaserprobleme Luftfilter reinig...

Страница 70: ...rgeschwindigkeit im Verh ltnis zur H he des zu m henden Grases hoch 5 4 5 Verstopfung des Auswurfkanals Die M hwerk ist mit Gras gef llt Reifendruck pr fen 5 3 2 M hwerk in bezug auf den Boden ausrich...

Страница 71: ...ar 1 2 bar 1 2 bar 1 2 bar 1 2 bar 1 2 bar Haltef higkeit der Kraftstofftank 5 4 liter 5 4 liter 5 4 liter 8 5 liter 8 5 liter 8 5 liter 8 5 liter Gesamtgewicht 216 kg 215 kg 230 kg 234 kg 245 kg 255...

Страница 72: ...21 Lenkrad Funktion 4 1 M hwerk Beschreibung 2 2 1 Auswaschen innen 5 4 11 Messer Beschreibung 2 2 2 Einschalten 4 8 Ausbau und Sch rfen 6 3 1 b Einstellung der Kupplung 6 3 3 Motor Motor l 6 4 1 lfil...

Страница 73: ...sioni proprie o a terzi Nel caso dovesse riscontrare qualche leggera differenza fra quanto qui de scritto e la macchina in suo possesso tenga presente che dato il continuo mi glioramento del prodotto...

Страница 74: ...neggiati o usurati 7 Se il serbatoio deve essere vuotato effettuare questa operazio ne all aperto 8 Fare attenzione al fatto che la rotazione di una lama provoca la ro tazione anche dell altra 9 Quand...

Страница 75: ...ICHETTE DI SICUREZZA La vostra macchina deve essere utilizzata con prudenza Per ricor darvelo sulla macchina sono state poste delle etichette raffiguranti dei pittogrammi che richiamiamo le principali...

Страница 76: ...il carter che racchiude le lame rotanti 2 Lame sono gli elementi preposti al taglio dell erba le alette poste all estremit favoriscono il convogliamento dell erba ta gliata verso il canale d espulsion...

Страница 77: ...innestate La condizione di Lame innestate segnalata dall accensione della spia tranne modelli SB 4 11 c Se le lame vengono innestate senza rispettare le condizioni di si curezza previste il motore si...

Страница 78: ...endo la tra zione alle ruote e nella seconda parte si comporta da fre no agendo sulle ruote posteriori HF2315SB Il ribaltamento del sacco per lo svuota mento avviene premendo il pulsante 4 9 2 tenendo...

Страница 79: ...N 4 31 4 32 4 33 4 34 5 NORME D USO 5 1 RACCOMANDAZIONI PER LA SICUREZZA Usare la macchina unicamente per gli scopi a cui destinata taglio e raccolta dell erba Qualsiasi altro impiego considerato come...

Страница 80: ...na senza piombo verde Euro 95 Fare girare il motore con una quantit di olio in sufficiente lo pu danneggiare molto gravemente L uso di un olio non detergente o per motori a due tempi pu ridurre la dur...

Страница 81: ...asciare gradualmente il pedale che passa cos dalla funzione freno a quella di frizione azionando le ruote posteriori 4 21 ATTENZIONE ATTENZIONE HF2315SB NOTA ATTENZIONE IMPORTANTE NOTA IMPORTANTE PERI...

Страница 82: ...seguibile solo a lame disinnestate in caso contrario si arresterebbe il motore estrarre la leva 1 4 9 1 e ribaltare il sacco per svuotarlo richiudere il sacco in modo che resti agganciato all arpione...

Страница 83: ...un telo Dopo ogni utilizzo ripulire l esterno della macchina svuotare il sacco e scuoterlo per ripulirlo dai residui d erba e terriccio Ricercare ed eliminare ogni accumulo d erba all interno del van...

Страница 84: ...BIAMENTO DI DIREZIONE SUI TERRENI IN PEN DENZA e inserire sempre il freno di stazionamento prima di lasciare la macchina ferma e incustodita Nei terreni in pendenza occorre iniziare la marcia avanti c...

Страница 85: ...la condi zione del prato se il problema rimane cause probabili sono i coltelli male affilati o il profilo delle alette deformato 10 Fare molta attenzione ai tagli in corrispondenza di cespugli e in pr...

Страница 86: ...manutenzione ad ogni intervallo di ore o mesi di funzionamento a seconda di quale si verifica prima AD OGNI UTILIZZO 3 MESI o 20 ORE 6 MESI o 50 ORE 1 ANNO o 100 ORE 300 ORE Olio motore Controllo Camb...

Страница 87: ...ia fondamentale per garantirne una lunga durata La batteria della vostra macchina deve essere tassativamente caricata prima del primo utilizzo 3 4 Nei periodi di inattivit il livello di carica pu esse...

Страница 88: ...fuoriescano dalle sedi Al montaggio prestare attenzione ad utilizzare i due fori posteriori delle squadrette per il fissaggio dei perni 7 eseguire a ritroso le operazioni sopra indicate assicurandosi...

Страница 89: ...tuno che la parte anteriore risulti sempre pi bassa di 5 7 mm ri spetto alla posteriore Porre la macchina su una su perficie piana e verificare la cor retta pressione dei pneumatici in corrispondenza...

Страница 90: ...zato per consigli relativi alla chiave per filtro utensile spe ciale NOTA IMPORTANTE L accesso alla regolazione pos sibile togliendo lo sportello posto sul tunnel alla base del sedile Allentare il dad...

Страница 91: ...el filtro dell aria e rimuovere il coperchio Muovere l elemento cartaceo 3 dal corpo del filtro dell aria Ri muovere l elemento di gomma spugnosa 4 dal coperchio del fil tro dell aria Sbloccare le due...

Страница 92: ...usura USARE SEMPRE CINGHIE ORIGINALI NOTA HF23 HF24 HF2622H IMPORTANTE 5 Una volta che la candela si posa sulla sua base stringerla con una chiave per candele 1 in modo che comprima la ranella Quando...

Страница 93: ...ttrodi 6 4 5 verificare il livello dell olio motore e rabboccare se necessario 5 3 3 5 Avviamento difficoltoso o funzionamento irregolare del motore problemi di carburazione pulire o sostituire il fil...

Страница 94: ...locit di avanzamento elevata in rapporto all altezza dell erba da tagliare 5 4 5 intasamento del canale il piatto di taglio pieno d erba controllare la pressione dei pneumatici 5 3 2 ripristinare l al...

Страница 95: ...di sterzata lato sinistro 1 8 m 1 8 m 1 8 m 1 8 m 1 8 m 1 6 m 1 6 m Altezza di taglio 30 80 mm 30 80 mm 30 90 mm 30 90 mm 30 90 mm 29 90 mm 29 90 mm Larghezza di taglio 91 cm 91 cm 101 cm 101 cm 101 c...

Страница 96: ...ina 5 3 5 Pedali trazione Funzione dei pedali 4 32 4 33 Marcia avanti 5 4 2 Retromarcia 5 4 4 Pendii Precauzioni d uso 5 5 Piatto di taglio Descrizione 2 2 1 Lavaggio interno 5 4 11 Rimozione 6 3 1 a...

Страница 97: ...ant teweeg waardoor de gebruiker zelf verantwoordelijk is voor schade of letsel die hijzelf of anderen oplopen Mocht u verschillen tegenkomen tussen wat beschreven is en de machine die u bezit denk er...

Страница 98: ...n te worden van gras bladeren of teveel vet 5 Controleer de grasopvangbak regelmatig op slijtage or beschadigingen 6 Uit veiligheidsoverwegingen moeten beschadigde of versleten onderde len verwisseld...

Страница 99: ...op hellingen 10 of minder 100 kg of minder 1 2 VEILIGHEIDSSTICKERS Uw machine dient met voorzichtigheid te worden gebruikt Om daaraan her innerd te worden bevinden zich op de machine een aantal sticke...

Страница 100: ...m het gras te maaien de windvleugels die aan de uiteinden zitten bevorderen de afvoer van het gemaaid gras naar het uitwerpkanaal 3 Uitwerpkanaal dit is het verbindingselement tussen het maaidek en de...

Страница 101: ...akelde messen wordt aangegeven door het controle lampje 4 11 c dat brandt Behalve de modellen SB Het inschakelen van de messen zonder het in acht nemen van de voor geschreven veiligheidsmaatregelen ve...

Страница 102: ...intrappen van het eer ste gedeelte dient het pedaal als koppe lingspedaal waarbij de wielaandrijving in of uitgeschakeld wordt en het tweede deel dient als rem die op de achterwielen in werkt HF2315S...

Страница 103: ...32 4 33 4 34 5 GEBRUIKSVOORSCHRIFTEN 5 1 VEILIGHEIDSADVIEZEN Gebruik de machine all n voor het doel waarvoor zij gemaakt is het maaien en opvangen van gras Eender welk ander gebruik wordt als oneigen...

Страница 104: ...0W30 en loodvrije benzine groen Euro 95 Indien men de motor laat draaien met een ontoerei kende hoeveelheid olie kan deze ernstig beschadigd worden Het gebruik van een niet detergerende olie of een ol...

Страница 105: ...het pedaal ingetrapt om zo de handrem uit te schakelen laat het pe daal langzaam opkomen zodat het pedaal van de remfunctie naar de koppelingsfunctie overgaat waarbij de achterwielen in werking geste...

Страница 106: ...om voor het legen sluit de zak op zo n manier zodat deze zich vastkoppelt aan de veerhaak 2 en berg de hendel 1 LET OP LET OP OPMERKING HF2 B HF2 HM HF2 H U dient de pedaal geleidelijk op te laten ko...

Страница 107: ...ek ze indien mogelijk toe met een zeil Maak na elk gebruik de buitenkant van de machine schoon leeg de opvangzak en klop deze goed uit om alle gras en aarderesten te verwijderen Kijk of er grasresten...

Страница 108: ...ht over het stuur doen verliezen VERTRAAG DE SNELHEID OP HELLINGEN ALVO RENS VAN RICHTING TE VERANDEREN Op een helling dient de handrem altijd te worden ingeschakeld alvorens de machine te ver laten e...

Страница 109: ...oestand van het gazon mocht het probleem aanhouden dan kan het ook zijn dat de messen niet goed geslepen zijn of dat het profiel van de vleugels vervormd is 10 Pas erg goed op bij het maaien langs str...

Страница 110: ...tervallo di ore o mesi di funzionamento a seconda di quale si verifica prima BIJ IEDER GEBRUIK 3 MAANDEN OF 20 UREN 6 MAANDEN OF 50 UREN 1 JAAR OF 100 UREN 300 UREN Motorolie Controle Wissel 1 Luchtfi...

Страница 111: ...ldig te onderhouden voor een duurzaam bestaan De accu van uw machine dient altijd v r het eerste gebruik 3 4 Tijdens de periodes van inactiviteit wordt een optimaal laadniveau met de bijgeleverde spec...

Страница 112: ...tting komen Zorg er bij de montage voor dat de twee achter ste gaten van de beugels gebruikt worden voor de bevestiging van de pin nen 7 voer de voornoemde handelingen in omgekerde volgorde uit en zor...

Страница 113: ...ultaat is het verstandig om er voor te zorgen dat de voorkant altijd 5 7 mm lager afgesteld dan de ach terkant plaats de machine op een vlakke on dergrond en kijk na of de banden de juiste spanning he...

Страница 114: ...K De toegang tot het afstellen is mogelijk door het deurtje op de gleuf onder de stoel te verwijderen Draai de moer 1 waarmee de staaf 2 bevestigd is los en draai aan de moer 3 totdat een veerlengte v...

Страница 115: ...e bouten 1a van het luchtfilterdeksel en verwijder dan het deksel Haal het papieren element 3 van de behuizing van de luchtfilter Ver wijder het schuim element 4 van het deksel van de luchtfilter Maak...

Страница 116: ...en GEBRUIK ALTIJD ORIGINELE DRIJFSNAREN OPMERKING BELANGRIJK HF2622H HF23 HF24 5 Nadat de bougie handvast zit deze met een bougiesleutel 1 aantrekken om de dichtingsring samen te drukken Wanneer een n...

Страница 117: ...af stand juist is 6 4 5 controleer oliepeil motor en vul zo nodig bij 5 3 3 5 Een moeilijke start of een onregelmatige werking van de motor er brandstofproblemen zijn reinig of vervang luchtfilter 6...

Страница 118: ...ein de messen werken niet goed de rijsnelheid is te hoog ten opzichte van de hoogte van het gras 5 4 5 het kanaal is verstopt het maaidek zit vol met gras controleer de bandenspanning 5 3 2 stel het m...

Страница 119: ...8 m 1 8 m 1 8 m 1 6 m 1 6 m Maaihoogte 30 80 mm 30 80 mm 30 90 mm 30 90 mm 30 90 mm 29 90 mm 29 90 mm Maaibreedte 91 cm 91 cm 101 cm 101 cm 101 cm 122 cm 122 cm Inhoud opvangzak 280 liters 280 liters...

Страница 120: ...torolie 6 4 1 Oliefilter 6 4 2 Luchtfilter 6 4 3 Brandstoffilter 6 4 4 Bougie 6 4 5 Mulching Bedienhendel 4 10 Functie en inschakeling 5 4 8 Onderhoud Toepassingen 6 2 1 6 2 2 Opvangzak Beschrijving 2...

Страница 121: ...sido proyectada y fabricada seg n las normas vigentes re sultando segura y confiable para el corte y la recolecci n de c sped conforme a las indicaciones contenidas en este manual uso previsto Cualqui...

Страница 122: ...vaciar el dep sito de la gasolina efectuar esta operaci n al aire libre 8 Prestar atenci n al hecho de que la rotaci n de una cuchilla produce la rotaci n de la otra 9 Cuando hay que guardar la m quin...

Страница 123: ...o menos 1 2 ETIQUETAS DE SEGURIDAD La m quina debe ser utilizada con prudencia Para record rselo han sido puestas sobre la m quina etiquetas que representan pictogramas que indi can las principales p...

Страница 124: ...illas son los elementos predispuestos para el corte del c sped las aletas colocadas en los extremos favorecen el transporte del c sped cortado hacia el canal de expulsi n 3 Canal de expulsi n es el el...

Страница 125: ...das B Tirado Cuchillas acopladas El condici n de Cuchillas acopladas est se alada por el encendido del indicador 4 11 c excepto modelos SB Si las cuchillas se acoplan sin respetar las condiciones de s...

Страница 126: ...s y en la segunda parte se comporta como freno actuando sobre las ruedas pos teriores HF2315SB El vuelco de la bolsa de recolecci n para el va ciado se realiza con el pulsador 4 9 2 man teni ndolo pul...

Страница 127: ...I N HF2 H ATENCI N NOTA IMPORTANTE N 4 31 4 32 4 33 4 34 5 NORMAS DE USO 5 1 MEDIDAS DE SEGURIDAD Destinar la m quina s lo al uso para la cual ha sido expresamente proyectada corte y recolecci n del c...

Страница 128: ...o uniformemente Las presiones deben ser ANTERIOR 1 5 bar 13 x 5 00 6 1 0 bar 15 x 5 00 6 POSTERIOR 1 2 bar 5 3 3 Abastecimiento de aceite y gasolina Usar aceite SAE 10W30 y gasolina sin plomo verde Eu...

Страница 129: ...al que de ese modo pasa de la funci n freno a la de embrague accionando las ruedas posteriores 4 21 NOTA ATENCI N IMPORTANTE NOTA IMPORTANTE PELIGRO ATENCI N ATENCI N HF2315SB Existen dos tipos de mez...

Страница 130: ...ate in caso contrario si arresterebbe il motore estrarre la leva 1 4 9 1 e ribaltare il sacco per svuotarlo richiudere il sacco in modo che resti agganciato all arpione di fermo 2 e riporre la leva 1...

Страница 131: ...brirla con una lona Despu s de cada uso limpiar el exterior de la m quina vaciar la bolsa de recolecci n y sacudirla para limpiarla de los re siduos de c sped y mantillo Buscar y eliminar la hierba ac...

Страница 132: ...LA VELOCIDAD ANTES DE CUALQUIER CAMBIO DE DIRECCI N SOBRE TERRENOS EN PENDIENTE y en granar siempre el freno de estacionamiento antes de dejar la m quina parada y sin vigilancia En los terrenos en pe...

Страница 133: ...oblema persiste son causas probables las cuchi llas mal afiladas o el perfil de las aletas deformado 10 Prestar especial atenci n en los cortes en terrenos con matas o cerca de bordes bajos que podr a...

Страница 134: ...mantenimiento a cada intervalo de horas y meses de funcionamiento seg n cu l se compruebe antes EN CADA USO 3 MESES O 20 HORAS 6 MESES O 50 HORAS 1 A O O 100 HORAS 300 HORAS Aceite motor Control Camb...

Страница 135: ...llenado 6 2 3 Bater a Es fundamental efectuar un cuidadoso man tenimiento de la bater a para garantizar una larga duraci n de la misma La bater a de su m quina deber estar taxati vamente cargada antes...

Страница 136: ...los pernos salgan de los alojamientos En el montaje preste atenci n a utilizar los dos orificios posteriores de las escuadras para la fijaci n de los pernos 7 realizar al contrario las operaciones ind...

Страница 137: ...la parte anterior resulte siempre 5 7 mm m s baja que la parte posterior colocar la m quina en una superficie llana y comprobar la correcta pre si n de los neum ticos en la l nea medianera de las cuch...

Страница 138: ...tros herramienta especial NOTA IMPORTANTE Es posible acceder a la regulaci n sa cando la portezuela colocada en el t nel en la base del asiento Aflojar la tuerca 1 que fija la abraza dera 2 e interven...

Страница 139: ...motor 1 Extraiga los dos pernos 1a de la cubierta del filtro de aire de la cubier ta del filtro de aire y extraiga la cubierta Extraiga el elemento de papel 3 de la caja del filtro de aire extraiga el...

Страница 140: ...UTILIZAR SIEMPRE CORREAS ORIGINALES NOTA IMPORTANTE HF2622H HF23 HF24 5 Despu s de haber asentado a mano las buj as nuevas apriete con una llave de buj a para comprimir las arandelas 1 Cuando instale...

Страница 141: ...re los electrodos 6 4 5 comprobar el nivel de aceite motor y llenar si fuera necesario 5 3 3 5 Puesta en marcha dificultosa o funcionamiento irregular del motor anomal as en el carburador limpiar o su...

Страница 142: ...a altura de la hierba a cortar 5 4 5 atascamiento del canal el plato de corte est lleno de hierba controlar la presi n de los neum ticos 5 3 2 restablecer la alineaci n del plato de corte respecto al...

Страница 143: ...izquierdo 1 8 m 1 8 m 1 8 m 1 8 m 1 8 m 1 6 m 1 6 m Altura de corte 30 80 mm 30 80 mm 30 90 mm 30 90 mm 30 90 mm 29 90 mm 29 90 mm Anchura de corte 91 cm 91 cm 101 cm 101 cm 101 cm 122 cm 122 cm Capa...

Страница 144: ...de la eficiencia 5 3 4 Uso del freno 5 4 3 Regulaci n 6 3 4 Freno de estacionamiento Funci n de la palanca 4 5 Fusible Sustituci n 6 4 4 Indicadores luminosos Funci n 4 11 Intervenci n 5 4 13 Limpiez...

Страница 145: ...iehel Bypass Mriehel QRM17 Tel 356 21 498 561 Fax 356 21 480 150 NETHERLANDS Honda Nederland B V Afd Power Equipment Capronilaan 1 1119 NN Schiphol Rijk Tel 31 20 7070000 Fax 31 20 7070001 http www ho...

Страница 146: ...rlands Dutch EG verklaring van overeenstemming 1 Ondergetekende Hiroki Chubachi vertegenwoordiger van de con structeur verklaart hierbij dat de hieronder beschreven machine in overeenstemming is met d...

Страница 147: ...Nameran hladina akustick ho v konu b Zaru en hladina akustick ho v konu c Rozmer d Proced ra posudzovania zhody e Notifikovan osoba 8 Miesto 9 D tum Eesti Estonian E vastavusdeklaratsioon 1 Allakirju...

Страница 148: ...RCS ORL ANS B 501 736 565 71505502 4...

Отзывы: