background image

ATV Safety

7

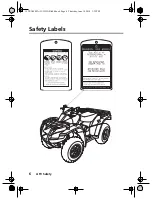
Safety Labels

19 TRX680FA (U)-32HN8A400.book  Page 7  Thursday, June 14, 2018  1:25 PM

Содержание FourTrax Rincon TRX680FA5 2018

Страница 1: ...TRX680FA5 FOURTRAX RINCON Part Number...

Страница 2: ...sidered a permanent part of the ATV and should remain with the ATV when it is resold This publication includes the latest production information available before printing Honda Motor Co Ltd reserves t...

Страница 3: ...Honda TRX680FA5 FOURTRAX RINCON OWNER S MANUAL 19 TRX680FA U 32HN8A400 book Page 2 Thursday June 14 2018 1 25 PM...

Страница 4: ...nes and perform all pre ride and other periodic checks detailed in this manual We also recommend that you read this owner s manual before you ride It s full of facts instructions safety information an...

Страница 5: ...ve any questions or if you ever need special service or repairs remember that your dealer knows your ATV best and is dedicated to your complete satisfaction Happy riding 19 TRX680FA U 32HN8A400 book P...

Страница 6: ...is manual This information alerts you to potential hazards that could hurt you or others Of course it is not practical or possible to warn you about all hazards associated with operating or maintainin...

Страница 7: ...w to use this ATV correctly and safely This entire manual is filled with important safety information please read it carefully 3DANGER You WILL be KILLED or SERIOUSLY HURT if you don t follow instruct...

Страница 8: ...ments Controls 9 The location and function of indicators and controls on your ATV and operating instructions for various controls and features Before Riding 43 The importance of wearing a helmet and o...

Страница 9: ...maintenance and adjustment items Tips 175 How to store and transport your ATV and how to be an environmentally responsible rider Taking Care of the Unexpected 185 What to do if you have a flat tyre y...

Страница 10: ...19 TRX680FA U 32HN8A400 book Page 9 Thursday June 14 2018 1 25 PM...

Страница 11: ...nd recommendations to help you ride your ATV safely Please take a few moments to read these pages This section also includes information about the location of safety labels on your ATV Important Safet...

Страница 12: ...ATV model is 16 Children under age 16 should never operate this vehicle Always Wear a Helmet It s a proven fact helmets significantly reduce the number and severity of head injuries So always wear an...

Страница 13: ...n Practice Even if you have ridden other ATVs take time to become familiar with how this ATV works and handles Practice in a safe area until you build your skills and get accustomed to the ATV s size...

Страница 14: ...one drink can reduce your ability to respond to changing conditions and your reaction time gets worse with every additional drink So don t drink and ride and don t let your friends drink and ride eit...

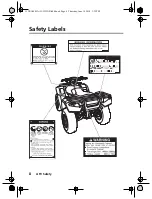
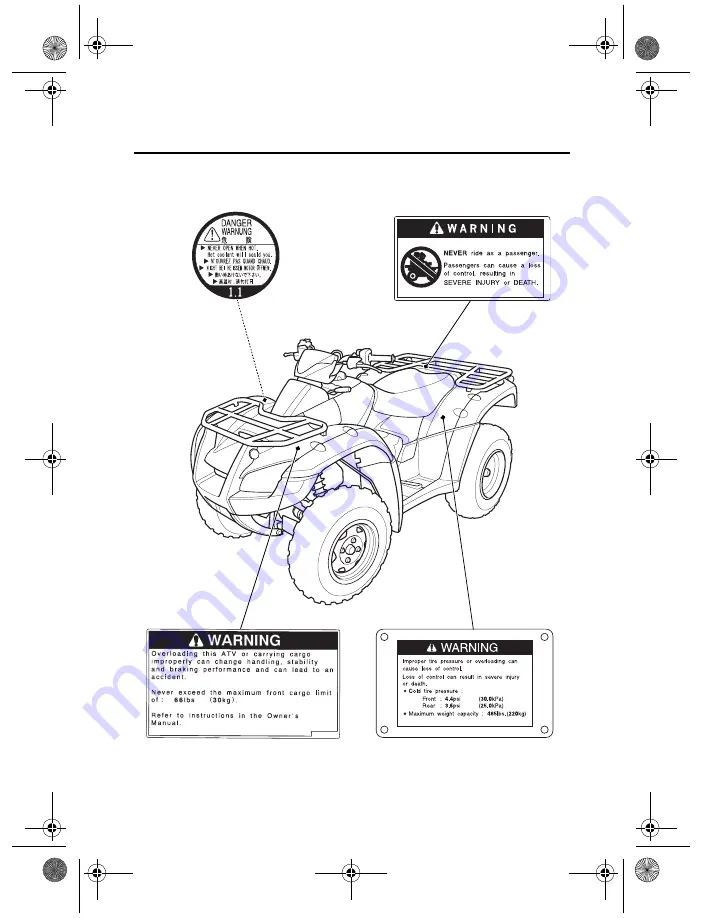
Страница 15: ...n Anyone who rides the vehicle should read and understand this information before riding The labels should be considered permanent parts of the vehicle If a label comes off or becomes hard to read con...

Страница 16: ...ATV Safety 6 Safety Labels 19 TRX680FA U 32HN8A400 book Page 6 Thursday June 14 2018 1 25 PM...

Страница 17: ...ATV Safety 7 Safety Labels 19 TRX680FA U 32HN8A400 book Page 7 Thursday June 14 2018 1 25 PM...

Страница 18: ...ATV Safety 8 Safety Labels 19 TRX680FA U 32HN8A400 book Page 8 Thursday June 14 2018 1 25 PM...

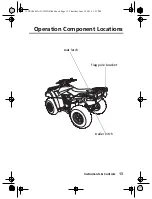
Страница 19: ...scribed in this section Instructions for other components are presented in other sections of this manual where they will be most useful Operation Component Locations 11 Indicators Displays 14 Multi fu...

Страница 20: ...31 Engine Stop Switch 31 Headlight Switch 32 Headlight Dimmer Switch 32 Horn Button 32 Recoil Starter 33 Throttle Lever 34 Gearshift Switch 35 Front Brake Lever 36 Rear Brake Lever Parking Brake Lever...

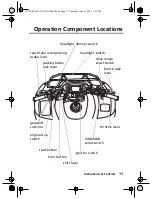
Страница 21: ...D 4WD select switch throttle lever headlight switch headlight dimmer switch drive mode select switch front brake lever shift lever start button gearshift switches engine stop switch rear brake lever p...

Страница 22: ...nstruments Controls 12 Operation Component Locations rear cargo rack accessory socket front cargo rack recoil starter rear brake pedal 19 TRX680FA U 32HN8A400 book Page 12 Thursday June 14 2018 1 25 P...

Страница 23: ...Instruments Controls 13 Operation Component Locations seat latch flag pole bracket trailer hitch 19 TRX680FA U 32HN8A400 book Page 13 Thursday June 14 2018 1 25 PM...

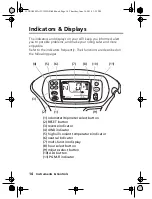
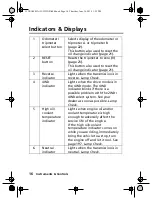
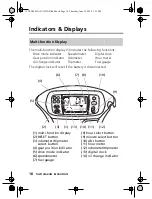
Страница 24: ...requently Their functions are described on the following pages 11 9 10 7 8 2 1 6 5 4 3 1 odometer tripmeter select button 2 RESET button 3 reverse indicator 4 4WD indicator 5 high oil coolant temperat...

Страница 25: ...remain on until you shift out of reverse or neutral If one of these indicators does not come on when it should have your dealer check for problems Display Check When the ignition switch is turned ON q...

Страница 26: ...drive mode is in the 4WD mode The 4WD indicator blinks if there is a possible problem with the 2WD 4WD select system See your dealer as soon as possible Lamp Check 5 High oil coolant temperature indic...

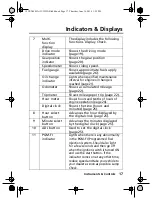
Страница 27: ...hours and tenths of hours of engine operation page 24 Digital clock Shows the time hours and minutes page 25 8 Hour select button Advances the hour displayed by the digital clock page 25 9 Minute sele...

Страница 28: ...cator Odometer Hour meter Oil change indicator Tripmeter Fuel gauge 8 hour select button 9 minute select button 10 ADJ button 11 hour meter 12 odometer tripmeter 13 digital clock 14 oil change indicat...

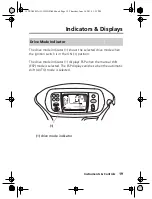
Страница 29: ...ignition switch is in the ON q position The drive mode indicator 1 displays ESP when the manual shift ESP mode is selected The ESP display vanishes when the automatic shift AUTO mode is selected Driv...

Страница 30: ...e D for drive and 1 3 for the three forward speed positions in the ESP mode will be displayed on the gear position indicator when the transmission is not shifted into gear properly Before riding check...

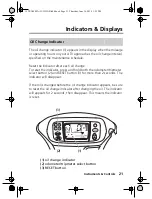
Страница 31: ...th the odometer tripmeter select button 2 and RESET button 3 for more than 2 seconds The indicator will disappear If the oil is changed before the oil change indicator appears be sure to reset the oil...

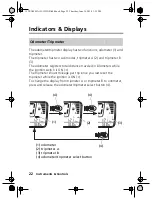
Страница 32: ...ometers while the ignition switch is ON q The tripmeter shows mileage per trip since you last reset the tripmeter while the ignition is ON q To change the display from tripmeter A or tripmeter B to od...

Страница 33: ...isplays To reset the tripmeter to zero press and hold the RESET button 5 for more than 2 seconds with the display in the tripmeter A or tripmeter B mode 5 5 RESET button 19 TRX680FA U 32HN8A400 book P...

Страница 34: ...shows accumulated hours while the ignition is ON q The hour meter provides accurate service period information for initial and regular maintenance Hour meter 1 2 1 hour meter 2 hour meter mark 19 TRX...

Страница 35: ...y reaches the desired hour 4 To advance the minute display one unit at a time press and release the minute select button 3 To advance the minute display automatically press and hold the minute select...

Страница 36: ...ment E 2 and low fuel indicator 3 flash you should refill the tank as soon as possible The amount of fuel remaining when the flashing starts is approximately 5 3 1 40 US gal 1 17 Imp gal All segments...

Страница 37: ...gine page 66 Insert the key and turn it to the right for the ON q position Ignition Switch Key Position Function ON q Electrical circuits on OFF w No electrical circuits function CENTRE OF HANDLEBAR 1...

Страница 38: ...shift lever 1 has three positions drive D neutral N and reverse R See Shifting Gears page 71 and Riding in Reverse page 77 Shift Lever LEFT SIDE OF HANDLE COVER 1 1 shift lever 19 TRX680FA U 32HN8A40...

Страница 39: ...eatures The drive mode select switch 1 has two positions AUTO and ESP See Shifting Gears page 71 Drive Mode Select Switch RIGHT HANDLEBAR 1 1 drive mode select switch 19 TRX680FA U 32HN8A400 book Page...

Страница 40: ...the desired position To check your present drive mode look at the 4WD indicator 2 2WD mode the 4WD indicator goes off 4WD mode the 4WD indicator goes on 4WD can only be engaged while the engine is run...

Страница 41: ...sed to stop the engine in an emergency To operate slide the switch to the OFF r position The switch must be in the RUN e position to start the engine and it should normally remain in the RUN e positio...

Страница 42: ...change between the high and low beams of the headlight To operate turn the switch to HI u for high beam LO i for low beam Press the horn button 3 to sound the horn Headlight Switch y t Headlight Dimm...

Страница 43: ...Features The recoil starter 1 is used to start the engine when the battery is low See Using the Recoil Starter page 70 Recoil Starter RIGHT SIDE 1 recoil starter 1 19 TRX680FA U 32HN8A400 book Page 3...

Страница 44: ...ver 1 with your thumb To reduce engine rpm release pressure on the throttle lever The throttle will automatically return to the closed position engine idle when you remove your thumb Throttle Lever RI...

Страница 45: ...ext higher or lower gear in the transmission To operate press the upshift switch 1 to engage the next higher gear or press the downshift switch 2 to engage the next lower gear See Shifting Gears page...

Страница 46: ...king brake lever is used to slow or stop your ATV To operate pull the lever For information on braking techniques see page 79 The rear brake pedal is used to slow or stop your ATV To operate depress t...

Страница 47: ...ur left hand and then lock it with the lock lever using your right hand See Parking page 93 The brakelights are activated by applying the parking brake When using the parking brake be sure to turn the...

Страница 48: ...ealer To mount a pole in the bracket 1 follow the instructions that come with the flag pole kit Flag poles are required in some riding areas Check local regulations before riding Flag Pole Bracket RIG...

Страница 49: ...a proper size ball 2 as specified by the trailer manufacturer To attach the ball and properly hook up a trailer follow the trailer manufacturer s instructions For load limits and operational guideline...

Страница 50: ...ny heat generating or high wattage accessory such as an automobile cigarette lighter or high power spotlight because it can damage the socket To use the accessory socket turn the ignition switch ON q...

Страница 51: ...tery The accessory socket s rated capacity is DC 12 V 120 Watts 10 A or less If you exceed this limit you may blow a fuse See If a Fuse Blows page 199 When you are done using an accessory unplug it an...

Страница 52: ...Instruments Controls 42 19 TRX680FA U 32HN8A400 book Page 42 Thursday June 14 2018 1 25 PM...

Страница 53: ...your comfort convenience or safety This section also includes important information about loading Are You Ready to Ride 44 Protective Apparel 44 Rider Training 46 Age Recommendation 47 No Passengers...

Страница 54: ...any alcohol or drugs in your system For your safety we strongly recommend that you always wear an approved motorcycle helmet eye protection boots gloves trousers and a long sleeved shirt or jacket wh...

Страница 55: ...rcycle gloves to help protect your hands Riding trousers with knee and hip pads a riding jersey with padded elbows and a chest shoulder protector WARNING 3WARNING Operating this ATV without wearing an...

Страница 56: ...V s controls and feel comfortable with its size and weight Rider Training WARNING 3WARNING Operating this ATV without proper instruction could increase your risk of a crash which could lead to serious...

Страница 57: ...r cargo racks Age Recommendation WARNING 3WARNING A child using an ATV that is not recommended for their age could lose vehicle control while riding resulting in severe injury or death A child under 1...

Страница 58: ...ult your doctor to be sure it is safe to operate a vehicle after taking medication No Alcohol or Drugs WARNING 3WARNING Operating this ATV after consuming alcohol or drugs can seriously affect your ju...

Страница 59: ...ealer There may be damage or other problems you cannot see Check the following items before you get on the ATV WARNING 3WARNING Improperly maintaining this ATV or failing to correct a problem before r...

Страница 60: ...heels to see that the axle nuts are tightened Use a wrench to make sure all accessible nuts bolts and fasteners are tight Underbody Exhaust System Check for and remove any dirt vegetation or other deb...

Страница 61: ...ke sure you do not exceed the load limits page 54 Cargo Check that all cargo is secure Throttle Check the freeplay and adjust if needed Press the throttle to make sure it moves smoothly without sticki...

Страница 62: ...Headlight and Headlight Dimmer Switch Check for proper function page 32 Engine Stop Switch Check for proper function page 31 Steering Check that the wheels turn properly as you steer the handlebar Mov...

Страница 63: ...t change this ATV s design and performance can also make it unsafe Also the weight of any accessories will reduce the maximum load the ATV can carry More specific information on load limits accessorie...

Страница 64: ...tongue jack or other support to keep the trailer level The weight of added accessories will reduce the maximum cargo weight you can carry Load Limits maximum weight capacity 220 kg 485 lb includes th...

Страница 65: ...on the rear rack as far forward as possible Make sure cargo on the front rack does not interfere with handlebar movement Do not allow cargo to extend beyond the edges of either the front or rear rack...

Страница 66: ...these guidelines Make sure the accessory does not obscure any lights reduce ground clearance limit suspension travel or steering travel or interfere with operating any controls Make sure the accessor...

Страница 67: ...ld change its design or operation Such changes could seriously impair your ATV s handling stability and braking making it unsafe to ride Removing or modifying your lights exhaust system emission contr...

Страница 68: ...Before Riding 58 19 TRX680FA U 32HN8A400 book Page 58 Thursday June 14 2018 1 25 PM...

Страница 69: ...to Break in Guidelines page 214 Safe Riding Precautions 61 Off road Use Only 61 Keep Hands and Feet on Controls 62 Riding Position Safety Equipment 63 Control Speed 63 Use Care on Unfamiliar or Rough...

Страница 70: ...ing Your ATV 81 Making Turns 81 Skidding or Sliding 83 Riding Up Hills 84 Riding Down Hills 88 Crossing or Turning on Hills or Slopes 89 Riding Over Obstacles 91 Riding Through Water 92 Parking 93 19...

Страница 71: ...d for off road use only not for pavement Riding on pavement can affect handling and control You should not ride your ATV on pavement When riding off road also remember to always obey local off road ri...

Страница 72: ...or one foot from the footpegs can reduce your ability to control the ATV or could cause you to lose your balance and fall off the ATV WARNING 3WARNING Operating this ATV on public streets roads or hi...

Страница 73: ...ons plus your own skills and experience Riding Position Safety Equipment Control Speed WARNING 3WARNING Operating this ATV at excessive speeds increases your chances of losing control of the ATV which...

Страница 74: ...den rocks bumps or holes in time to react Use Care on Unfamiliar or Rough Terrain WARNING 3WARNING Failure to use extra care when operating this ATV on unfamiliar terrain could result in the ATV overt...

Страница 75: ...vely rough slippery or loose terrain could cause loss of traction or vehicle control which could result in an accident including an overturn Do not operate on excessively rough slippery or loose terra...

Страница 76: ...a and cause illness or death WARNING 3WARNING Running the engine of your vehicle while in an enclosed or even partially enclosed area can cause a rapid build up of toxic carbon monoxide gas Breathing...

Страница 77: ...is vehicle has a fuel injected engine with an automatic choke Follow the procedure indicated below Any Air Temperature Press the start button with the throttle completely closed The engine will not st...

Страница 78: ...e slightly if idling is unstable If the engine does not start wait 10 seconds then follow steps 1 4 again If the engine still won t start refer to If Your Engine Quits or Won t Start page 188 Your veh...

Страница 79: ...ed the engine release the front brake lever then apply throttle gradually Normal Engine Stop To stop the engine make sure the transmission is in neutral by checking that the neutral indicator light is...

Страница 80: ...00 mm 4 in 5 Pull the grip up briskly and fully 6 After the engine starts allow the starter grip to return slowly If the starter grip does not return smoothly see your dealer The engine cannot be star...

Страница 81: ...e this mode for everyday riding The transmission automatically adjusts to keep the engine at the best speed for riding conditions The gear position indicator shows D and the drive mode indicator disap...

Страница 82: ...is moved while the vehicle is moving the transmission may be damaged The drive mode select switch 2 is located on the right handlebar switches To select the drive mode operate the drive mode select sw...

Страница 83: ...p the shift lever 1 shift to D 2 Pull down the shift lever and confirm that the lever is locked and the gear position indicator 3 is showing D Shifting to N neutral or R reverse is in the same manner...

Страница 84: ...o gearshift switches are located next to the left handlebar grip upshift a and downshift s To upshift the transmission press the upshift switch 4 once To downshift the transmission press the downshift...

Страница 85: ...press the downshift switch once Remember to close the throttle each time you shift to the next lower position Learning when to shift gears in manual shift ESP mode comes with experience Keep the follo...

Страница 86: ...tow the ATV for long distances with the engine off Recommended Shift Points Ride in the highest gear that lets the engine run and accelerate smoothly This will give you good fuel economy and effectiv...

Страница 87: ...iter which helps the vehicle to maintain a safe speed while riding in reverse gear NOTICE If the gearshift lever is moved while the vehicle is moving the transmission may be damaged 5 Release the rear...

Страница 88: ...f reverse and into neutral shift the shift lever into N neutral gear WARNING 3WARNING Applying only the rear brake abruptly when operating in reverse gear could cause the front wheels to lift off the...

Страница 89: ...taneously Using both braking systems will stop your ATV faster with greater stability To slow or stop apply the brake lever and brake pedal smoothly while downshifting to match your speed when your AT...

Страница 90: ...e with intermittent use of both brakes Continuous brake application can overheat the brakes and reduce their effectiveness Riding with your foot resting on the brake pedal or your hands on the brake l...

Страница 91: ...in making turns Making Turns WARNING 3WARNING Turning improperly can make the ATV go out of control causing a collision or overturn Always follow proper procedures for turning as described in this own...

Страница 92: ...your body slightly forward on the seat and lean inside as you steer the handlebar Shifting weight forward allows the rear wheels to turn easier and it also improves front wheel steering To make a tur...

Страница 93: ...and ride with caution If your ATV skids sideways during a turn steer in the direction of the skid Avoid hard braking or accelerating until you have regained directional control Skidding or Sliding WAR...

Страница 94: ...nt wheels to help keep them on the ground To do this shift your body slightly forward on the seat and lean forward For greater weight shift move your body farther forward and lean forward Riding Up Hi...

Страница 95: ...gear and speed for the conditions Maintain a steady speed as you ascend the hill Never open the throttle suddenly or make sudden gear changes The ATV could flip over backward Never go over the top of...

Страница 96: ...n the engine off 4 Then assess the situation If the ATV starts rolling backwards before you begin braking 1 Keep your weight uphill 2 Carefully apply the front brakes first then carefully apply the re...

Страница 97: ...walk the ATV back down the hill Make sure your intended path is clear in case you lose control of the ATV 1 Stand with your body facing downhill beside the vehicle so you can reach the rear brake leve...

Страница 98: ...and survey the terrain below Never ride past the limit of your visibility Never go down a hill at high speed Riding Down Hills WARNING 3WARNING Going down a hill improperly could cause loss of contro...

Страница 99: ...ont and rear wheels Remember braking effectiveness is reduced on any hill with a loose surface Riding on hills or slopes is different from riding on level terrain Be careful when riding on any hill Ma...

Страница 100: ...ou may also need to steer slightly uphill to maintain a straight course across the slope Avoid crossing hills that are excessively steep slippery or rough Making Turns on Slopes Compared to riding on...

Страница 101: ...and be prepared to stop Never try to ride over large obstacles such as large rocks or fallen logs Riding Over Obstacles WARNING 3WARNING Improperly operating over obstacles could cause loss of contro...

Страница 102: ...e to stop 5 After leaving the water always test both the front and rear brakes Riding through water can make the brakes less effective than normal and may reduce stopping ability If necessary apply th...

Страница 103: ...king brake When using the parking brake be sure to turn the ignition switch OFF w to avoid discharging the battery Parking on a Steep Incline or a Loose or Slippery Surface If you must park your ATV o...

Страница 104: ...Basic Operation Riding 94 19 TRX680FA U 32HN8A400 book Page 94 Thursday June 14 2018 1 25 PM...

Страница 105: ...ions information on fuels and oils and tips for keeping your Honda looking good For information about replacing fuses see page 199 Before You Service Your Honda The Importance of Maintenance 97 Mainte...

Страница 106: ...ar Final Gear Oil 122 Front Final Gear Oil 124 Coolant 126 Air Cleaner 131 Engine Throttle 136 Spark Plugs 138 Valves 142 Spark Arrester 143 Chassis Brakes 145 Tyres 153 Guards 160 Drivetrain Boots 16...

Страница 107: ...e service intervals in this schedule are based on average riding conditions Frequent servicing of the air cleaner is especially important to help you avoid a possible costly engine repair If your ATV...

Страница 108: ...a technician or other qualified mechanic Instructions are included in this manual only to assist in emergency service Some of the most important safety precautions follow However we cannot warn you of...

Страница 109: ...do so Read the instructions before you begin and make sure you have the tools and skills required To reduce the possibility of a fire or explosion be careful when working around petrol Use only non f...

Страница 110: ...asic mechanical skills and hand tools Procedures for these items are provided in this manual Other items involve more extensive procedures and may require special training tools and equipment We recom...

Страница 111: ...y of Maintenance Schedule Notes Procedures NOTES 1 Service more frequently when riding in dusty areas sand or snow 2 Service more frequently after riding in very wet or muddy conditions 3 Replace ever...

Страница 112: ...AR Refer to page MAINT MAINT INTERVAL km 150 1000 2000 mi 100 600 1200 MONTH 1 6 12 ITEMS NOTE HOURS 20 100 200 FUEL LINE I THROTTLE OPERATION I 136 AIR CLEANER NOTE 1 C C 131 AIR CLEANER HOUSING DRAI...

Страница 113: ...page MAINT MAINT INTERVAL km 150 1000 2000 mi 100 600 1200 MONTH 1 6 12 ITEMS NOTE HOURS 20 100 200 DRIVETRAIN BOOTS I I 163 164 FRONT REAR FINAL GEAR OIL R EVERY 2 YEARS I 122 124 BRAKE FLUID NOTE 3...

Страница 114: ...50 km 100 mile or 1 month or 20 hours initial maintenance is considered a normal owner operating cost and will be charged for by your dealer Use the space under Notes to record anything you want to re...

Страница 115: ...ice Preparations Maintenance Component Locations front brake fluid reservoir front brake lever throttle lever fuel fill cap rear brake lever parking brake lever 19 TRX680FA U 32HN8A400 book Page 105 T...

Страница 116: ...cleaner rear brake fluid reservoir front brake caliper air cleaner housing drain tube front brake caliper rear brakelight switch rear brake pedal engine oil filter coolant reserve tank front final gea...

Страница 117: ...ual storage compartment air pressure gauge spark plugs tool kit spark arrester engine oil dipstick engine oil fill cap engine oil drain bolt rear final gear oil drain bolt rear final gear oil fill cap...

Страница 118: ...e sufficient to perform routine maintenance and simple repairs Any extensive work requiring additional tools should be performed by your dealer The tool kit includes the following items standard Phill...

Страница 119: ...open the compartment turn left the quick screw 3 and remove the lid 4 The owner s manual and air pressure gauge 5 should be stored in the plastic bag 6 and fastened with the rubber band 7 Be careful...

Страница 120: ...Removal 1 Pull the seat latch 1 at the rear of the seat 2 Slide the seat 2 back and lift it Installation 1 Insert the front prongs 3 into the hooks 4 and press the studs 5 into the grommets on the re...

Страница 121: ...e use of Petrol Containing Alcohol see page 215 Use of lower octane petrol can cause persistent pinging or spark knock a loud rapping noise which if severe can lead to engine damage Light pinging expe...

Страница 122: ...be refilled as soon as possible when the E segment in the fuel gauge flashes Refer to Safety Precautions on page 99 Fuel Capacity Refueling Procedure 3 1 2 3 fuel fill cap 4 filler neck 1 breather tub...

Страница 123: ...After refueling turn the fuel fill cap clockwise until it clicks 5 Insert the breather tube into the handlebar cover hole If you replace the fuel fill cap use only a Honda Genuine replacement part WAR...

Страница 124: ...t Changing oil helps get rid of dirt and deposits in the engine Operating the engine with old or dirty oil can damage your engine Running the engine with insufficient oil can cause serious damage to t...

Страница 125: ...tion Do not use API SH or higher oils displaying a circular API energy conserving or resource conserving service label on the container They may affect lubrication and clutch performance Do not use no...

Страница 126: ...ed range JASO T 903 standard The JASO T 903 standard is an index for engine oils for 4 stroke motorcycle engines There are two classes MA and MB Oil conforming to the standard is labeled on the oil co...

Страница 127: ...ted area and let it idle for 3 5 minutes Stop the engine and wait 2 3 minutes 3 Remove the dipstick 1 from the front crankcase cover and wipe it clean 4 Insert the dipstick without screwing it in then...

Страница 128: ...the fill cap hole up to the upper level mark on the dipstick Do not overfill 6 Reinstall the oil fill cap oil fill cap lid and dipstick NOTICE Running the engine with an improper oil level can cause s...

Страница 129: ...s mechanical skill and professional tools such as a torque wrench and oil filter wrench as well as a means for disposing of the drained fluid page 180 If you do not have the skills or the tools see yo...

Страница 130: ...lter to the oil filter cover Use only the Honda Genuine oil filter or a filter of equivalent quality specified for your model Using the wrong Honda filter or a non Honda filter which is not of equival...

Страница 131: ...5 kgf m 18 lbf ft 13 Fill the crankcase with the recommended grade oil approximately 2 9 3 1 US qt 2 6 Imp qt 14 Reinstall the oil fill cap 15 Start the engine let it idle for 3 5 minutes 16 Stop the...

Страница 132: ...il with the rear final gear at normal operating temperature to assure complete and rapid draining Oil Recommendation type hypoid gear oil viscosity weight SAE 80W 90 suggested oil Honda shaft drive oi...

Страница 133: ...itable container and dispose of it in an approved manner page 184 NOTICE Improper disposal of drained fluids is harmful to the environment 6 Fill the rear final gear case with the recommended oil 80 c...

Страница 134: ...il with the front final gear at normal operating temperature to assure complete and rapid draining Oil Recommendation type hypoid gear oil viscosity weight SAE 80W 90 suggested oil Honda shaft drive o...

Страница 135: ...itable container and dispose of it in an approved manner page 184 NOTICE Improper disposal of drained fluids is harmful to the environment 6 Fill the front final gear case with the recommended oil 180...

Страница 136: ...label Use only distilled water as a part of the coolant solution Water that is high in mineral content or salt may be harmful to the aluminum engine NOTICE Using coolant with silicate inhibitors may c...

Страница 137: ...age 99 Check the engine coolant level each day before operating your ATV and add if needed 1 Make sure the vehicle is on level ground 2 With the engine at normal operating temperature check the coolan...

Страница 138: ...ttempt to add coolant by removing the radiator cap 4 Add coolant to the reserve tank as required to bring the coolant level to the UPPER level mark 5 After adding coolant install the reserve tank cap...

Страница 139: ...properly dispose of drained coolant refer to You the Environment page 184 NOTICE Improper disposal of drained fluids is harmful to the environment Coolant Replacement WARNING 3WARNING Removing the rad...

Страница 140: ...ator core after riding the ATV in mud To clean the radiator core oil cooler and radiator cover plate 1 Unhook the tabs 1 2 Remove the radiator cover plate 2 3 Wash the radiator core 3 oil cooler 4 and...

Страница 141: ...ervice interval for your riding conditions Your ATV s air cleaner has very specific performance requirements Use a new Honda Genuine air cleaner specified for your model or an air cleaner of equal qua...

Страница 142: ...y pulling the seat latch 1 up 2 Unlatch the retainer clips 2 3 Remove the air cleaner housing cover 3 Cleaning UNDER SEAT 1 1 seat latch 2 retainer clips 3 air cleaner housing cover 2 3 2 19 TRX680FA...

Страница 143: ...on flammable high flash point solvent such as kerosene not petrol After cleaning gently squeeze out the remaining solvent Avoid twisting or wringing the air cleaner This can tear the foam 9 Inspect fo...

Страница 144: ...ore spreading the oil into the air cleaner 12 Install the air cleaner on the air cleaner body 13 Apply a thin coat of grease to the sealing surface of the air cleaner assembly 14 Install the clamp 15...

Страница 145: ...eposits can be seen in the drain tube the tube must be cleaned before starting the vehicle 1 Remove the drain tube 1 by removing the clip 2 under the air cleaner housing 3 2 Drain the deposits 3 Reins...

Страница 146: ...Turn the adjuster to obtain the correct freeplay 4 Tighten the lock nut and reinstall the sleeve 5 After adjustment check for smooth operation of the throttle lever from fully closed to fully open in...

Страница 147: ...g positions If there is a problem see your dealer 3 Inspect the condition of the throttle cables from the throttle lever down to the throttle body If the cable is kinked or chafed have it replaced 4 C...

Страница 148: ...ve the seat page 110 2 Remove the pin 1 by a Phillips screwdriver and pull the clip 2 out of the hole 3 Loosen the band screw 3 and remove the resonance chamber 4 4 Unhook the rubber cover 5 Spark Plu...

Страница 149: ...isconnect the top spark plug cap 10 and side spark plug cap 11 Take care to avoid damaging the spark plug wires when disconnecting the caps 9 Using a spark plug wrench provided in the tool kit remove...

Страница 150: ...lectrode 13 should not be eroded If the electrodes and insulator tip appear unusually fouled or burned we suggest that you contact your Honda dealer 11 Discard the spark plug if there is apparent wear...

Страница 151: ...n loosen the plug c Next tighten the plug again 1 8 turn after it seats NOTICE An improperly tightened spark plug can damage the engine If a plug is too loose the piston may be damaged If a plug is to...

Страница 152: ...wer and possibly damage the valves For those who are mechanically proficient and have the proper tools instructions on adjusting valve clearances are given in the official Honda Shop Manual Otherwise...

Страница 153: ...periodically purged of accumulated carbon To purge the system 1 Allow the engine and muffler to cool 2 Remove the bolts 1 the spark arrester 2 and the gasket 3 from the muffler 4 REAR 1 2 3 4 1 bolts...

Страница 154: ...arrester screen The spark arrester must be free of breaks and holes Replace if necessary Check the gasket Replace if necessary 4 Install the spark arrester and the gasket in the muffler and tighten th...

Страница 155: ...brake lever or brake pedal freeplay does not feel within the normal range while riding check the brake pads for wear page 148 Worn pads should be replaced If the pads are not worn beyond the recommen...

Страница 156: ...s possible NOTICE Brake fluid can damage plastic and painted surfaces Handle with care With the ATV in an upright position check the fluid level It should be above the LOWER level mark 1 If the level...

Страница 157: ...tion check the fluid level It should be between the UPPER 1 and LOWER 2 level mark If the level is at or below the LOWER level mark check the brake pads for wear page 148 Worn brake pads should be rep...

Страница 158: ...r service intervals to determine the pad wear Check the wear indicator 1 Remove the front wheels page 195 If the wear indicator aligns with the reference mark 2 both pads must be replaced see your dea...

Страница 159: ...wear indicator If the wear indicator 1 aligns with the reference mark 2 replace both pads as a set see your dealer for this service REAR 1 wear indicator 2 reference mark 2 1 19 TRX680FA U 32HN8A400 b...

Страница 160: ...ever 1 moves before the brake starts to take hold Freeplay measurement at the tip of the end of the brake lever should be 25 30 mm 1 1 2 in 3 If necessary adjust to the specified range Rear Brake Leve...

Страница 161: ...e brake arm pin 3 Check that the brake lever and brake pedal assemblies are positioned properly and the securing bolts are tight Make sure that the brake cables brake arm spring and fasteners are in g...

Страница 162: ...ide behind the engine from time to time Adjustment is done by turning the adjusting nut 2 Turn the nut in direction A if the switch operates too late and in direction B if the switch operates too soon...

Страница 163: ...elect your riding area with care The following pages give detailed information on how and when to check your air pressure how to inspect your tyres for wear and damage and our recommendations for tyre...

Страница 164: ...y underinflated tyres wear unevenly adversely affect handling and are more likely to fail from being overheated Overinflated tyres make your ATV ride harshly are more prone to damage from surface haza...

Страница 165: ...of warm tyres to match the recommended cold tyre pressures the tyres will be underinflated Be sure to check tyre pressure at the riding site since changes in altitude can affect air pressure The reco...

Страница 166: ...o look for Bumps or bulges in the side of the tyre or the tread Replace any tyre that has a bump or bulge Cuts slits or cracks in the tyres Replace the tyre if you can see fabric or cord Nails or othe...

Страница 167: ...e groove depth 1 in the centre of the tyre or check the wear indicator 2 For best performance you should replace a tyre before the tread depth at the centre reaches the following limits front 4 mm 0 1...

Страница 168: ...or permanently repaired as soon as possible For more information on temporary repairs see If You Have a Flat Tyre page 193 A permanent repair such as an internal plug patch can be made if a tyre has o...

Страница 169: ...tyre The recommended tyres for your ATV are When you replace a tyre remember Have the tyre replaced by your dealer if possible If you have a tyre professionally repaired at a non Honda facility we rec...

Страница 170: ...the guard and plate for cracks damage or looseness at intervals shown in the Maintenance Schedule Have the engine guard and skid plate replaced if they are cracked or damaged If the guard and plate b...

Страница 171: ...driveshaft guards 2 for cracks damage or looseness Tighten any loose fasteners Replace the front boot guards and front driveshaft guards as required Front Boot Guards Front Driveshaft Guards 1 front b...

Страница 172: ...utions on page 99 Check the rear boot guards 1 for cracks damage or looseness Tighten any loose fasteners Replace the rear boot guards as required Rear Boot Guards 1 rear boot guards 1 19 TRX680FA U 3...

Страница 173: ...age 99 Check the rubber driveshaft boots 1 for cuts damage or leaking grease If necessary have your dealer replace them Front Driveshaft Boots Rear Driveshaft Boots FRONT REAR 1 rubber driveshaft boot...

Страница 174: ...propeller shaft boots 1 and rubber yoke joint boot 2 for cuts damage or leaking grease If necessary have your dealer replace them Propeller Shaft Boots Yoke Joint Boot 1 rubber propeller shaft boots 2...

Страница 175: ...eration also allows the battery to discharge If you have electrical accessories on your ATV or do not ride frequently we recommend that you charge the battery frequently see Battery Charging page 169...

Страница 176: ...ving the battery and slow charging it every 30 days see Battery Charging page 169 Before you remove the battery be sure to read all the information that follows as well as the information on the batte...

Страница 177: ...the rings and remove the rubber band 3 4 Disconnect the negative terminal lead 4 from the battery 5 first then disconnect the positive terminal lead 6 5 Remove the battery from battery box 7 REAR FEND...

Страница 178: ...y box after removing the battery for storage Dry the battery box and if paint is missing re paint the area 9 Slow charge the battery see following section once every 30 days Installation 1 Reinstall i...

Страница 179: ...r Honda which can be purchased from your dealer These units can be left connected for long periods without risking damage to the battery However do not intentionally leave the charger connected longer...

Страница 180: ...ive the engine and exhaust system time to cool off Park in a shady area Washing your ATV in bright sunlight may cause the finish to fade because water droplets intensify the sun s brightness Spotting...

Страница 181: ...ter on the surface to air dry can cause dulling and water spots As you dry inspect for chips and scratches 7 Remove the cover or the plug from exhaust outlet Then start the engine and let it idle for...

Страница 182: ...nd clear plastic Light road grimes Spray any difficult to reach or very dirty areas with a spray cleaner degreaser Rinse and dry Apply a spray cleaner polish and wipe with a non abrasive cloth Heavy g...

Страница 183: ...er polish or wax For stained or dull looking wheels use a quality chrome aluminum polish to restore the finish Refer to Safety Precautions on page 99 The exhaust pipe and muffler are stainless steel b...

Страница 184: ...ally available spray cleaner polish or quality liquid or paste wax to finish the job Use only a non abrasive polish or wax made specifically for motorcycles or automobiles Apply the polish or wax acco...

Страница 185: ...o be an environmentally responsible ATV owner Preparing for a Ride 176 What to Take to the Riding Area 176 What to Take on the Trail 177 Transporting Your Honda 178 Storing Your Honda 180 Preparation...

Страница 186: ...me tools and supplies in case you have a problem For some of the difficulties you might encounter see Taking Care of the Unexpected which begins on page 193 We recommend that you always take water foo...

Страница 187: ...help and how experienced you or your companions are in making repairs If you decide to take some tools spare parts or other supplies on the trail be sure you can carry them safely and know how to use...

Страница 188: ...ommend that you carry the vehicle in its normal operating position on all four wheels Do not incline the vehicle upright on its rear end This can damage the vehicle and leaking petrol could be a hazar...

Страница 189: ...nary rope is not recommended because it can stretch under load Using tie down straps in any other areas can damage your ATV 3 Rock the vehicle back and forth to make sure the tie down straps are tight...

Страница 190: ...m before storing it That way needed repairs won t be forgotten and it will be easier to get your ATV running again We suggest you perform the following procedures to keep your ATV in top condition The...

Страница 191: ...isposing of drained fuel page 184 1 Change the engine oil and filter page 119 2 Make sure the cooling system is filled with a 50 50 antifreeze solution page 126 3 Fill the fuel tank Make sure the fuel...

Страница 192: ...the battery page 169 once a month 6 Wash and dry your ATV Wax all painted surfaces 7 Inflate the tyres to their recommended pressures page 154 8 Store your ATV in an unheated area free of dampness awa...

Страница 193: ...ge the engine oil page 119 3 If your ATV has been stored for more than two months ask your dealer to drain and replace the fuel 4 Charge the battery page 169 as required Install the battery 5 Perform...

Страница 194: ...hoose Sensible Cleaners Use a biodegradable detergent when you wash your ATV Avoid aerosol spray cleaners that contain chlorofluorocarbons CFCs which damage the atmosphere s protective ozone layer Don...

Страница 195: ...time to read this section before you ride Also review the tips in Preparing for a Ride page 176 General Guidelines 186 If Your Engine Quits or Won t Start 188 If the Transmission Is Not Functioning P...

Страница 196: ...cause more damage and endanger your own safety After stopping take time to assess the situation Carefully inspect your ATV to identify the problem then consider your options before you decide what to...

Страница 197: ...your options before deciding what to do If the problem is relatively minor and you have the tools supplies and skills to make a temporary repair be sure to have permanent repairs made as soon as possi...

Страница 198: ...ne or experience poor engine performance the following information may help you If you can t correct the problem see your dealer If your ATV won t start listen as you press the start button If you don...

Страница 199: ...ry page 169 If charging doesn t help see your dealer faulty starter motor If all possible causes are negative the starter motor may be faulty See your dealer SYMPTOM Starter motor works but the engine...

Страница 200: ...st rich fuel mixture See your dealer detonates or pings under load If applicable switch to the recommended octane petrol page 111 or change your brand of petrol If the problem persists see your dealer...

Страница 201: ...ansmission If the gear position indicator shows and blinks while riding perform the following 1 Stop the ATV 2 Turn the ignition switch to the OFF w position 3 After the engine stops turn the ignition...

Страница 202: ...ock the transmission 1 Shift the shift lever in neutral N position 2 Apply the parking brake 3 Turn the ignition switch to the OFF w position 4 Loosen the screw 1 and release the lock plate 2 5 Turn t...

Страница 203: ...res A plug type repair kit available at most auto parts stores or service stations provides a plug an installation tool tyre cement and an instruction sheet Follow the instructions provided with the r...

Страница 204: ...158 Replacing a tyre involves removing and re installing the wheel page 195 If you are unable to repair a flat tyre on the trail you will need to send for help We strongly recommend that you do not tr...

Страница 205: ...ff the ground and place a support block under the vehicle 4 Remove the wheel nuts 5 Remove the wheel Avoid getting grease oil or dirt on the disc or pad surfaces when removing and installing each whee...

Страница 206: ...e wheel then lower the ATV to the ground before tightening the nuts in a crisscross rather than circular pattern to the specified torque 64 N m 6 5 kgf m 47 lbf ft If a torque wrench was not used for...

Страница 207: ...s a coolant leak Shut the engine off and wait until the steaming stops Look for a leak but don t touch the engine or radiator system Let everything cool off first Check for any restriction of air flow...

Страница 208: ...the oil level If necessary add the recommended oil page 115 to the upper level mark If you must leave your ATV to get oil secure it as much as possible Start the engine and check that the high oil coo...

Страница 209: ...working the first thing you should check for is a blown fuse 1 Check all the fuses before looking elsewhere for another possible cause of the problem Replace any blown fuses and check component opera...

Страница 210: ...fore checking or replacing the fuses 2 Remove the seat page 110 3 To access the main fuse 2 3 remove the fuse box cover 4 4 Pull the main fuse out If it is blown install the spare main fuse 5 2 main f...

Страница 211: ...7 of the same rating If you do not have a replacement fuse with the proper rating for the circuit install one with a lower rating NOTICE Replacing a fuse with one that has a higher rating greatly inc...

Страница 212: ...replace a blown fuse with a spare fuse that has a lower rating replace the fuse with the correct rating as soon as you can Also remember to replace any spare fuses that were installed If the replacem...

Страница 213: ...damage and determine if it is safe to ride Check the tightness of critical nuts and bolts securing such parts as the handlebar control levers brakes and wheels If there is minor damage or you are uns...

Страница 214: ...de If you don t know your key number call the dealer where you purchased your Honda ATV They may have it listed in their records If they don t transport your ATV to them or the nearest dealer The deal...

Страница 215: ...ke 3 Turn the ignition switch to the ON q position 4 Use the recoil starter page 70 to start the engine Jump starting is not recommended especially if you use an automobile battery The greater amperag...

Страница 216: ...pplies you have with you If any component of the brake system is damaged you may be able to ride carefully back to your base using the other brake components for slowing or stopping If you damage a th...

Страница 217: ...capacities and other technical data plus information on government requirements and how to break in your ATV Vehicle Identification 208 Specifications 210 Break in Guidelines 214 Petrol Containing Al...

Страница 218: ...r reference The VIN 1 is stamped on the front of the frame VIN ______________________________________________________ The engine number 2 is stamped on the upper side of the rear crankcase ENGINE No _...

Страница 219: ...label The colour code is helpful when ordering replacement parts Record the colour and code here for your reference COLOUR__________________________________________________ CODE _____________________...

Страница 220: ...qt after draining 2 7 2 9 US qt 2 4 Imp qt after draining oil filter change 2 9 3 1 US qt 2 6 Imp qt engine oil API Service Classification SG or higher except oils labeled as energy conserving or res...

Страница 221: ...spark plug standard CPR6EB 9 NGK spark plug gap 0 80 0 90 mm 0 031 0 035 in valve clearance cold intake 0 15 mm 0 006 in exhaust 0 32 mm 0 013 in idle speed 1 400 100 min 1 rpm NO ADJUSTMENT Power Tr...

Страница 222: ...si rear 25 kPa 3 6 psi Electrical battery YTX20L BS 12 V 18 Ah 10 HR generator 0 409 kW 5 000 min 1 rpm Lights headlight 12 V 40 40 W 2 brakelight taillight 12 V 21 5 W 2 neutral indicator LED reverse...

Страница 223: ...se oil drain bolt 12 N m 1 2 kgf m 9 lbf ft rear final gear case oil fill cap 12 N m 1 2 kgf m 9 lbf ft front final gear case oil drain bolt 12 N m 1 2 kgf m 9 lbf ft front final gear case oil fill ca...

Страница 224: ...s future reliability and performance by paying extra attention to how you ride during the first operating day or 25 km 15 miles During this period avoid full throttle starts and rapid acceleration 19...

Страница 225: ...methanol even if it has cosolvents and corrosion inhibitors Engine performance problems resulting from the use of fuels that contain alcohol are not covered under the warranty Honda cannot endorse the...

Страница 226: ...r ATV away from high grasses dry leaves or other flammables A defective catalytic converter contributes to air pollution and can impair your engine s performance Follow these guidelines to protect you...

Страница 227: ...Technical Information 217 19 TRX680FA U 32HN8A400 book Page 217 Thursday June 14 2018 1 25 PM...

Страница 228: ...earance care 170 B bank angle sensor 68 battery 165 Brakes cables 151 brakes cables 151 fluid 145 front brake lever 36 pad wear 148 parking 37 rear brake lever 36 rear brake lever freeplay 150 rear br...

Страница 229: ...09 compartment owner s manual 109 tool kit 108 component fails 206 controls features 27 crash if you 203 crossing or turning on hills or slopes 89 D digital clock 25 dimmer switch headlight 32 dipstic...

Страница 230: ...ng 69 won t start 189 environment 184 F flag pole bracket 38 flat tyre 193 flooded engine 68 front boot guards 161 front driveshaft guards 161 front final gear oil 124 fuel fill cap 112 gauge 26 recom...

Страница 231: ...ing on hills 86 hour select button 25 hour meter 24 I identification vehicle 208 ignition cut off system bank angle 68 ignition switch 27 indicators 4WD indicator 16 30 drive mode indicator 19 gear po...

Страница 232: ...ear oil 124 rear final gear oil 122 M maintenance component locations 105 importance 97 precautions 99 record 104 safety 98 schedule 100 maximum weight limit 54 minute select button 25 modifications 5...

Страница 233: ...locations 11 owner s manual storage 109 oxygen sensor 170 P parking 93 passenger no carrying 47 pavement no riding on 61 petrol 111 petrol containing alcohol 215 pinging engine 111 plugs spark 138 pr...

Страница 234: ...r 33 removal seat 110 reverse gear shifting into 77 indicator 16 riding in 77 rider training 46 riding basic operations 59 clothing 44 over obstacles 91 precautions 61 preparing for 176 safety 2 safet...

Страница 235: ...or sliding 83 spark arrester 143 spark knock 111 spark plugs 138 specifications 210 speedometer 17 stalling on a hill 86 start button 31 starting engine 66 troubleshooting 189 stop switch engine 31 st...

Страница 236: ...ansporting your ATV 178 tripmeter 22 trouble unexpected 185 troubleshooting starting 189 turning on hills or slopes 89 on level ground 82 tyres air pressure 154 flat 193 repairing 158 replacing 159 th...

Страница 237: ...Index 227 Index W washing your ATV 171 water riding through 92 weight limit 54 wheel removal 195 19 TRX680FA U 32HN8A400 book Page 227 Thursday June 14 2018 1 25 PM...

Страница 238: ...00X32 HN8 A400 32HN8A40 WPCXXXX 2018 XX 19 PRINTED IN USA U...

Отзывы: