background image

Torque Control Indicator

If the indicator operates in one of the

following ways, you may have a serious

problem with the Torque Control. Reduce

your speed and have your vehicle inspected

by your dealer as soon as possible.

Indicator comes and stays on (solid) while

riding.

Indicator does not come on when the

ignition switch is turned to the ON

position.

Indicator does not go off at speeds above

3 mph (5 km/h).

Even when the Torque Control indicator is

on, your vehicle will have normal riding ability

without Torque Control function.

u

When the indicator comes on while the

Torque Control is in operation, you will

have to completely close the throttle to

regain normal riding ability.

The Torque Control indicator may come on if

you rotate the rear wheel while your vehicle

is lifted off the ground. In this case, turn the

ignition switch to the OFF position, and then

to the ON position again. The Torque

Control indicator will go off after your speed

reaches 3 mph (5 km/h).

Warning Indicators On or Flashing 

u


Torque Control Indicator

Troubleshooting

129

Содержание CMX1100A 2021

Страница 1: ...Black PANTONE 286C Trim size A6 105 148 mm 2021 2021 PRINTED IN JAPAN 3000 2020 11 M 31MLA602 00X31 MLA 6020 CMX1100A D O 英 EN CMX1100A D 00X31 MLA 6020 ...

Страница 2: ...printing Honda Motor Co Ltd reserves the right to make changes at any time without notice and without incurring any obligation No part of this publication may be reproduced without written permission The vehicle pictured in this owner s manual may not match your actual vehicle CMX1100A D Single seat type is USA model only CMX1100A D Double seat type is Canada model only 2020 Honda Motor Co Ltd ...

Страница 3: ...ake responsibility for keeping your vehicle well serviced and maintained Also observe the break in guidelines and always perform the pre ride inspection and other periodic checks in this manual When service is required remember that your Honda dealer knows your vehicle best If you have the required mechanical know how and tools you can purchase an official Honda Service Manual to help you perform ...

Страница 4: ... maintaining a vehicle You must use your own good judgment You will find important safety information in a variety of forms including Safety labels on the vehicle Safety Messages preceded by a safety alert symbol and one of three signal words DANGER WARNING or CAUTION These signal words mean 3DANGER You WILL be KILLED or SERIOUSLY HURT if you don t follow instructions 3WARNING You CAN be KILLED or...

Страница 5: ...Contents Vehicle Safety P 2 Operation Guide P 22 Maintenance P 80 Troubleshooting P 124 Information P 137 Specifications P 164 ...

Страница 6: ... Labels P 8 Safety Precautions P 10 Riding Precautions P 12 Accessories Modifications P 17 Loading P 18 This section contains important information for safe riding of your vehicle Please read this section carefully Vehicle Safety ...

Страница 7: ...otective apparel 2 P 10 Before Riding USA model Model not equipped with Optional Passenger Seat Kit Make sure that you are physically fit mentally focused and free of alcohol and drugs Check that you are wearing an approved helmet and protective apparel Canada model and USA model equipped with Optional Passenger Seat Kit Make sure that you are physically fit mentally focused and free of alcohol an...

Страница 8: ...er 800 446 9227 USA Other riding tips can be found in the You and Your Motorcycle Riding Tips booklet that came with your vehicle Ride Defensively Always pay attention to other vehicles around you and do not assume that other drivers see you Be prepared to stop quickly or perform an evasive maneuver Make Yourself Easy to See Make yourself more visible especially at night by wearing bright reflecti...

Страница 9: ... drink The same is true for drug use Don t drink or use and ride and don t let your friends do it either Keep Your Honda in Safe Condition It s important to keep your vehicle properly maintained and in safe riding condition Inspect your vehicle before every ride and perform all recommended maintenance Never exceed load limits 2 P 18 and do not modify your vehicle or install accessories that would ...

Страница 10: ...es Equipped with Dual Clutch Transmission CMX1100D Unlike standard motorcycles or its manual transmission sibling the CMX1100D with dual clutch transmission does not have a clutch lever that would provide you with an additional means to control the engine power being transmitted to the rear wheel Thus in the unlikely event that you experience a stuck throttle or other unintended application of pow...

Страница 11: ...ntain a dangerous amount of carbon monoxide Never run your vehicle inside a garage or other enclosure 3WARNING Running the engine of your vehicle while in an enclosed or even partially enclosed area can cause a rapid build up of toxic carbon monoxide gas Breathing this colorless odorless gas can quickly cause unconsciousness and lead to death Only run your vehicle s engine when it is located in a ...

Страница 12: ...nd may warn you of potential hazards that could cause serious injury Read these labels carefully and don t remove them If a label comes off or becomes hard to read contact your dealer for a replacement Safety Labels Vehicle Safety 8 USA model Model not equipped with Optional Passenger Seat Kit shown ...

Страница 13: ...Safety Labels Vehicle Safety 9 USA model Model not equipped with Optional Passenger Seat Kit shown ...

Страница 14: ...other drivers and riders Protective Apparel USA model Model not equipped with Optional Passenger Seat Kit Make sure that you are wearing an approved helmet eye protection and high visibility protective clothing Avoid wearing loose clothes that could get caught on any part of the vehicle Ride defensively in response to weather and road conditions Canada model and USA model equipped with Optional Pa...

Страница 15: ...tion certification label on any helmet you buy 3WARNING Not wearing a helmet increases the chance of serious injury or death in a crash USA model Model not equipped with Optional Passenger Seat Kit Make sure that you always wear an approved helmet and protective apparel Canada model and USA model equipped with Optional Passenger Seat Kit Make sure that you and any passenger always wear an approved...

Страница 16: ...d During the first 300 miles 500 km of running follow these guidelines to ensure your vehicle s future reliability and performance Avoid full throttle starts and rapid acceleration Avoid hard braking and rapid down shifts Ride conservatively Brakes Observe the following guidelines Avoid excessively hard braking and downshifting u Sudden braking can reduce the vehicle s stability u Where possible r...

Страница 17: ...e both the front and rear brakes together Anti lock Brake System ABS This model is equipped with an Anti lock Brake System ABS designed to help prevent the brakes from locking up during hard braking ABS does not reduce braking distance In certain circumstances ABS may result in a longer stopping distance ABS does not function at speeds below 6 mph 10 km h The brake lever and pedal may recoil sligh...

Страница 18: ...ions If the brakes get wet apply the brakes while riding at low speed to help them dry Parking Park on a firm level surface If you must park on a slight incline or loose surface park so that the vehicle cannot move or fall over Make sure that high temperature parts cannot come into contact with flammable materials Do not touch the engine muffler brakes and other high temperature parts until they c...

Страница 19: ...sition and remove the key 6 Lock the steering 2 P 51 Refueling and Fuel Guidelines Follow these guidelines to protect the engine fuel system and catalytic converter Use only unleaded gasoline Use recommended octane number Using lower octane gasoline will result in decreased engine performance Do not use fuels containing a high concentration of alcohol 2 P 155 Do not use stale or contaminated gasol...

Страница 20: ...ue Control does not work during deceleration and will not prevent the rear wheel from skidding due to engine braking Do not close the throttle suddenly especially when riding on slippery surfaces Torque Control may not compensate for rough road conditions or rapid throttle operation Always consider road and weather conditions as well as your skills and condition when applying throttle If your vehi...

Страница 21: ...ate on public roads Before deciding to install accessories on your vehicle be certain the modification is safe and legal 3WARNING Improper accessories or modifications can cause a crash in which you can be seriously hurt or killed Follow all instructions in this owner s manual regarding accessories and modifications Do not pull a trailer with or attach a sidecar to your vehicle Your vehicle was no...

Страница 22: ... 2 P 164 Tie all luggage securely evenly balanced and close to the center of the vehicle Do not place objects near the lights or the muffler 3WARNING USA model Model not equipped with Optional Passenger Seat Kit Overloading improper loading or carrying a passenger can cause a crash and you can be seriously hurt or killed Canada model and USA model equipped with Optional Passenger Seat Kit Overload...

Страница 23: ... vehicle Do not carry a passenger unless a passenger seat with seat strap and footpegs have been securely installed on your vehicle 3WARNING Carrying a passenger without a properly designed and installed passenger seat and footpegs can result in serious injury or death to you and or the passenger Never carry a passenger without first installing a passenger seat with seat strap and footpegs specifi...

Страница 24: ...hicle GVWR weight ratings and tire load capacities can be found on the vehicle Single Seat as produced Optional Honda Genuine Accessory Passenger Seat Kit shown Loading Vehicle Safety 20 Single Seat Passenger Seat Kit ...

Страница 25: ...Vehicle Safety 21 ...

Страница 26: ...e grip P 120 Rear brake fluid reservoir P 111 Rear brake pedal Rear suspension spring preload adjuster P 123 Seat P 105 Side cover P 106 Steering lock P 51 Battery P 102 Canada model and USA model equipped with Optional Passenger Seat Kit Main fuse P 136 Front suspension spring preload adjuster P 122 ...

Страница 27: ...Side stand P 115 Shift lever P 63 Tool P 78 Drive chain P 116 Parking brake lever P 113 Coolant reserve tank P 109 Ignition switch P 47 Engine oil fill cap P 107 Fuel fill cap P 75 Document bag P 78 CMX1100D CMX1100A Fuse box P 135 CMX1100A Engine oil dipstick P 107 Helmet holders P 79 ...

Страница 28: ... for problems Display Check Clock 12 hour or 24 hour display To set the clock P 36 Tachometer red zone Riding mode display P 53 Speedometer Cursor excessive engine rpm range INFO 3 display P 33 INFO 1 display P 27 INFO 2 display P 30 Changing the INFO display P 27 P 30 Select the display P 26 NOTICE Do not operate the engine in the tachometer red zone Excessive engine speed can adversely affect en...

Страница 29: ... position indicator If the fuel gauge indicator flashes in a repeat pattern or turns off P 131 The gear position is shown in the gear position indicator when the MT MODE is selected The indicator may flash if u The front wheel leaves the ground u You turn the wheel while the vehicle is upright on the stand This is normal To operate the system again turn the ignition switch to the OFF position and ...

Страница 30: ... the display Press the MODE button to move the cursor and select a display Operation Guide 26 Instruments Continued Press the MODE button Riding mode display INFO 1 display INFO 2 display Cursor Cursor Cursor ...

Страница 31: ...a Select the INFO 1 display P 26 b Press the SEL up or the SEL down button until the desired indication is displayed c Press the MODE button The INFO 1 display is set and then the display moves to the INFO 2 display P 30 Operation Guide 27 Continued Press the SEL up button Press the SEL down button Odometer Current fuel mileage Elapsed time Available driving distance ...

Страница 32: ...peed is less than 3 mph 5 km h is displayed When select the mpg or km L for fuel mileage unit More than 300 0 mpg km L 300 0 is displayed When select the L 100 km for fuel mileage unit More than 300 0 L 100km is displayed If the calculated value is less than 0 1 L 100km 0 0 is displayed When is displayed except for the above mentioned cases go to your dealer for service Operation Guide 28 Instrume...

Страница 33: ... can travel on the remaining fuel Display range 999 to 3 mile 999 to 5 km Above 999 mile km 999 is displayed Initial display is displayed When the available driving distance is below 3 mile 5 km or the amount of remaining fuel is below 0 2 gal 1 0 L is displayed The indicated available driving distance is calculated based on driving conditions and the indicated figure may not always be the actual ...

Страница 34: ...2 display a Select the INFO 2 display P 26 b Press the SEL up or the SEL down button until the desired indication is displayed c Press the MODE button The INFO 2 display is set and then the display moves to the riding mode display Operation Guide 30 Instruments Continued Press the SEL up button Press the SEL down button Trip A Average fuel mileage A Average speed A Trip B Average fuel mileage B Av...

Страница 35: ...ge speed was reset The average speed will be calculated based on value displayed on the tripmeter A or B selected Display range 0 to 124 mph or 0 to 199 km h When your vehicle has traveled less than 0 2 km since the engine was started is displayed When your vehicle operating time is less than 16 seconds since the engine was started is displayed To reset the average speed P 34 Operation Guide 31 Co...

Страница 36: ...en select the mpg or km L for fuel mileage unit More than 300 0 mpg km L 300 0 is displayed When select the L 100 km for fuel mileage unit More than 300 0 L 100km is displayed If the calculated value is less than 0 1 L 100km 0 0 is displayed When the average fuel mileage is reset is displayed When is displayed except for the above mentioned cases go to your dealer for service To reset the average ...

Страница 37: ...ient temperature Display range 14 ºF to 122 ºF or 10 ºC to 50 ºC Below 10 ºC 14 ºF is displayed Above 122 ºF 50 ºC 122ºF 50 ºC flashes Comes on when air temperature is below 3 ºC 38 ºF and goes off when air temperature reaches 5 ºC 41 ºF after comes on u If you use cruise control while is displayed turns off Road heat and exhaust from another vehicle can affect the temperature reading when your ve...

Страница 38: ...eed A together press and hold the MODE button while the tripmeter A average fuel mileage A or average speed A is displayed When they are reset reset display appears at each indication Then the display returns to the last selected indication Operation Guide 34 Instruments Continued Tripmeter A Average fuel mileage A or Average speed A or ...

Страница 39: ...he MODE button while the tripmeter B average fuel mileage B or average speed B is displayed When they are reset reset display appears at each indication Then the display returns to the last selected indication Operation Guide 35 Continued Tripmeter B Average fuel mileage B or Average speed B or ...

Страница 40: ...lected Operation Guide 36 Instruments Continued Press and hold the SEL up or the SEL down button and the MODE button Press the MODE button Ordinary display Clock setting Backlight brightness adjustment Changing of temperature unit Changing the speed and mileage unit Changing the fuel mileage meter unit only when km unit system is selected Time format setting Activating deactivating of tripmeter A ...

Страница 41: ...rn to the ordinary display If the ignition switch is turned to the OFF position or press and hold the MODE button and SEL up or SEL down button items in the process of being set and those that are finalized will be applied 1 Time format setting You can switch the time format between 12 hour format or 24 hour format a Turn the ignition switch to the ON position b Press and hold the MODE button and ...

Страница 42: ...fast b Press the MODE button The minute digits start flashing c Press the SEL up button or the SEL down button until the desired minute is displayed u Press and hold the SEL up button or the SEL down button to advance the minute fast d Press the MODE button The clock is set and then the display moves to the backlight brightness adjustment Operation Guide 38 Instruments Continued ...

Страница 43: ...n or the SEL down button The brightness is switched b Press the MODE button The backlight is set and then the display moves to the activating deactivating of tripmeter A average fuel mileage A and average speed A automatic reset mode Operation Guide 39 Continued Press the SEL down button Press the SEL up button ...

Страница 44: ...average fuel mileage A and average speed A will automatically reset when your vehicle travels 0 06 mile 0 1 km and the ignition switch is turned to the OFF position and then to the ON position again a Press the SEL up button or the SEL down button to select On activate or OFF deactivate in the automatic reset mode b Press the MODE button The activation deactivation of automatic reset mode is set a...

Страница 45: ...auge unit a Press the SEL up button or the SEL down button to select C Centigrade or F Fahrenheit b When the km h for speed and km for mileage are selected Press the MODE button The temperature gauge unit is set and then the display moves to the changing of the fuel mileage meter unit When the mph for speed and mile for mileage are selected Press the MODE button The temperature gauge unit is set a...

Страница 46: ...unit a Press the SEL up button or the SEL down button to select L 100km or km L b Press the MODE button The fuel mileage meter unit is set and then the display will return to the ordinary display Operation Guide 42 Instruments Continued ...

Страница 47: ...MIL If it comes on while engine is running P 127 Comes on briefly when the ignition switch is turned to the ON position with the engine stop switch in the Run position Comes on briefly when the ignition switch is turned to the ON position Comes on briefly when the ignition switch is turned to the ON position High coolant temperature indicator If one of these indicators does not come on when it sho...

Страница 48: ...s on while engine is running P 127 Low oil pressure indicator Parking brake indicator Lights as a reminder that you have not released the parking brake lever If it comes on while riding P 128 ABS Anti lock Brake System indicator Comes on when the electrical system is turned on Goes off when your speed reaches approximately 10 km h 6 mph CMX1100D ...

Страница 49: ...ks when Torque Control is operating Comes on when the ignition switch is turned to the ON position Goes off when your speed reaches approximately 5 km h 3 mph to indicate Torque Control is ready to work Comes on if you have set a speed for cruise control Comes on when you press cruise control main switch Cruise control main indicator Cruise Control P 70 ...

Страница 50: ...Switches Operation Guide 46 Left handlebar switch P 49 P 50 Right handlebar switch P 48 ...

Страница 51: ... Continued Ignition switch Switches the electrical system on off u Key can be removed when in the OFF position ON OFF Turns engine off Turns electrical system on for starting riding Steering Lock P 51 SEAT Open the seat ...

Страница 52: ...ormally remain in the Run position A M switch N D switch Cruise control lever Right handlebar switch Press to activate the cruise control system P 70 Cruise control main switch Push up or down to set the speed or adjust the set speed P 72 To shift between Neutral and AT MODE P 68 CMX1100D To shift between the AT MODE and MT MODE P 68 CMX1100D ...

Страница 53: ...tch Passing switch Flashes the high beam headlight Horn button To shift down the gear P 69 Shift down switch To shift up the gear P 69 Shift up switch Left handlebar switches MODE button Used to operate and set the display P 26 P 36 Also used to set the riding mode P 53 CMX1100D CMX1100D ...

Страница 54: ... Sel up switch Switchable when the ignition switch is turned to the ON position Sel down switch Used to operate and set the display P 36 Also used to set the riding mode P 36 Also used to set the riding mode P 53 Used to operate and set the display P 36 ...

Страница 55: ...ll the way to the left b Insert the ignition key in the steering lock c Push the ignition key down and turn it 180 degrees clockwise u Jiggle the handlebar if the lock is difficult to engage d Remove the ignition key Unlocking Insert the ignition key push it in and turn it 180 degrees counterclockwise Operation Guide 51 Steering lock Ignition key Push Turn ...

Страница 56: ...elease button pops out and parking brake lever is not released u The parking brake lock will not function if the parking brake is not adjusted properly P 113 Unlocking Release the parking brake lever by lightly pulling in the lever a and pressing the release button b u Before riding check that the parking brake indicator is turned off and make sure that the parking brake is fully released so there...

Страница 57: ...modes Available riding mode SPORT STANDARD RAIN and USER SPORT STANDARD and RAIN u SPORT This mode is suitable for sports riding You can feel the highest engine response u STANDARD Standard all around mode for a variety of situations u RAIN Good for stable riding on slippery surfaces such as rainy conditions These levels cannot be changed USER Each value of initial setting can be changed Operation...

Страница 58: ...e High STANDARD Middle Middle Middle Middle RAIN Low High Low Low USER Middle 1 Middle 1 2 Middle 1 Middle 1 Notes 1 Level can be changed 2 If off is selected the level will change to Middle the next time the ignition is turned on Operation Guide 54 Riding mode Continued ...

Страница 59: ...is the maximum Torque Control level u Off deactivates the Torque Control EB level Engine brake level EB level has three setting levels Available setting range Low to High u High has the strongest engine braking effect u Low has the weakest engine braking effect D level DCT level D level has three setting levels Available setting range Low to High u Low has the lowest engine revolution u High has t...

Страница 60: ...the riding mode display P 26 c Press the SEL up or SEL down button with the throttle fully closed Operation Guide 56 Riding mode Continued MODE button SEL up button SEL down button Press the SEL up button Press the SEL down button SPORT STANDARD RAIN USER ...

Страница 61: ... parameter and setting level u To select the parameter press the MODE button u To select the setting level press the SEL up or down button u T level can be changed to off by pressing and holding the SEL down button while selecting the T parameter u T level can be changed from Off to Low by pressing the SEL up button You can stop setting the riding modes at any time by pressing and holding the MODE...

Страница 62: ...Operation Guide 58 Riding mode Continued Press the MODE button Press and hold the MODE button Press the SEL up button Press the SEL down button Press and hold the SEL down button ...

Страница 63: ...cover battery voltage Extended fast idling and revving the engine can damage the engine and the exhaust system a Make sure the engine stop switch is in the Run position b Turn the ignition switch to the ON position c Shift the transmission to Neutral N indicator comes on Alternatively pull in the clutch lever to start your vehicle with the transmission is in gear so long as the side stand is raise...

Страница 64: ...e throttle fully and press the START button for 5 seconds b Repeat the normal starting procedure c If the engine starts open the throttle slightly if idling is unstable d If the engine does not start wait 10 seconds before trying steps a b again If Engine Will Not Start P 125 Operation Guide 60 Starting the Engine Continued About 1 8 in 3 mm without freeplay ...

Страница 65: ...to recover battery voltage Extended fast idling and revving the engine can damage the engine and the exhaust system a Make sure the engine stop switch is in the Run position b Turn the ignition switch to the ON position c Check the transmission is in Neutral N indicator come on d Press the START button with the throttle completely closed e Make sure the parking brake lever is released before ridin...

Страница 66: ...r comes on u If you turn the ignition switch to the OFF position when the vehicle in gear the engine will shut off with the clutch disengaged b Turn the ignition switch to the OFF position c Set the parking brake when you park the vehicle P 52 Operation Guide 62 Starting the Engine Continued ...

Страница 67: ...h From 2nd to 3rd 19 mph 30 km h From 3rd to 4th 25 mph 40 km h From 4th to 5th 31 mph 50 km h From 5th to 6th 37 mph 60 km h Shifting Down From 6th to 5th 28 mph 45 km h From 5th to 4th 22 mph 35 km h From 4th to 3rd 16 mph 25 km h NOTICE Improper shifting can damage the engine transmission and drive train Also coasting or towing the vehicle for long distances with the engine off can damage the t...

Страница 68: ... 19 mph 30 km h From 3rd to 4th 25 mph 40 km h From 4th to 5th 31 mph 50 km h From 5th to 6th 37 mph 60 km h Shifting Down From 6th to 5th 28 mph 45 km h From 5th to 4th 23 mph 37 km h From 4th to 3rd 20 mph 32 km h NOTICE Improper shifting can damage the engine transmission and drive train Also coasting or towing the vehicle for long distances with the engine off can damage the transmission Opera...

Страница 69: ...peration which delivers the same shift feel as a manual transmission u Always use the recommended tires and sprockets to ensure correct Dual Clutch Transmission operation The Dual Clutch Transmission system runs a self check immediately after starting the engine appears in the gear position indicator window for a few seconds then goes out While appears you cannot shift into gear Operation Guide 65...

Страница 70: ... and then to the ON position again P 130 You may hear click noises when the transmission shifts to Neutral N This is normal When you can change between N and D u Vehicle is stopped and the engine is idling u Throttle is completely closed It is not possible to change from Neutral to D mode while the throttle is applied u You cannot change between N and D mode while the wheels are rotating u Side st...

Страница 71: ...change the D level when you need more power in AT MODE such as when overtaking climbing hills pulling away Higher engine RPM can be used by increasing the level D level can be changed only when riding mode is USER To change the D level P 57 Riding mode P 53 D mode AT This is the standard mode when AT MODE is selected Select D mode for regular operation and efficient fuel economy MT MODE MT MODE 6 ...

Страница 72: ...ear position indicator and first gear is selected Changing from AT or MT MODE to Neutral Press N on the N D switch c The D indicator goes out d while gear position is in the neutral Changing between AT MODE and MT MODE Press the A M switch e The D indicator goes out while MT MODE is selected f Operation Guide 68 Shifting Gears Continued A M switch N D switch ...

Страница 73: ...e u The transmission automatically shifts down when you slow down even in MT MODE u You will start from 1st gear even if MT MODE is selected Gear shift operation Shifting Up Press the shift up switch g Shifting Down Press the shift down switch h You cannot continue shifting gear by keeping the shift switch pressed To continue shifting gear release the switch and press it again Shift Limit You cann...

Страница 74: ... gear From 3rd to 6th gear When cruise control is on your speed will still vary slightly particularly going up and down hills Cruise control is intended for use only on straight uncongested highways Do not use cruise control on city streets winding roads during bad weather or at any other time when you need total control of the throttle 3WARNING Improper use of the cruise control can lead to a cra...

Страница 75: ...l main indicator will come on c Accelerate to the desired speed d Push the cruise control lever to side The cruise control set indicator will come on u Current travelling speed is memorized and then the set speed is displayed on the INFO 3 display Operation Guide 71 Continued SET Cruise control set indicator Cruise control main indicator Cruise control set speed INFO 3 display Cruise control main ...

Страница 76: ...r than the possible setting range will not be indicated stops at the upper or lower limit speed To Change the Set Speed Continuously To increase the set speed push and hold the cruise control lever to side The system will accelerate your vehicle automatically When you reach the desired speed release the cruise control lever If the cruise control lever is pushed and held to side continuously the se...

Страница 77: ...til you reach the desired speed b Push and release the cruise control lever to side u Cruise control set speed is set to the travelling speed when cruise control lever is released To Manually Increase Vehicle Speed a Use the throttle in the normal manner to accelerate b To return to the set speed close the throttle and coast without applying the brakes u The cruise system will maintain the speed y...

Страница 78: ...hrottle grip past the automatically closed position in the deceleration direction CMX1100A Disengage the clutch or operate the shift lever b To resume cruise control If you are still over 30 mph 50 km h push and release the cruise control lever to side If you are under 30 mph 50 km h use the throttle to increase road speed above 30 mph 50 km h and then push and release the cruise control lever to ...

Страница 79: ...o open the fuel fill cap Closing the Fuel Fill Cap a After refueling push the fuel fill cap closed until it locks b Remove the ignition key and close the lock cover u The ignition key cannot be removed if the fuel fill cap is not locked 3WARNING Gasoline is highly flammable and explosive You can be burned or seriously injured when handling fuel Stop the engine and keep heat sparks and flame away H...

Страница 80: ...e when in use Only USB devices within the following specifications can be connected USB Type C rated capacity 15 W 5 V 3 0 A To connect your USB device a Remove the seat P 105 b Remove the cap to access the USB socket c Connect a certified USB cable to the USB socket u To prevent lost the cap put the USB socket cover through the ring part of the cap and then connect a certified USB cable to the US...

Страница 81: ...tion may cause damage to them or they could shift unexpectedly NOTICE Using any heat generating USB devices or improperly rated USB devices can damage the socket Do not use the USB socket in wet conditions when or while washing or any other wet conditions as these will damage the USB socket Do not allow the USB s harness to become pinched or trapped Do not allow the USB s harness to interfere with...

Страница 82: ...Storage Equipment Tool Document Bag The tool kit and document bag are located under the seat by the rubber strap Removing the Seat P 105 Operation Guide 78 Document bag Rubber strap Tool kit ...

Страница 83: ...WARNING Riding with a helmet attached to the holder can interfere with your ability to safely operate the vehicle and could lead to a crash in which you can be seriously hurt or killed Use the helmet holder only while parked Do not ride with a helmet secured by the holder Operation Guide 79 Underside of the seat Helmet D ring Helmet holder ...

Страница 84: ...1 Side Stand P 115 Drive Chain P 116 Clutch P 117 Throttle P 120 Other Adjustments P 121 Adjusting the Brake Lever P 121 Adjusting the Front Suspension P 122 Adjusting the Rear Suspension P 123 Please read Importance of Maintenance and Maintenance Fundamentals carefully before attempting any maintenance Refer to Specifications for service data An optional larger tool kit may be available Check wit...

Страница 85: ... or failing to correct a problem before you ride can cause a crash in which you can be seriously hurt or killed Always follow the inspection and maintenance recommendations and schedules in this owner s manual For information about the exhaust emission and noise emission requirements of the U S Environmental Protection Agency EPA the California Air Resources Board CARB and the Environment and Clim...

Страница 86: ...ether or not you should perform a given task Follow these guidelines when performing maintenance Stop the engine and remove the key Place your vehicle on a firm level surface using the side stand or a maintenance stand to provide support Allow the engine muffler brakes and other high temperature parts to cool before servicing as you can get burned Run the engine only when instructed and do so in a...

Страница 87: ... Your dealer meets all of these requirements All scheduled maintenance is considered a normal owner operating cost and will be charged to you by your dealer Keeping an accurate maintenance record will help ensure your vehicle is properly maintained 2 P 86 Make sure whoever performs the scheduled maintenance completes the maintenance record Retain all service documents If you sell your vehicle thes...

Страница 88: ... 6 Engine Idle Speed Radiator Coolant 5 3 Years 109 Cooling System Secondary Air Supply System Evaporative Emission Control System 4 Maintenance Level Maintenance Legend Intermediate We recommend service by your dealer unless you have the necessary tools and are mechanically skilled Procedures are provided in an official Honda Service Manual 2 P 156 Inspect clean adjust lubricate or replace if nec...

Страница 89: ...tion 6 113 Headlight Aim Clutch System 7 117 Side Stand 115 Suspension Nuts Bolts Fasteners Wheels Tires 98 Steering Head Bearings Notes 1 At higher odometer reading repeat at the frequency interval established here 2 Service more frequently when riding in unusually wet or dusty areas 3 Service more frequently when riding in rain or at full throttle 4 50 STATE meets California 5 Replacement requir...

Страница 90: ...0 km 16 000 miles 25 600 km 20 000 miles 32 000 km 24 000 miles 38 400 km 28 000 miles 44 800 km 32 000 miles 51 200 km 36 000 miles 57 600 km 40 000 miles 64 000 km 44 000 miles 70 400 km 48 000 miles 76 800 km 52 000 miles 83 200 km 56 000 miles 89 600 km 60 000 miles 96 000 km 64 000 miles 102 400 km 68 000 miles 108 800 km Maintenance 86 ...

Страница 91: ...chain Adjust slack and lubricate as needed 2 P 95 USA model Model not equipped with Optional Passenger Seat Kit Check the following items if you are carrying a cargo Canada model and USA model equipped with Optional Passenger Seat Kit Check the following items if you are carrying a passenger or cargo Combined weight is within load limits 2 P 164 Cargo is secured properly Suspension is adjusted to ...

Страница 92: ...Brake fluid level is Front above the LOWER level mark 2 P 111 Rear between the UPPER and LOWER level marks 2 P 111 Engine coolant level is between the UPPER and LOWER level marks 2 P 109 Side stand functions properly 2 P 115 CMX1100D Parking brake works properly 2 P 113 Maintenance Fundamentals Maintenance 88 ...

Страница 93: ... grip 2 P 120 front brake lever 2 P 121 rear brake pedal and parking brake CMX1100D only 2 P 113 operate properly Drive chain Check the slack 2 P 116 adjust the slack and lubricate 2 P 96 as needed Fuses Check that you have a full supply of spare fuses Nuts bolts Check the major nuts and bolts and tighten as needed Periodic Checks You should also perform other periodic maintenance checks at least ...

Страница 94: ... your vehicle unsafe and cause a crash in which you can be seriously hurt or killed Always use Honda Genuine Parts or equivalents that have been designed and approved for your vehicle Battery Your vehicle has a maintenance free type battery You do not have to check the battery electrolyte level or add distilled water Clean the battery terminals if they become dirty or corroded Do not remove the ba...

Страница 95: ...shes onto your skin u Remove affected clothing and wash your skin thoroughly using water Electrolyte splashes into your mouth u Rinse mouth thoroughly with water and do not swallow 3WARNING The battery gives off explosive hydrogen gas during normal operation A spark or flame can cause the battery to explode with enough force to kill or seriously hurt you Wear protective clothing and a face shield ...

Страница 96: ... Charging If you use electrical accessories that drain the battery or you do not ride frequently we recommend that you charge the battery every 30 days using a charger designed specifically for your Honda which can be purchased from your dealer Read the information that came with your battery charger and follow the instructions on the battery Avoid using an automobile type battery charger as these...

Страница 97: ...electrical on your vehicle stops working check for and replace any blown fuses 2 P 135 Inspecting and Replacing Fuses Turn the ignition switch to the OFF position to remove and inspect fuses If a fuse is blown replace with a fuse of the same rating For fuse ratings see Specifications 2 P 166 NOTICE Replacing a fuse with one that has a higher rating greatly increases the chance of damage to the ele...

Страница 98: ...he following standards JASO T 903 standard 1 MA SAE standard 2 10W 30 API classification 3 SG or higher 1 The JASO T 903 standard is an index for engine oils for 4 stroke motorcycle engines There are two classes MA and MB For example the following label shows the MA classification 2 The SAE standard grades oils by their viscosity 3 The API classification specifies the quality and performance ratin...

Страница 99: ...ly DOT 4 fluid from a sealed container Drive Chain The drive chain must be inspected and lubricated regularly Inspect the chain more frequently if you often ride on bad roads ride at high speed or ride with repeated fast acceleration 2 P 116 If the chain does not move smoothly makes strange noises has damaged rollers has loose pins has missing O rings or kinks have the chain inspected by your deal...

Страница 100: ...ng wipe dry and lubricate with the recommended lubricant Recommended lubricant Pro Honda HP Chain Lube or equivalent Do not use a steam cleaner a high pressure cleaner a wire brush volatile solvent such as gasoline and benzene abrasive cleaner chain cleaner or lubricant NOT designed specifically for O ring chains as these can damage the rubber O ring seals Avoid getting lubricant on the brakes or ...

Страница 101: ...etter protection in colder climates NOTICE Using coolant not specified for aluminum engines or tap mineral water can cause corrosion Crankcase Breather Service more frequently when riding in rain at full throttle or after the vehicle is washed or overturned Service if the deposit level can be seen in the transparent section of the drain tube If the drain tube overflows the air filter may become co...

Страница 102: ... is changed do not return it to the original position Have your vehicle inspected by your dealer Inspecting for Damage Inspect the tires for cuts slits or cracks that exposes fabric or cords or nails or other foreign objects embedded in the side of the tire or the tread Also inspect for any unusual bumps or bulges in the side walls of the tires Inspecting for Abnormal Wear Inspect the tires for si...

Страница 103: ...res when the minimum tread depth is reached 3WARNING Riding on tires that are excessively worn or improperly inflated can cause a crash in which you can be seriously hurt or killed Follow all instructions in this owner s manual regarding tire inflation and maintenance Maintenance Fundamentals Maintenance 99 Continued Wear indicator location mark or TWI ...

Страница 104: ...ot install a tube inside a tubeless tire on this vehicle Excessive heat build up can cause the tube to burst Use only tubeless tires on this vehicle The rims are designed for tubeless tires and during hard acceleration or braking a tube type tire could slip on the rim and cause the tire to rapidly deflate 3WARNING Installing improper tires on your vehicle can adversely affect handling and stabilit...

Страница 105: ...ved from service after 10 years from the date of manufacture regardless of their condition or state of wear The last four digits of the TIN tire identification number indicate the date of manufacture Tire Identification Number TIN The tire identification number TIN is a group of numbers and letters located on the sidewall of the tire a b c DOT XXXX XXXX 22 09 DOT This indicates that the tire meets...

Страница 106: ...y Components Battery Removal Make sure the ignition switch is in the OFF position 1 Remove the left and right side covers 2 P 106 2 Remove the utility box by removing the screws Maintenance 102 Utility box Screws Utility box ...

Страница 107: ...ery Installation Install the parts in the reverse order of removal Always connect the positive terminal first Make sure that bolts and nuts are tight Make sure the clock information is correct after the battery is reconnected 2 P 36 For proper handling of the battery see Maintenance Fundamentals 2 P 90 Battery Goes Dead 2 P 134 Removing Installing Body Components u Battery Maintenance 103 Negative...

Страница 108: ... Removal 1 Remove the pin by a Phillips screwdriver 2 Pull the clip out of the hole Installation 1 Insert the clip into the hole 2 Push the pin in Removing Installing Body Components u Clip Maintenance 104 ...

Страница 109: ... stays 2 Push the front of the seat backward and lower until it locks Make sure that the seat is locked securely in position by pulling it up lightly The seat locks automatically when closed Take care not to lock your key in the compartment under the seat Removing Installing Body Components u Seat Maintenance 105 Seat Prongs Seat stays Turn Push Ignition key OFF SEAT ...

Страница 110: ...y Removal 1 Remove the seat 2 P 105 2 Remove the clip 2 P 104 3 Remove the prongs from the grommets 4 Remove the side cover Installation Install the parts in the reverse order of removal Removing Installing Body Components u Side Cover Maintenance 106 Clip Grommets Prongs ...

Страница 111: ... minutes 3 Place your vehicle in an upright position on a firm level surface 4 Remove the dipstick and wipe it clean 5 Insert the dipstick until it seats but don t screw it in 6 Check that the oil level is between the upper level and lower level marks on the dipstick 7 Securely install the dipstick Maintenance 107 Upper level Lower level Oil fill cap Dipstick ...

Страница 112: ...l u Do not overfill above the upper level mark u Make sure no foreign objects enter the oil filler opening u Wipe up any spills immediately 2 Securely reinstall the oil fill cap NOTICE Overfilling with oil or operating with insufficient oil can cause damage to your engine Do not mix different brands and grades of oil They may affect lubrication and clutch operation For the recommended oil and oil ...

Страница 113: ...l marks on the reserve tank If the coolant level is dropping noticeably or the reserve tank is empty you likely have a serious leak Have your vehicle inspected by your dealer Adding Coolant If the coolant level is below the LOWER level mark add the recommended coolant 2 P 97 until the level reaches the UPPER level mark Add fluid only from the reserve tank cap and do not remove the radiator cap Mai...

Страница 114: ...oreign objects enter the reserve tank opening 2 Securely reinstall the reserve tank cap 3WARNING Removing the radiator cap while the engine is hot can cause the coolant to spray out potentially scalding you Always let the engine and radiator cool down before removing the radiator cap Coolant u Adding Coolant Maintenance 110 Reserve tank cap ...

Страница 115: ...OWER level and UPPER level marks If the brake fluid level in either reservoir is below the LOWER level mark or the brake lever and pedal freeplay becomes excessive inspect the brake pads for wear If the brake pads are not worn you most likely have a leak Have your vehicle inspected by your dealer Maintenance 111 Front Rear LOWER level mark LOWER level mark UPPER level mark Rear brake fluid reservo...

Страница 116: ...if a brake pad is worn to the indicator 1 Front Inspect the brake pads from below the brake caliper 2 Rear Inspect the brake pads from the rear right of the vehicle If necessary have the pads replaced by your dealer Always replace both left and right brake pads at the same time Brakes u Inspecting the Brake Pads Maintenance 112 Front Rear Brake pads Disc Wear indicators Wear indicators Brake pads ...

Страница 117: ...m level surface Stop the engine and push your vehicle while set the parking brake to check the efficacy of the parking brake If the efficacy of the parking brake becomes weak have the brake adjusted by your dealer Brakes u Checking the Parking Brake Maintenance 113 ...

Страница 118: ...switch Hold the brake light switch and turn the adjusting nut in the direction A if the switch operates too late or turn the nut in the direction B if the switch operates too soon Brakes u Adjusting the Brake Light Switch Maintenance 114 Adjusting nut A B Brake light switch ...

Страница 119: ...ansmission to Neutral and raise the side stand CMX1100D Sit on the vehicle and raise the side stand 4 CMX1100A Start the engine pull the clutch lever in and shift the transmission into gear CMX1100D Start the engine and press the D side of N D switch to switch the transmission into D mode 5 Lower the side stand all the way The engine should stop as you lower the side stand If the engine doesn t st...

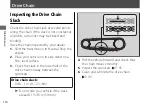
Страница 120: ...nsmission to Neutral Stop the engine 2 Place your vehicle on its side stand on a firm level surface 3 Check the slack in the lower half of the drive chain midway between the sprockets Drive chain slack 9 16 1 in 15 25 mm u Do not ride your vehicle if the slack exceeds 1 15 16 in 50 mm 4 Roll the vehicle forward and check that the chain moves smoothly 5 Inspect the sprockets 2 P 95 6 Clean and lubr...

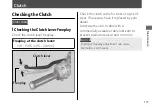
Страница 121: ... 8 13 16 in 10 20 mm Check the clutch cable for kinks or signs of wear If necessary have it replaced by your dealer Lubricate the clutch cable with a commercially available cable lubricant to prevent premature wear and corrosion NOTICE Improper freeplay adjustment can cause premature clutch wear Maintenance 117 Freeplay Clutch lever ...

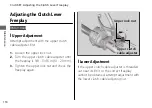
Страница 122: ...until the freeplay is 3 8 13 16 in 10 20 mm 3 Tighten the upper lock nut and check the freeplay again Lower Adjustment If the upper clutch cable adjuster is threaded out near its limit or the correct freeplay cannot be obtained attempt adjustment with the lower clutch cable adjusting nut Clutch u Adjusting the Clutch Lever Freeplay Maintenance 118 Upper clutch cable adjuster Upper lock nut ...

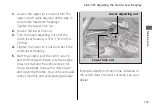
Страница 123: ...ck nut and check the clutch lever freeplay 5 Start the engine pull the clutch lever in and shift into gear Make sure the engine does not stall and the vehicle does not creep Gradually release the clutch lever and open the throttle Your vehicle should move smoothly and accelerate gradually If proper adjustment cannot be obtained or the clutch does not work correctly see your dealer Clutch u Adjusti...

Страница 124: ...rottle With the engine off check that the throttle rotates smoothly from fully closed to fully open If the throttle does not move smoothly close automatically have the vehicle inspected by your dealer Maintenance 120 Throttle ...

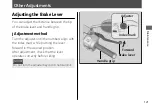
Страница 125: ...ustment method Turn the adjuster until the numbers align with the index mark while pushing the lever forward in the desired position After adjustment check that the lever operates correctly before riding NOTICE Do not turn the adjuster beyond its natural limit Maintenance 121 Adjuster Index mark Forward Brake lever Handle grip ...

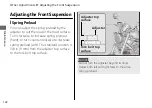
Страница 126: ...or turn counterclockwise to decrease spring preload soft The standard position is 3 8 in 9 mm from the adjuster top surface to the fork bolt top surface NOTICE Do not turn the adjuster beyond its limits Adjust both left and right forks to the same spring preload Other Adjustments u Adjusting the Front Suspension Maintenance 122 Fork bolt top surface Adjuster top surface Adjuster ...

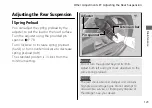
Страница 127: ...se spring preload soft The standard position is 3 clicks from the minimum setting NOTICE Do not turn the adjuster beyond its limits Adjust both left and right shock absorbers to the same spring preload NOTICE The rear shock absorber damper unit contains high pressure nitrogen gas Do not attempt to disassemble service or improperly dispose of the damper See your dealer Other Adjustments u Adjusting...

Страница 128: ...tion Malfunction Indicator Lamp MIL P 127 ABS Anti lock Brake System Indicator P 128 Torque Control Indicator P 129 If the Indicator is Blinking in the Gear Position Window While Riding P 130 Other Warning Indications P 131 Fuel Gauge Failure Indication P 131 Tire Puncture P 133 Electrical Trouble P 134 Battery Goes Dead P 134 Burned out Light Bulb P 134 Blown Fuse P 135 Troubleshooting ...

Страница 129: ...ator lamp is on contact your dealer as soon as possible Starter Motor Does Not Operate Check the following items Check the correct engine starting sequence 2 P 59 Make sure engine stop switch is in the Run position 2 P 46 Check for a blown fuse 2 P 135 Check for a loose battery connection 2 P 102 or battery terminal corrosion 2 P 90 Check the condition of the battery 2 P 134 If the problem continu...

Страница 130: ...ion switch to the ON position 2 Check that the radiator fan is operating and then turn the ignition switch to the OFF position If the fan is not operating Suspect a fault Do not start the engine Transport your vehicle to your dealer If the fan is operating Allow the engine to cool with the ignition switch in the OFF position 3 After the engine has cooled inspect the radiator hose and check if ther...

Страница 131: ...entarily cause the low oil pressure indicator to come on especially if the oil is at or near the low level If the low oil pressure indicator stays on when the oil level is at the proper level stop the engine and contact your dealer If the engine oil level goes down rapidly your vehicle may have a leak or another serious problem Have your vehicle inspected by your dealer PGM FI Programmed Fuel Inje...

Страница 132: ...tion Indicator does not go off at speeds above 6 mph 10 km h If the ABS indicator stays on your brakes will continue to work as a conventional system but without the anti locking function The ABS indicator may flash if you turn the rear wheel while the rear wheel is lifted off the ground In this case turn the ignition switch to the OFF position and then to the ON position again The ABS indicator w...

Страница 133: ...rque Control indicator is on your vehicle will have normal riding ability without Torque Control function u When the indicator comes on while the Torque Control is in operation you will have to completely close the throttle to regain normal riding ability The Torque Control indicator may come on if you rotate the rear wheel while your vehicle is lifted off the ground In this case turn the ignition...

Страница 134: ...annot start the engine Turn the ignition switch to the OFF position and move the vehicle back and forth slightly to disengage the gears Turn the ignition switch to the ON position again and start the engine If you still cannot start the engine Start the engine while applying the brake lever or pressing the brake pedal If you can shift from N to D mode When a gear position is shown in the gear posi...

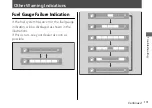
Страница 135: ...tions Fuel Gauge Failure Indication If the fuel system has an error the fuel gauge indicators will be displayed as shown in the illustrations If this occurs see your dealer as soon as possible Troubleshooting 131 Continued ...

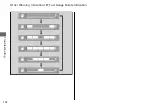
Страница 136: ...Other Warning Indications u Fuel Gauge Failure Indication Troubleshooting 132 ...

Страница 137: ...air using a tubeless tire repair kit Follow the instructions provided with the emergency tire repair kit Riding your vehicle with a temporary tire repair is very risky Do not exceed 30 mph 50 km h Have the tire replaced by your dealer as soon as possible 3WARNING Riding your vehicle with a temporary tire repair can be risky If the temporary repair fails you can crash and be seriously injured or ki...

Страница 138: ...rcycle battery and cause permanent damage If the battery does not recover after recharging contact your dealer NOTICE Jump starting using an automobile battery can damage your vehicle s electrical system and is not recommended Bump starting is also not recommended Burned out Light Bulb All light bulbs on the vehicle are LEDs If there is an LED which is not turned on see your dealer for servicing T...

Страница 139: ...es out one by one with the fuse puller and check for a blown fuse Always replace a blown fuse with a spare fuse of the same rating u Fuse puller and spare fuses are provided on back side of the fuse box cover 4 Reinstall parts in the reverse order of removal Electrical Trouble u Blown Fuse Troubleshooting 135 Continued Spare fuses Fuse puller Spare fuses Fuse box cover ...

Страница 140: ... with a spare fuse of the same rating u Spare fuses are provided in the starter magnetic switch u Fuse puller is provided on back side of the fuse box cover 2 P 135 5 Reinstall parts in the reverse order of removal NOTICE If a fuse fails repeatedly you likely have an electrical problem Have your vehicle inspected by your dealer Electrical Trouble u Blown Fuse Troubleshooting 136 Spare fuses Starte...

Страница 141: ...ring Your Vehicle P 145 Transporting Your Vehicle P 146 You the Environment P 147 Vehicle Identification Number P 148 Emission Control Systems P 149 Catalytic Converter P 154 Oxygenated Fuels P 155 Authorized Manuals P 156 Warranty Coverage and Service P 157 Honda Contacts P 160 Reporting Safety Defects P 162 Information ...

Страница 142: ...pair and maintain the vehicle This data may not be accessed by anyone else except as legally required or with the permission of the vehicle owner However this data may be accessed by Honda its authorised dealers and authorised repairers employees representatives and contractors only for the purpose of the technical diagnosis research and development of the vehicle Service Diagnostic Recorders Info...

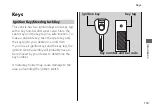
Страница 143: ...ke a duplicate key take the spare key and the key tag to your dealer or a locksmith If you lose all ignition keys and the key tag the ignition switch assembly will probably have to be removed by your dealer to determine the key number A metal key holder may cause damage to the area surrounding the ignition switch Keys Information 139 Ignition key Key tag Key number and bar code ...

Страница 144: ...iling to do so will drain the battery Odometer The display locks at 999 999 when the read out exceeds 999 999 Tripmeter The tripmeters return to 0 0 when each read out exceeds 99 999 9 Document Bag The owner s manual registration and insurance information can be stored in the plastic document bags located underside of the seat Ignition Cut off System A banking lean angle sensor automatically stops...

Страница 145: ...r operation feel lighter Use only MA classification engine oil for your vehicle Using engine oil other than MA classification oil could result in damage to the assist slipper clutch system Throttle by Wire System This model is equipped with a Throttle by Wire System Do not put magnetized items or items susceptible to magnetic interference near the right handlebar switches Instruments Controls Othe...

Страница 146: ...tra care to avoid scratching them Avoid directing water into the air cleaner muffler and electrical parts 3 Thoroughly rinse your vehicle with plenty of clean water and dry with a soft clean cloth 4 After the vehicle dries lubricate any moving parts u Make sure that no lubricant spills onto the brakes or tires Brake discs pads drum or shoes contaminated with oil will suffer greatly reduced braking...

Страница 147: ... water under the seat u Water in the under seat compartment can damage your documents and other belongings Do not direct water at the air cleaner u Water in the air cleaner can prevent the engine from starting Do not direct water near the headlight u The headlight s inside lens may fog temporarily after washing or while riding in the rain This does not impact the headlight function However if you ...

Страница 148: ...soft sponge and plenty of water To remove stubborn stains use diluted detergent and rinse thoroughly with plenty of water Avoid getting gasoline brake fluid or detergents on the instruments panels or headlight Exhaust Pipe and Muffler When the exhaust pipe and muffler are painted do not use a commercially available abrasive kitchen cleaning compound Use a neutral detergent to clean the painted sur...

Страница 149: ...er and allow the vehicle to dry Remove the battery 2 P 102 to prevent discharge Fully charge the battery and then place it in a shaded well ventilated area u If you leave the battery in place disconnect the negative terminal to prevent discharge After removing your vehicle from storage inspect all maintenance items required by the Maintenance Schedule USA For more information about storage refer t...

Страница 150: ...flatbed truck or trailer that has a loading ramp or lifting platform and motorcycle tie down straps Never try to tow your vehicle with a wheel or wheels on the ground NOTICE Towing your vehicle with a wheel or wheels on the ground can cause serious damage to the transmission Transporting Your Vehicle Information 146 ...

Страница 151: ...Put oil and other toxic wastes in approved containers and take them to a recycling center Call your local or state office of public works or environmental services to find a recycling center in your area and to get instructions on how to dispose of non recyclable wastes Do not place used engine oil in the trash or pour it down a drain or on the ground Used oil gasoline coolant and cleaning solvent...

Страница 152: ...iquely identify your vehicle and are required in order to register your vehicle They may also be required when ordering replacement parts You should record these numbers and keep them in a safe place Vehicle Identification Number Information 148 VIN VIN Engine number ...

Страница 153: ...kcase and fuel permeation emission standards during its useful life when operated and maintained according to the instructions provided CARB also requires that your vehicle comply with applicable evaporative emission requirements during its useful life when operated and maintained according to the instructions provided USA Compliance with the terms of the Distributor s Warranties for Honda Motorcy...

Страница 154: ...FI programmed fuel injection system uses sequential multiport fuel injection and is comprised of air intake engine control fuel control and exhaust control subsystems The engine control module ECM uses sensors to determine how much air enters the engine and then controls how much fuel to inject Ignition Timing Control System The ignition timing control system adjusts the ignition timing to reduce ...

Страница 155: ...nto the engine and burned while riding Crankcase Emissions Control System The engine is equipped with a closed crankcase system to prevent discharging crankcase emissions into the atmosphere Blow by gas is returned to the combustion chamber through the air cleaner housing and throttle body Fuel Permeation Emission Control The fuel tank fuel hoses and fuel vapor charge hoses use fuel permeation con...

Страница 156: ...s sale or delivery to the ultimate purchaser or while it is in use or 2 the use of the vehicle after such device or element of design has been removed or rendered inoperative by any person AMONG THOSE ACTS PRESUMED TO CONSTITUTE TAMPERING ARE THE FOLLOWING ACTS Removal of or puncturing the muffler baffles header pipes or any other component which conducts exhaust gases Removal of or puncturing of ...

Страница 157: ...pected and repaired by your dealer if you experience any of the following symptoms Hard starting or stalling after starting Rough idling Misfiring or backfiring during acceleration Poor engine performance and poor fuel economy Emission Control Systems Information 153 ...

Страница 158: ...ngine s performance A replacement unit must be an original Honda part or equivalent Follow these guidelines to protect your vehicle s catalytic converter Always use unleaded gasoline Leaded gasoline will damage the catalytic converter Keep the engine in good running condition A poorly running engine can cause the catalytic converter to overheat causing damage to the converter or the vehicle If you...

Страница 159: ...ine containing methanol methyl alcohol If you accidentally fill your fuel tank with an oxygenated fuel containing higher percentages you may experience performance problems To resolve the problem have your dealer drain the fuel tank and replace with the correct fuel Fuel system or performance problems resulting from the use of an oxygenated fuel containing higher percentages are not covered by you...

Страница 160: ...s systems on Honda motorcycles scooters ATV and SxS USA The Winter Storage Guide in conjunction with the Owner s Manual and Service Manual can help you prepare your Honda motorcycle scooter ATV and SxS for winter storage These Honda manuals are written for the professional technician However if you possess the proper tools observe the safety standards and are mechanically capable you should find t...

Страница 161: ...o the Warranty Booklet posted on our website at www honda ca It is important to realize that your warranty applies only to defects in material or workmanship of your Honda Your warranty coverage does not apply to the normal wear and deterioration associated with use of the vehicle Your warranty coverage is not voided if you perform your own maintenance However failures that occur due directly to i...

Страница 162: ...s discovered that an aftermarket or recycled part installed on the vehicle is defective or was installed incorrectly and caused damage to another part of the vehicle otherwise covered under warranty The Federal Trade Commission requires that a manufacturer demonstrate that an aftermarket or recycled part or service performed by a person other than an authorized service provider caused damage to an...

Страница 163: ...ion If a problem exists and is covered under warranty your dealer will perform the warranty repairs If you have any questions about your warranty coverage or the nature of the repair talk to the Service Manager of your Honda dealer If a misunderstanding occurs and you aren t satisfied with your dealer s handling of the situation we suggest you discuss your problem with the appropriate member of th...

Страница 164: ...lephone 866 784 1870 Website https powersports honda com contact us Canada Honda Canada Inc Customer Relations Department 180 Honda Boulevard Markham Ontario L6C 0H9 Telephone 888 946 6329 Fax 877 939 0909 E mail honda_cr ch honda com Please include the following information in your letter Name address and telephone number Product model year and VIN Date of purchase Dealer name and address We will...

Страница 165: ...partment offers Honda Genuine Parts Pro Honda products Honda Genuine Accessories USA only and Honda accessories and products Canada only that provide the same quality that went into your vehicle USA The sales department offers the Honda Protection Plan to extend almost all of your warranty coverage Your Honda dealer can also supply information about riding events and information about safety train...

Страница 166: ...ds that a safety defect exists in a group of vehicles it may order a recall and remedy campaign However NHTSA cannot become involved in individual problems between you your dealer or American Honda Motor Co Inc To contact NHTSA you may call the Vehicle Safety Hotline toll free at 1 888 327 4236 TTY 1 800 424 9153 go to http www safercar gov or write to Administrator NHTSA 1200 New Jersey Avenue SE...

Страница 167: ...d if it finds that a safety defect exists in a group of vehicles it may lead to a recall and remedy campaign However Transport Canada cannot become involved in individual problems between you your dealer or Honda Canada Inc To contact Transport Canada s Defect Investigations and Recalls Division you may call 1 800 333 0510 For more information on reporting safety defects or about motor vehicle saf...

Страница 168: ...b 233 kg Maximum weight capacity 1 USA model 348 lb 158 kg Canada model 348 lb 158 kg 1 Including rider passenger all luggage and accessories Passenger capacity USA model Model not equipped with Optional Passenger Seat Kit Rider only no passenger Canada model and USA model equipped with Optional Passenger Seat Kit Rider and 1 passenger Minimum turning radius 9 8 ft 2 99 m Displacement 66 1 cu in 1...

Страница 169: ...ir pressure Front 33 psi 225 kPa 2 25 kgf cm2 Rear 33 psi 225 kPa 2 25 kgf cm2 Minimum tread depth Front 0 06 in 1 5 mm Rear 0 08 in 2 0 mm Spark plug standard SILMAR8A9S NGK Spark plug gap 0 031 0 035 in 0 80 0 90 mm Idle speed non adjustable 1 250 100 rpm Recommended engine oil API Service Classification SG or higher except oils labeled as energy conserving or resource conserving on the circular...

Страница 170: ... system capacity 1 84 US qt 1 74 L Recommended coolant Pro Honda HP Coolant Recommended drive chain lubricant Pro Honda HP Chain Lube or equivalent Drive chain slack 9 16 1 in 15 25 mm Standard drive chain RK BP525MRO No of links 114 Standard sprocket size Drive sprocket 16T Driven sprocket 42T Bulbs Headlight LED Brake light Taillight LED Front turn signal Position light LED Rear turn signal LED ...

Страница 171: ...Information Record VIN Engine No Color Label Code Owner s Name Address City State Phone Dealer s Name Address City State Phone Service Manager 167 ...

Страница 172: ...hthalates and lead which are known to the State of California to cause cancer and birth defects or other reproductive harm To minimize exposure avoid breathing exhaust do not idle the engine except as necessary service your vehicle in a well ventilated area and wear gloves or wash your hands frequently when servicing your vehicle For more information go to www P65Warnings ca gov passenger vehicle ...

Страница 173: ...Black PANTONE 286C Trim size A6 105 148 mm 2021 2021 31MLA602 00X31 MLA 6020 CMX1100A D EN CMX1100A D ...

Отзывы: