background image

18 of 25

AII 50024-50373 (1308)

© 2013 American Honda Motor Co., Inc. – All Rights Reserved.

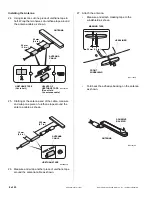
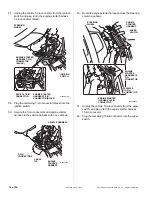
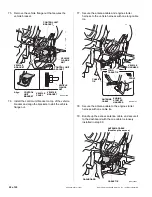
66. Secure the engine starter harness to the vehicle 

harness with two cable ties. Check that the harness 
is secured without strain to the connectors or 
harness.

NOTE: Make sure that the connectors and harness 
are not pinched, or interfering the steering wheel 
when moved for adjustment.

Q0N2010BG

ENGINE 
STARTER 
HARNESS

VEHICLE 
HARNESS

2 CABLE 
TIES

Do not stretch the 
left connector 
harness

Do not strain the 
right connector 
harness.

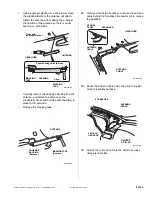
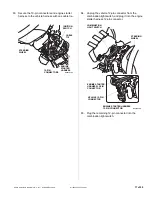
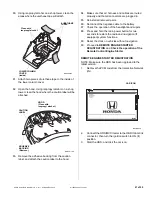
67. Route the antenna cable along the engine starter 

harness as shown.

QC50916AB

ENGINE STARTER 
HARNESS

FRONT

LEFT KNEE 
BOLSTER

CABLE TIE 

(Loosely secure.)

ANTENNA 
CABLE

CABLE 
TIE

ANTENNA 
CABLE

CABLE 
TIE

VEHICLE 
HARNESS

DASHBOARD

FUSE 
BOX

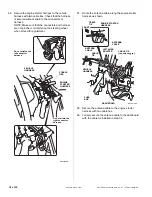
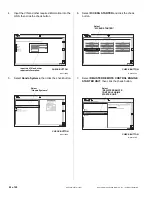
68. Secure the antenna cable to the engine starter 

harness with two cable ties.

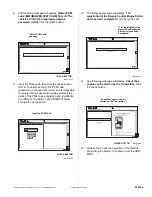
69. Loosely secure the antenna cable to the dashboard 

with the cable tie installed in step 54.

Содержание 08E91-E54-100

Страница 1: ...0373 REMOTE CONTROL ENGINE STARTER 2014 CR V AUG 2013 PARTS LIST Remote Control Engine Starter Kit P N 08E91 E54 100 Transmitter Control unit Antenna ID label Remote Control Engine Starter Attachment Kit P N 08E92 T0A 100B Control unit bracket Engine starter harness 3 Relays 20 Cable ties Long Cable tie 6 Urethane tapes Clip Caution label Fuse label Accessory User s Information Manual ...

Страница 2: ...rol Engine Starter Installed on the Vehicle QC50901AB 40A FUSE CONTROL UNIT ANTENNA 3 RELAYS 3A FUSE ENGINE STARTER HARNESS INSTALLATION Customer Information The information in this installation instruction is intended for use only by skilled technicians who have the proper tools equipment and training to correctly and safely add equipment to your vehicle These procedures should not be attempted b...

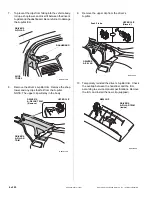
Страница 3: ...ONNECTORS ROOF CONSOLE 4 SCREWS 4 RETAINING TABS LEFT LENS SUNGLASS HOLDER Open 4 RETAINING TABS RIGHT LENS 5 Release the driver s sunvisor from the sunvisor holder Rotate the holder 45 counterclockwise and remove it QC50902AB Rotate SUNVISOR HOLDER SUNVISOR HOLDER DRIVER S SUNVISOR 6 Pull the driver s door seal away from the driver s A pillar Gently pull out the driver s A pillar trim to release ...

Страница 4: ...ar trim Remove the shop towel and any clips that fell from the A pillar NOTE The upper clip will stay in the body Q0N2016AG UPPER CLIP DRIVER S A PILLAR TRIM Remove DRIVER S A PILLAR TRIM 9 Remove the upper clip from the driver s A pillar Q0N2017AG Push 2 tabs UPPER CLIP Discard DRIVER S A PILLAR 10 Temporarily reinstall the driver s A pillar trim Check the overlap between the headliner and the tr...

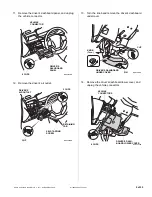
Страница 5: ... S DASHBOARD PANEL 12 Remove the driver s air outlet Q0N2020BG DRIVER S AIR OUTLET 2 CLIPS RETAINING TAB SELF TAPPING SCREW CLIP 13 Turn the knob and remove the driver s dashboard undercover Q0N2021BG PIN DRIVER S DASHBOARD UNDER COVER KNOB Turn CLIP 14 Remove the driver s dashboard lower cover and unplug the vehicle connectors QAN2325AD VEHICLE CONNECTORS 8 CLIPS DRIVER S DASH BOARD LOWER COVER ...

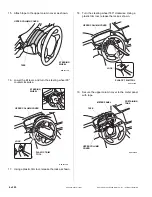
Страница 6: ...ering wheel 90 counterclockwise Q0N2024BG PLASTIC TRIM TOOL STEERING WHEEL LOCK UPPER COLUMN COVER 17 Using a plastic trim tool release the lock as shown 18 Turn the steering wheel 180 clockwise Using a plastic trim tool release the lock as shown Q0N2025BG LOCK UPPER COLUMN COVER PLASTIC TRIM TOOL 19 Secure the upper column cover to the meter panel with tape Q0N2026AG TAPE 2 RETAINING TABS UPPER C...

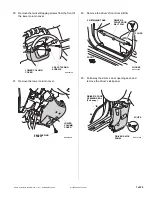
Страница 7: ... COVER 2 SELF TAPPING SCREWS 21 Remove the lower column cover Q0N2028AG SELF TAPPING SCREW LOWER COLUMN COVER 22 Remove the driver s front door sill trim Q0N2029BG 2 RETAINING TABS FRONT 3 CLIPS 2 HOOKS DRIVER S FRONT DOOR SILL TRIM 23 Pull away the driver s door opening seal and remove the driver s kick panel Q0N2030AG DRIVER S DOOR OPENING SEAL Pull away DRIVER S KICK PANEL 2 CLIPS ...

Страница 8: ...NE TAPE Cut in half ANTENNA CABLE 25 Starting at the antenna end of the cable measure and wrap one piece of urethane tape around the antenna cable as shown QC50903AB 220 mm 8 7 in 10 mm 0 4 in ANTENNA CABLE URETHANE TAPE 26 Measure and wrap another piece of urethane tape around the antenna cable as shown 27 Attach the antenna Measure and attach masking tape to the windshield as shown QC11702AB MAS...

Страница 9: ...adhesive backing from the antenna and attach the antenna to the windshield Press and hold the antenna firmly in place for 30 seconds Remove the masking tape QB51405CH ADHESIVE BACKING Remove ANTENNA MASKING TAPE Remove 28 Gently pull back the headliner and tuck the antenna cable behind the headliner Be careful not to crease the headliner QC50904AB ANTENNA CABLE HEADLINER HEADLINER VEHICLE PANEL AN...

Страница 10: ...Q0N1801AG 40A FUSE LABEL 2 RELAYS RELAY 40A FUSE LABEL FUSE BLOCK RELAY BLOCK ENGINE STARTER HARNESS 3A FUSE LABEL 33 Using isopropyl alcohol on a shop towel thoroughly clean the relay block and fuse block where the 3A fuse label and 40A fuse labels will attach 34 Attach the 3A fuse label and two 40A fuse labels to the relay and fuse blocks 35 Route the two 28 pin starter harness connectors upward...

Страница 11: ...d vehicle 28 pin connector as shown Q0N1805BG VEHICLE 28 PIN CONNECTOR ENGINE STARTER HARNESS 28 PIN CONNECTOR TOP VIEW FRONT ENGINE STARTER HARNESS 28 PIN CONNECTOR DRIVER S A PILLAR VEHICLE 28 PIN CONNECTOR 39 Plug the other vehicle 28 pin connector into the engine starter harness 28 pin connector 40 Secure the engine starter harness and the antenna cable to the vehicle frame with one cable tie ...

Страница 12: ...remaining 5 pin engine starter harness connector into the fuse box NOTE Make sure that the engine starter harness 5 pin connector is securely connected to the fuse box A loose connection can cause the engine to stall 44 Attach the connector clip on the 5 pin connector to the hole in the vehicle panel QC50909AB ENGINE STARTER HARNESS 5 PIN CONNECTOR FUSE BOX VEHICLE PANEL HOLE CONNECTOR CLIP 45 Sli...

Страница 13: ...e fuse box Go to step 49 QC50911AB FRONT VIEW FUSE BOX FUSE BOX Plug in here ENGINE STARTER HARNESS 4 PIN CONNECTOR 47 Unplug the fog light 4 pin connector from the fuse box and plug it into the engine starter harness 4 pin connector QC50912AB FRONT VIEW FUSE BOX FUSE BOX Plug in here ENGINE STARTER HARNESS 4 PIN CONNECTOR FOG LIGHTS 4 PIN CONNECTOR ENGINE STARTER HARNESS 4 PIN CONNECTOR 48 Plug t...

Страница 14: ... BOX ENGINE STARTER HARNESS 24 PIN CONNECTOR VEHICLE 24 PIN CONNECTOR VEHICLE 24 PIN CONNECTOR 50 Slide the clip from the engine starter harness 24 pin connector onto the bottom of the fuse box then plug the remaining vehicle 24 pin connector into the engine starter harness 24 pin connector QC50914AB FRONT VIEW FUSE BOX FUSE BOX ENGINE STARTER HARNESS 24 PIN CONNECTOR VEHICLE 24 PIN CONNECTOR FUSE...

Страница 15: ...the hole in the left knee bolster using the clip on the engine starter harness as shown 54 Locate the white tape on the engine starter harness and loosely secure the engine starter harness to the dashboard with one cable tie at the white tape Q0N2005AG ENGINE STARTER HARNESS CABLE TIE Loosely secure DASHBOARD WHITE TAPE 55 Route the engine starter harness to the steering wheel as shown Q0N2006BG E...

Страница 16: ... the ignition switch 59 Secure the 7 pin connectors and engine starter harness to the vehicle harness with one cable tie Q090211BK VEHICLE HARNESS 7 PIN CONNECTORS CABLE TIE ENGINE STARTER HARNESS 60 Route the engine starter harness across the steering column as shown Q0N2008AG VEHICLE 10 PIN CONNECTOR ENGINE STARTER HARNESS ENGINE STARTER HARNESS 10 PIN CONNECTOR STEERING WHEEL WIPER SWITCH ENGIN...

Страница 17: ...IE 10 PIN CONNECTORS ENGINE STARTER HARNESS STEERING WHEEL 64 Unplug the vehicle 12 pin connector from the combination light switch and plug it into the engine starter harness 12 pin connector QA20704BG VEHICLE 12 PIN CONNECTOR ENGINE STARTER HARNESS 12 PIN CONNECTOR STEERING WHEEL COMBINATION LIGHT SWITCH ENGINE STARTER HARNESS 12 PIN CONNECTOR 65 Plug the remaining 12 pin connector into the comb...

Страница 18: ...ustment Q0N2010BG ENGINE STARTER HARNESS VEHICLE HARNESS 2 CABLE TIES Do not stretch the left connector harness Do not strain the right connector harness 67 Route the antenna cable along the engine starter harness as shown QC50916AB ENGINE STARTER HARNESS FRONT LEFT KNEE BOLSTER CABLE TIE Loosely secure ANTENNA CABLE CABLE TIE ANTENNA CABLE CABLE TIE VEHICLE HARNESS DASHBOARD FUSE BOX 68 Secure th...

Страница 19: ...hicle unit as shown 72 Plug the antenna cable connector and the engine starter connector into the control unit QC50917AB ENGINE STARTER HARNESS 28 PIN CONNECTOR CONTROL UNIT ANTENNA CABLE CONNECTOR 73 Attach the control unit bracket to the control unit QC50918AB CONTROL UNIT CONTROL UNIT BRACKET 74 Secure the clip from the engine starter harness fuse block and the clip from the engine starter harn...

Страница 20: ...ket on top of the vehicle bracket and align the brackets Install the vehicle flange nut 77 Secure the antenna cable and engine starter harness to the vehicle harness with one long cable tie QC61401AY ENGINE STARTER HARNESS FRONT LONG CABLE TIE ANTENNA CABLE VEHICLE HARNESS CABLE TIE 78 Secure the antenna cable to the engine starter harness with one cable tie 79 Bundle up the excess antenna cable a...

Страница 21: ... Make sure that all harness and cables are routed properly and that all connectors are plugged in 85 Reinstall all removed parts 86 Reconnect the negative cable to the battery 87 Check the operation of the headlights and wipers 88 Press and hold the radio power button for two seconds to restore the radio and navigation if equipped system functions 89 Reset the clock on vehicles without navigation ...

Страница 22: ...IN and other required information CHECK BUTTON 5 Select Honda Systems then click the check button QB32103AH Select Honda Systems CHECK BUTTON 6 Select R C ENG STARTER and click the check button QB32104AH Select R C ENG STARTER CHECK BUTTON 7 Select REGISTER REMOTE CONTROL ENGINE STARTER UNIT then click the check button QB32105BH Select REGISTER REMOTE CONTROL ENGINE STARTER UNIT CHECK BUTTON ...

Страница 23: ... the dates of the PCM code acquisition and registration are different The date on the HDS MVCI tester should also be the same QB32107BH Input the PCM Code CHECK BUTTON 10 The following message will display The registration of the Remote Control Engine Starter Unit has been completed Turn the ignition off QB32108CH The registration of the Remote Control Engine Starter Unit has been completed 11 The...

Страница 24: ...y is outside the vehicle All doors and tailgate closed and locked Inspection 1 Press and release the engine command button on the transmitter within 2 seconds press the lock start button on the transmitter Does the engine start Yes Operation is normal No Make sure all Operating Conditions are met Check the engine starter harness connections Connect the HDS MVCI and check for an indicated failure R...

Страница 25: ...ust be cycled or the driver s door must be opened and closed Move the shift lever out of the P position Unlock or open the doors or the tailgate Open the hood Insert the key in the ignition Press the brake pedal Does the engine stop after each of these tests Yes Operation is normal No Check the engine starter harness connections 4 Make sure the power windows and the moonroof do not function and th...

Отзывы: