Home Decorators Collection Merryn Скачать руководство пользователя страница 10

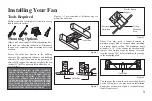
Making the Electrical Connections

WARNING

TO AVOID POSSIBLE ELECTRICAL SHOCK, BE SURE ELECTRICITY IS TURNED OFF AT THE 

MAIN FUSE BOX BEFORE WIRING.

NOTE

INSTALLATION OF THIS FAN REQUIRES THAT A THREE-CONDUCTOR CABLE WITH 

GROUND WIRE BE RUN BETWEEN CEILING AND WALL OUTLET BOX,  OR THE OSCILLAT-

ING FEATURE WILL NOT WORK.

Disconnect the power and remove the existing wall plate and switch from the wall outlet box (Figure 11).

Set knob on the wall control in 0 position.

Make wire connections as follows, using the wire nuts supplied:

a. Speed/oscillation control wire connection (see figure 12) 
    CONNECT                                                                 
    (From speed/oscillation switch)                                

    Blue wire (FOR OSCILLATION)….........…………
    Black wire (TO MOTOR L)………………………..
    Black/white wire (AC IN L)………………………..
    Yellow/green wire (GROUND)……...........……….
   •  If your wall outlet box has a ground wire (green or bare copper), connect the Speed/oscillation control's yellow/green ground wire to it; otherwise 

connect the Speed/oscillation control's yellow/green ground wire directly to one of the screws from the wall outlet box.

b.  Fan wire connection (see figure 13) 
     CONNECT                          
     (From fan)                            

     Blue fan wire ……………...............
     Black fan wire …………….............
     White wire……………....…............
     Ground wire………………..............

1.

2.

3.

If you feel you do not have enough electrical wiring knowledge or experience, have your fan installed 
by a licensed electrician.

Figure 11

Switch

Wall Outlet Box

Wall Plate

Screws

Screws

6

TO
(From wall outlet box)

Red wire (TO CEILING OUTLET BOX)
Black wire (TO CEILING OUTLET BOX)
Black wire (AC TO WALL SWITCH)
Green wire (WALL SWITCH GROUND)

TO
(Conductor cable between ceiling and wall outlet box) 

Red wire
Black wire
White wire
Ground wire

Содержание Merryn

Страница 1: ...erryn 52 in Ceiling Fan Owner s Manual Merryn Ventilador de Techo de 1 32 m Manual del Propietario 122 891 Model YG583 BN 120 V 60 Hz 70 W Read and follow all the instructions before using this produc...

Страница 2: ...Merryn by Home Decorators Collections...

Страница 3: ...ter SERVICIOS HOME DEPOT S DE R L DE C V Ricardo Margain 605 Santa Engracia San Pedro Garza Garc a Nuevo Le n C P 66267 Tel Phone 01 800 004 6633 Lea y siga todas las instrucciones de seguridad y oper...

Страница 4: ...product has been manufactured with the highest standards of safety and quality The finish of this fan is weather resistant but over time will naturally weather and fade Table of Contents Safety Rules...

Страница 5: ...electrical connections spliced conductors should be turned upward and pushed carefully up into outlet box The wires should be spread apart with the grounded conductor and the equipment grounding 1 2 3...

Страница 6: ...h 2 mounting screws and 3 wire nuts Mounting plate with 2 mounting screws 7 8 9 10 10A Blade Attachment Hardware 7 Screws 7 Lock Washers Electrical Hardware 3 Plastic Wire Nuts Allen Wrench A B C 1 WA...

Страница 7: ...G SCREWS PROVIDED WITH THE OULET BOX OUTLET BOX COMMONLY USED FOR THE SUPPORT OF LIGHTING FIXTURE MAY NOT BE ACCEPTABLE FOR FAN SUPPORT AND MAY NEED TO BE REPLACED CONSULT A QUALIFIED ELECTRICIAN IF I...

Страница 8: ...longer downrod is needed take out the screw located in the hanger ball lower the hanger ball and remove the pin remove all 3 pieces from the downrod and assemble them onto the new longer downrod befor...

Страница 9: ...t box by sliding the mounting bracket over the screws provided with the outlet box Figure 9 Security tighten the two mounting screws Carefully lift the fan assembly up to the ceiling mounting bracket...

Страница 10: ...OR L Black white wire AC IN L Yellow green wire GROUND If your wall outlet box has a ground wire green or bare copper connect the Speed oscillation control s yellow green ground wire to it otherwise c...

Страница 11: ...igure 12 Speed oscillation Switch Wall Outlet Box Wall Outlet Box Ac To Wall Switch Wall Switch Ground Black Red Black Black white Yellow green Blue Blue Red Green White White Ground conductor Black B...

Страница 12: ...llen Wrench 8 WARNING MAKE SURE THE TAB ON THE HANGING BRACKET PROPERLY SITS IN THE GROOVE IN THE HANGER BALL BEFORE ATTACHING THE CANOPY TO THE BRACKET BY TURNING THE HOUSING UNTIL IT DROPS INTO PLAC...

Страница 13: ...and and lock waher provided Fig 16 Repeat this process to attach the other two blades 1 2 WARNING TO REDUCE THE RISK OF PERSONAL INJURY DO NOT BEND THE BLADES WHILE INSTALL ING BALANCING THE BLADES O...

Страница 14: ...as shown in Figure 17 Rotate the fan until the next blade is positioned and repeat the measurement using the same point from the ceiling for every blade Measurement deviations should be within 1 8 If...

Страница 15: ...ht kit and secure it to fan by turning glass clockwise until snug DO NOT OVERTIGHTEN Fig 19 1 2 3 4 5 NOTE BEFORE STARTING INSTALLATION DISCON NECT THE POWER BY TURNING OFF THE CIRCUIT BREAKER OR REMO...

Страница 16: ...22 Warm weather Counter Clockwise direction A downward air flow creates a cooling effect Fig 21 This allows you to set your air conditioner on a higher setting without affecting your comfort Cool wea...

Страница 17: ...s to help you maintain your fan Check the main and branch circuit fuses or breakers Check the line wire connections to the fan and switch wire connections in the switch housing Make sure all motor hou...

Страница 18: ...L DE C V Ricardo Margain 605 Santa Engracia San Pedro Garza Garc a Nuevo Le n C P 66267 Tel 01 800 004 6633 Warranty printed on manual is not valid for Mexico Questions problems missing parts Before...

Отзывы: