


Assembly — Hanging the Fan (continued)
8a
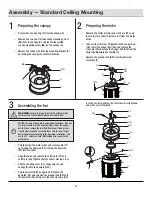
Standard ceiling mounting
8b
Close-to-ceiling mounting
WARNING:
The locking slots of the canopy (D) are provided
only as an aid to mounting. Do not leave the fan assembly
unattended until all four canopy mounting screws (BB) are
engaged and firmly tightened.
WARNING:
Make sure the tab on the mounting bracket (A)
properly sits in the groove in the hanger ball/downrod
assembly (F) before attaching the canopy (D) to the mounting
bracket (A) by turning the canopy (D) until it drops into place.
WARNING:
Locking slots of the canopy (D) are provided
only as an aid to mounting. Do not leave the fan assembly
unattended until all four canopy mounting screw (BB) are
engaged and firmly tightened.
□
Slide the canopy (D) up to the ceiling. Make sure you
have placed the wires and resister (VV) safely into
the outlet box (OO).
□
Secure the canopy (D) to the mounting bracket (A)
with the four canopy mounting screws with lock
washers (BB) included with your fan.
□
Slide the canopy ring (C) over the canopy (D) and
tighten by turning the ring (C).
□
Remove the fan from the hook on the mounting
bracket (A).
□
Secure the canopy (D) to the mounting bracket (A)
with the four canopy mounting screw with lock
washers (BB) provided.
□
Slide the canopy ring (C) over the canopy (D) and
tighten by turning the ring (C).
BB
OO
A
BB
F
BB
A
BB
C
D
C
D
15
HOMEDEPOT.COM/HOMEDECORATORS
Please contact 1-800-986-3460 for further assistance.