background image

EN

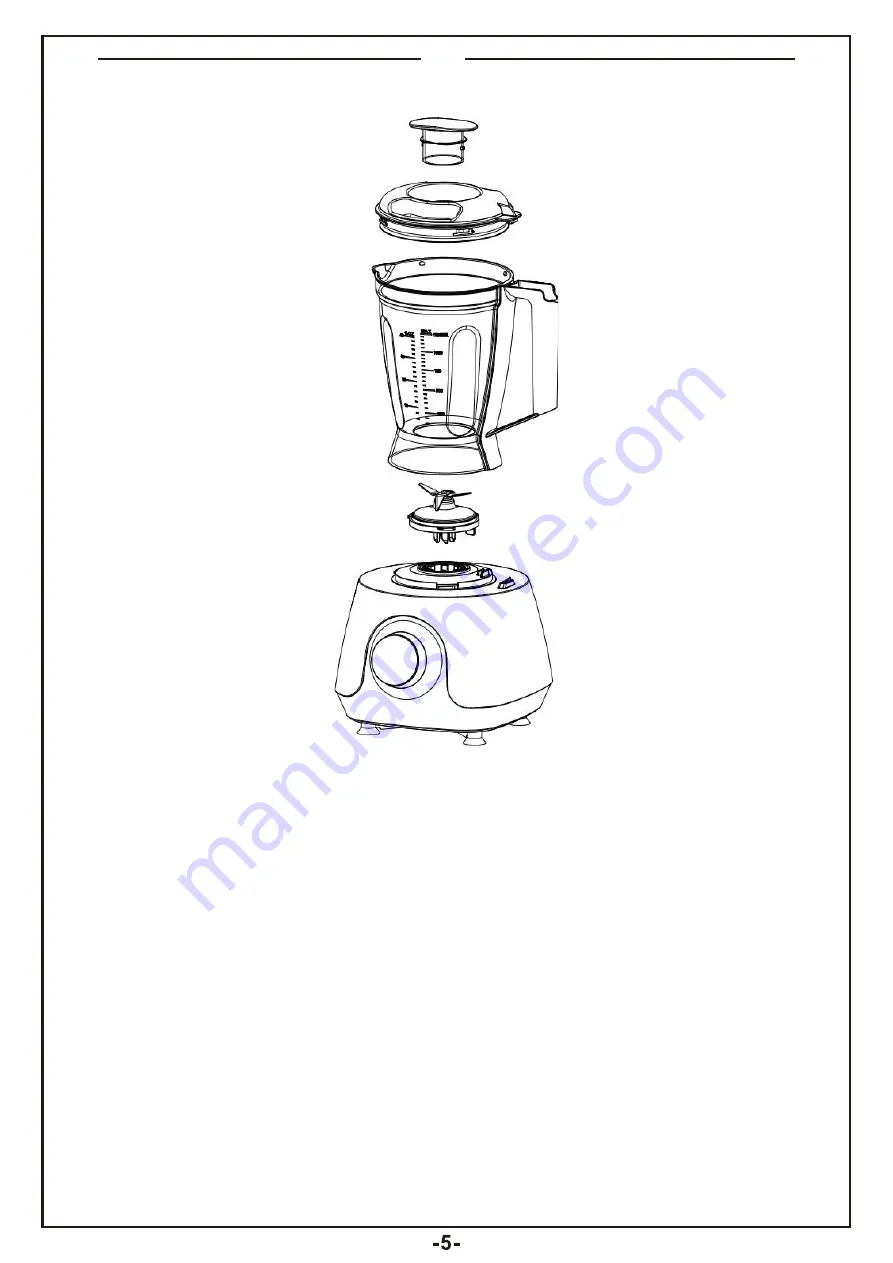
To use your blender

1.  Place the unit base on a dry level surface.
2.  Attaching the Blade Assembly onto the top of the Jar. 
3.  Securely tighten by turning clockwise.
4.  Attach the jar and snap the jar handle and rotate it clockwise until it 
is fully locked on the Base.
5.  Put your ingredients into the Jar.
6.  Put the Lid cap in the lid, then turn.
7.  Turn the lid in to lock onto the Jar.
8.  Plug the product into AC electrical outlet.
9.  Select a speed to operate product.
10. When you think it reaches your desired status and stop working.
11. When the Blade has stopped and remove the lid.
12. Enjoy your salad dressing.
Allow all liquids to cool to room temperature before placing them in the 
liquidiser.

Содержание 800-138

Страница 1: ...INSTRUCTION INcsb061_UK_DE_ES 800 138 IMPORTANT RETAIN FOR FUTURE REFERENCE READ CAREFULLY FOOD PROCESSOR INSTRUCTION MANUAL K CHENMASCHINE GEBRAUCHSANWEISUNG PROCESADOR DE ALIMENTOS MANUAL DE INSTRU...

Страница 2: ...ns Do not blend hot liquids Do not use outdoors Do not let cord hang over edge of table or counter or touch hot surface including stove Keep hands and utensils away from moving blades while processing...

Страница 3: ...rst use Remove any packaging material or promotional labels before rst use Wash the chopper cover and jar in warm soapy water Dry thoroughly Care should be taken when cleaning the blades blades are s...

Страница 4: ...lets you check processed results and control the tininess 1 turn the knob to 1 the machine run at 1 speed continuously and time will be cumulative in the screen 2 turn the knob to 2 the machine run at...

Страница 5: ...s fully locked into the bowl 7 Rotate the knob clockwise until it is on the 1 2 3 for continuous processing put down the food pusher with about 1lb force 8 After processing food rotate the knob anticl...

Страница 6: ...y locked on the Base 5 Put your ingredients into the Jar 6 Put the Lid cap in the lid then turn 7 Turn the lid in to lock onto the Jar 8 Plug the product into AC electrical outlet 9 Select a speed to...

Страница 7: ...If more ice is needed remove the cap and add cubes one by one through the hole in the lid DO NOT CRUSH ICE WITHOUT LIQUID Failure to follow these directions can result in damage to the blades jar ben...

Страница 8: ...foods such as carrots may temporarily stain the Bowl To remove stains make a paste of 1 tablespoon baking soda and two tablespoons warmwater Apply the paste to the stains and rub with a cloth Rinse i...

Страница 9: ...muss das Ger t ersetzt werden Die Verwendung von Aufs tzen einschlie lich Einmachgl sern die nicht vom Hersteller empfohlen werden Kann zu einer Verletzungsgefahr f r Personen f hren Mischen Sie keine...

Страница 10: ...ielen Wenn das Kabel besch digt ist muss es vom Hersteller seinem Kundendienst oder einer hnlich quali zierten Person ersetzt werden um eine Gef hrdung zu vermeiden Vor der ersten Verwendung Entfernen...

Страница 11: ...ntinuierlich mit dieser 2 Geschwindigkeit und die Zeit wird auf dem Bildschirm kumulativ angezeigt 3 Drehen Sie den Drehknopf auf 3 die Maschine l uft kontinuierlich mit dieser 3 Geschwindigkeit und d...

Страница 12: ...auf die Antriebswelle und lassen Sie sie los 5 Geben Sie die Zutaten in St cke die klein genug sind um in die Sch ssel zu passen 6 Befestigen Sie den Deckel mit dem St el und drehen Sie ihn im Uhrzei...

Страница 13: ...t richtig auf dem Sockel sitzt Wenn der Deckel ENTRIEGELT ist be nden sich der Sicherheitsmechanismus am Deckel und die Sch ssel in einer anderen Position Das Ger t funktioniert nicht Wichtig Der Mixe...

Страница 14: ...in kleine St cke 2 Zoll ca 5 cm bevor Sie sie in den Mixer geben Zum Hacken Reiben oder Zubereiten von Fruchtsmoothies mit frischem oder gefrorenem Obst schneiden Sie die Zutaten in 3 4 Zoll 2 cm gro...

Страница 15: ...Sie das Ger t in der Sp lmaschine reinigen stellen Sie die abnehmbaren Teile nur in das oberste Fach nicht in den Geschirrkorb oder in dessen N he 6 Ve r w e n d e n S i e k e i n e r a u e n S c h e...

Страница 16: ...iche Gesundheit durch unkontrollierte Abfallentsorgung zu vermeiden recyceln Sie es verantwortungsbewusst um die nachhaltige Wiederverwendung von Materialressourcen zu f rdern Um Ihr Altger t zur ckzu...

Страница 17: ...de alguna manera todo el procesador debe ser reemplazado No se recomienda utilizar los accesorios incluidos tarros para conservas De lo contrario puede provocar riesgo de lesiones personales No utilic...

Страница 18: ...Si el cable est da ado de alguna manera debe ser reemplazado por el fabricante su agente de servicio o los profesionales cali cados de manera similar por motivo de evitar un peligro Antes del primer u...

Страница 19: ...ntrolar la neza 1 Gire la perilla a 1 el procesador de alimentos funcionar a velocidad de nivel 1 continuamente y el tiempo acumulado de funcionamiento se mostrar en la pantalla 2 Gire la perilla a 2...

Страница 20: ...rebanadora cuchilla trituradora en el eje de conducci n y su ltela 5 Agregue los ingredientes en trozos que son su cientemente peque os en el taz n 6 Coloque la tapa con el empujador y g rela en el s...

Страница 21: ...do en la base de manera correcta Cuando la tapa est DESBLOQUEADA el mecanismo de seguridad de la tapa y el taz n estar n en posiciones distintas el procesador de alimentos no funcionar Importante Su p...

Страница 22: ...cuando est vac o Corte los alimentos en trozos peque os de 5 cm 2 pulgadas m s o menos antes de agregarlos al procesador de alimentos Para picar triturar o preparar batidos con frutas frescas o congel...

Страница 23: ...ilon para limpiar a fondo el taz n y la tolva la tapa el cepillo de nailon tambi n ayudar a evitar cortarse con la hoja de cuchilla para picar el disco rebanador triturador y la hoja de cuchilla de li...

Страница 24: ...alizar un reciclaje seguro para el medio ambiente V Volt Hz Hertz Watt W Corriente alterna S mbolo de aparato de clase II Comunicaciones europeas ES Especi caciones el ctricas 220 240V 50 60 Hz 650W V...

Отзывы: