


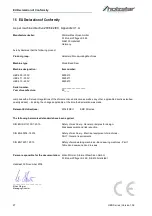

13
HBS Series | Version 1.06
Settings
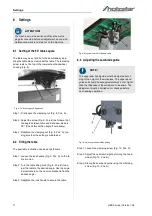
8.6 Adjusting the running of the saw band
Fig. 13: Saw band running
Step 1: Release the clamping lever (Fig. 13, Pos. A) by
turning it counterclockwise.
Step 2: Turn the upper saw band wheel with the front
cover open. Turn the adjustment screw (Fig. 13,
Pos. B) counterclockwise or clockwise to adjust
the band saw blade run. You can observe your
settings in the side window.
Step 3: Then turn the saw band wheel several times to
check your settings.
Step 4: Close the front covers and secure your settings
with the clamping lever (Fig. 13, Pos. A).
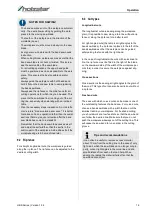
8.7 Adjusting of the saw blade guide
The upper and lower saw blade guides are similar in con
-
struction and must be adjusted as listed below.
Upper saw blade guide:
Fig. 14: Saw blade guide
Step 1: First loosen the screw and push the rollers up to
approx. 1.5 mm towards the saw blade teeth.
Step 2: Clamp the screw again.
Step 3: To adjust the lateral guide rollers (Fig. 14, Pos. D),
loosen the clamping plates (Fig. 14; C) and adjust
the guide rollers with the adjusting screw (Fig. 14,
Pos. B) so that there is a gap of approx. 0.5-0.7
mm between them and the saw band. If the gap is
set too small, the bandsaw blades will wear faster!
Step 4: Retighten the screws (Fig. 14, Pos. C).
Step 5: Loosen the screw (Fig. 14; A) and slide the rear gui
-
de roller on the saw band backs.
Step 6: Retighten the screw (Fig. 14, Pos. A).
Lower saw blade guide:
Fig. 15: Saw blade guide
NOTE!
Before the saw blade run can be adjusted, a concrete
adjustment of the saw blade tension is necessary.
Disconnect the machine from the power supply as
with all adjustment work.


