background image

CLEANING

Preventive  maintenance  for  your  Holman  toaster  consists  of  the 
following recommended cleaning procedures. To keep your toaster 
in its top operating condition, these steps should be performed on a 
daily or weekly basis as required.

Supplies

KAY® QSR Oven Cleaner
KAY® QSR Heavy Duty Multi-Purpose Sink Detergent 

(dispensed use solution)
KAY® Sink Sanitizer (use solution prepared at the sink)
No Scratch Pad

Red Cloth

Daily Procedure:

1.  Turn  toaster  off,  conveyor  will  continue  to  run  until  cooled 

down (approx. 5-10 minutes)

2.  Immediately  spray  the  oven  cleaner  onto  the  No  Scratch 

Pad and scrub the conveyor chain while it is still warm and 
moving.  

NOTE: DO NOT SPRAY directly onto the conveyor 
belt or into the cooking chamber.  Overspray onto the 
heating elements can damage or shorten the life of the 
elements.

3.  Wash the No Scratch pad at the 3 compartment sink and then 

soak with Multi-Purpose Sink Detergent.  Ring the pad out so 
that it is only damp and continue to scrub the conveyor belt 
while it’s still moving.  

4.  Rinse the No Scratch pad at the 3 compartment sink to remove 

all  detergent  and  then  soak  with  clean  warm  water.    Ring 
the pad out so that it is only damp and continue to scrub the 
conveyor belt while it still moving.

5.  Wipe the conveyor belt with a clean red cloth dampened with 

sanitizer solution while it is still moving.  Allow to air dry.

6.  Rinse the No Scratch pad at the 3 compartment sink and then 

soak with clean warm water.  Ring the pad out so that it is only 
damp and wipe exterior areas of the toaster.

7.  Remove interior crumb tray and bottom catch tray and take 

to the three compartment sink.  Spray the pieces with oven 
cleaner and allow to sit on the drain board for a minimum of 

five minutes.

8.  Wash, Rinse and Sanitize removable pieces and allow to air 

dry before sliding the trays back into the unit.

9.  Unit is now ready to turn ON for warm up and use.

DO NOT IMMERSE THE UNIT IN WATER OR LET 
THE UNIT STAND IN WATER.

DO NOT USE A NON-STICK SPRAY ON THE 
CONVEYOR BELT, IT WILL CAUSE A STICKY 
BUILD-UP AND INCREASE STICKING.

DO NOT HOSE DOWN THE UNIT OR THE 
TABLE/COUNTER IF THE UNIT IS ON THE 
TABLE/COUNTER.

KEEP AWAY FROM RUNNING WATER.

WARNING

WARNING

WARNING

CAUTION

STAR INTERNATIONAL HOLDINGS INC. COMPANY

Star - Holman - Lang - Wells - Bloomfield - Toastmaster

10 Sunnen Drive, St. Louis, MO 63143 U.S.A.

(314) 678-6303

www.star-mfg.com

Содержание R2E-12BK-208

Страница 1: ...loss if damage or loss is not apparent until after equipment is unpacked a request for inspection of concealed damage must be made with carrier within 15 days Be certain to retain all contents plus e...

Страница 2: ...UNNING WATER CAUTION WARNING WARNING WARNING The Holman RCSe conveyor toaster comes with pre programmed factory default settings for CROISSANT MUFFIN PASTRY Factory default settings are as follow POWE...

Страница 3: ...nu item can have independent conveyor speed settings B PROGRAMMING VALUES FOR MENU ITEMS To make a program change to the top bottom elements or conveyor speed you must first be in the menu item you wa...

Страница 4: ...ove all detergent and then soak with clean warm water Ring the pad out so that it is only damp and continue to scrub the conveyor belt while it still moving 5 Wipe the conveyor belt with a clean red c...

Страница 5: ...oad tray by unscrewing the two thumb screws on either side of the exit tray Lift the tray up and away from the oven Remove the Load Up and Unload Trays Fig 1 4 Remove Crumb Trays Burn Guards load up t...

Страница 6: ...o the previous link to prevent the link from being damaged or bent 9 Now that the link have been un hooked the Con veyor can now be carefully removed from the oven Standing at the end of the oven Star...

Страница 7: ...INTO OVEN CAVITY 12 Reinstall Conveyor Belt by rst laying the belt along bottom of oven cavity making sure the hooks on the sides of the belt will be facing the inside and the ends of the hooks will...

Страница 8: ...ook the two ends of the Conveyor once again completing the Conveyor Belt system 17 Examine the oven to assure proper installation once satis ed reinstall burn guard crumb tray and load up trays 18 Rec...

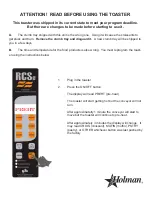
Страница 9: ...u in a few days B The time and temperature for the food products is also wrong You must reprogram the toast er using the instructions below 1 Plug in the toaster 2 Press the ON OFF button The display...

Страница 10: ...4 Press the UP and DOWN arrow buttons at the same time and hold for 3 seconds 3 Press the CROIS croissant button The display will read CROIS CROIS CROIS...

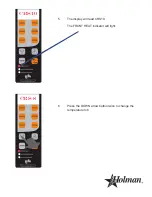
Страница 11: ...5 The display will read CRS10 The FRONT HEAT indicator will light CRS10 6 Press the DOWN arrow button twice to change the temperature to 8 CRS 8...

Страница 12: ...7 Press the CROIS button The display will read CRS10 The BACK BOTTOM HEAT indicator will light CRS10 CRS 8 8 Press the DOWN arrow button twice to change the temperature to 8...

Страница 13: ...CRS70 9 Press the CROIS button The display will read CROIS70 The CONVEYOR SPEED indicator will light CRS45 10 Press the DOWN arrow button until the display reads CRS45...

Страница 14: ...with step 3 again but substitute the CROIS button with the MUFFIN button Change the settings to FRONT HEAT 8 BACK BOTTOM HEAT 8 CONVEYOR SPEED 25 13 Start with step 3 again but substitute the CROIS b...

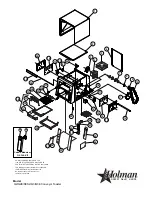
Страница 15: ...37 40 14 15 41 42 8 38 39 11 SK2297 Rev B 4 24 08 Model Q2 Q2E RCS2 Q3 Q3E Conveyor Toaster This drawing contains information confidential to Star Manufacturing International Inc No reproduction or d...

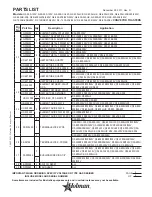
Страница 16: ...208 240V R2 1200B 208 240V R2 600HJ 208 240V Q2E 600H 208V Q2 800 240UK R2E 800 208V 5 2U 200559 1 FAN 120V Q2E 500 120V Q2E 500CUL20 2U 200560 FAN 240V Q2 600H 208 220 240V Q2 800 208 220 240V R2 600...

Страница 17: ...500 120V Q2 500 CUL20 HO 197844 HEATERTUBE QUARTZ Q2 600H 220V Q2 800 220V Q2E 600H 220V Q2 600H CE 13 HC Z10390 1 ELEMENT RETAINER RIGHT QCS Q2 600H 208 220 240V Q2 800 208 220 240V Q2E 600H 208V Q2...

Страница 18: ...240V R2 1200B 208 240V R2 600HJ 208 240V Q2E 600H 208V 25 2M 200864 1 LABEL QCS 2 3 CONTROLS Q2 600H 208 220 240V Q2 800 208 220 240V Q2 500 120V Q2 500 CUL20 Q2 600H CE Q2 600H UK 2M 200894 LABEL QCS...

Страница 19: ...208V R2E 500 120V 2E Z13360 CONTROL BOARD Q2E 600HW Q2E 600HW 2E Z14864 CONTROL BOARD R2E 12BK R2E 12BK 208 240 44 2U 200592 1 QCSE POWER BOARD Q2E 600H 208 240V Q2E 800 208 240V Q2E 500 120V R2E 12B...

Страница 20: ......

Страница 21: ...S MAY NOT BE AVAILABLE ILLUSTRATIVE PURPOSES ONLY AND IN SOME ITEMS ARE INCLUDED FOR 4 WHITE 3 BLACK 2 WHITE 1 BLACK 5 BLACK 7 BLACK 8 WHITE 6 WHITE QCSe OT1 HT1 HB1 F1 M1 L1 120V OT2 F2 L2 M2 120V 24...

Отзывы: