background image

7

TROUBLESHOOTING

WARRANTY

Thank you for purchasing this prelit tree. This tree assembles in minutes and is decorated with UL 

listed premium miniature light sets. Please note this tree also comes with an ON/OFF foot pedal 

switch for easy illumination.
This product carries a 2 year limited guarantee. This guarantee does NOT cover damage resulting 

from accident, misuse, abuse, negligence, or normal wear and any discoloration.
The warranty is in force from the date that you purchased this tree. There is no need to register your 

purchase, however, it is important that 

you retain your sales receipt as proof of purchase. Receipt 

may be required for warranty service. 

Please note this warranty is non-transferable and is voided if 

the product is not used as intended. Please keep this product manual for future reference.
In the unlikely event that you experience problems with the tree, please call our customer service 

hotline at (800) 414-3434.

BULB REPLACEMENT:

 1. 

Unplug product from its power source.


2.  Pull bulb AND plastic base straight out of socket. Do not twist bulb.


3.  Replace burned out bulb with 2.5 volt bulb ONLY (replacement bulbs included).


Replace burned out twinkling bulb with 3.5 volt bulb ONLY (replacement bulbs included).

NOTE: 

Replace burned out bulbs as soon as possible. Failure to replace burned out bulbs will result 

in a shorter bulb life for remaining lights.

IF EXTENSION CORD PLUG DOES NOT FIT INTO OUTLET:

This product comes with an extension cord with a polarized plug (one prong is wider than the other) 

as a feature to reduce the risk of electrical shock. This plug will fit into a polarized outlet only one way.  

If the plug does not fit fully into the outlet, reverse the plug. If it still does not fit, contact a qualified 

electrician. Do not use with an extension cord unless the plug can be fully inserted. Do not alter or 

replace the plug.

STORAGE:

 Disassembled tree can be stored in its original box.  Store tree in a cool, dry place where 

the temperature does not exceed 100º F.

Printed in China.

FOR INDOOR USE ONLY.

Содержание 0484870

Страница 1: ...sing parts Before returning to your retailer call our customer service department at 1 800 414 3434 24 hours a day 7 days a week ATTACH YOUR RECEIPT HERE AB13347 Serial Number Purchase Date Español p 8 Holiday Living Design is a registered trademark of LF LLC All rights reserved ...

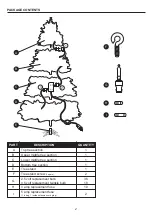
Страница 2: ...iddle tree section Lower middle tree section Bottom tree section Tree stand Tree stand screw 1 spare G 36 18 2 5 volt replacement bulb 3 5 volt replacement twinkle bulb H 10 3 amp replacement fuse I 2 QUANTITY 5 amp replacement fuse 1 in bag 1 inside extension cord plug H I D E C B A 1 2 3 ...

Страница 3: ...supply cord or on any wire Do not close doors or windows on the product or extension cords as this may damage the wire insulation Do not remove tape placed over mounted electrical outlet sockets Any outlet you need to plug into is not wrapped in tape Only remove tape when inspecting fuses see Troubleshooting section Should you discover any of the following a cut damaged or frayed wire insulation b...

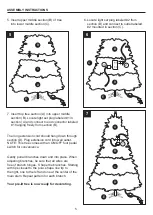
Страница 4: ...run down through section D and toward wall outlet DO NOT PLUG INTO WALL OUTLET UNTIL ASSEMBLY IS COMPLETE E F D C 3 E D 4 Locate plug labeled 3 from section D and connect to outlet labeled 3 mounted in section C C 4 E D IMPORTANT Do not remove the tape wrapped around the outlets of the light set cords Any outlet you need to plug into is NOT wrapped in tape and is clearly labeled Only remove tape w...

Страница 5: ...foot pedal switch for convenience 7 Insert top tree section A into upper middle section B Locate light set plug labeled 1 in section A and connect to end connector labeled 1 hanging freely from section B 7 E D B A C 1 Gently pull all branches down and into place When adjusting branches be sure that all wires are free of branch hinges Shape the branches Starting with tips closest to the pole shape ...

Страница 6: ...reviewed to determine the cause 1 Unplug product from its power source 2 Open access cover on top of plug and locate blown fuse 3 Remove blown fuse 4 Locate spare replacement fuse inside plug Open holder and remove replacement fuse 5 Insert new fuse Close fuse access cover CAUTION To reduce risk of fire replace fuse in extension cord with 5 Amp 125 volt fuse ONLY Do not replace attachment plug Dis...

Страница 7: ...hotline at 800 414 3434 BULB REPLACEMENT 1 Unplug product from its power source 2 Pull bulb AND plastic base straight out of socket Do not twist bulb 3 Replace burned out bulb with 2 5 volt bulb ONLY replacement bulbs included Replace burned out twinkling bulb with 3 5 volt bulb ONLY replacement bulbs included NOTE Replace burned out bulbs as soon as possible Failure to replace burned out bulbs wi...

Страница 8: ...zas faltantes Antes de volver a la tienda llame a nuestro Departamento de Servicio al Cliente al 1 800 414 3434 las 24 horas del día los 7 días de la semana ADJUNTE SU RECIBO AQUÍ Número de serie Fecha de compra Holiday Living Design es una marca registrada de LF LLC Todos los derechos reservados ...

Страница 9: ...el árbol Sección inferior del árbol Base para árbol Tornillo de la base para árbol 1 de repuesto G 36 18 Bombilla de repuesto de 2 5 voltios Bombilla destellante de repuesto de 3 5 voltios H 10 Fusible de repuesto de 3 amperios I 2 CANTIDAD Fusible de repuesto de 5 amperios 1 en la bolsa 1 dentro del enchufe de la extensión eléctrica H I D E C B A 1 2 3 ...

Страница 10: ...ierre puertas o ventanas sobre el producto o las extensiones eléctricas ya que puede dañar el aislamiento del cable No retire la cinta ubicada en el tomacorriente instalado Los tomacorrientes que debe usar son los que no están envueltos en cinta adhesiva Solo retire la cinta cuando inspeccione los fusibles consulte la sección Solución de problemas Si descubre alguna de las siguientes situaciones a...

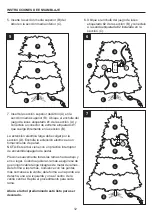
Страница 11: ... sección D hacia el tomacorriente NO ENCHUFE EL ÁRBOL EN EL TOMACORRIENTE ANTES DE COMPLETAR EL ENSAMBLAJE E F D C 3 E D 4 Ubique el enchufe etiquetado 3 de la sección D y conéctelo a la salida etiquetada 3 instalada en la sección C C 4 E D IMPORTANTE No retire la cinta adhesiva que envuelve las salidas de los cables de los juegos de luces Las salidas que debe usar NO están envueltas en cinta adhe...

Страница 12: ...e pedal 7 Inserte la sección superior del árbol A en la sección media superior B Ubique el enchufe del juego de luces etiquetado 1 de la sección A y conéctelo al conector de extremo etiquetado 1 que cuelga libremente en la sección B 7 E D B A C 1 Presione suavemente todas las ramas hacia abajo y en su lugar Cuando ajuste las ramas asegúrese de que ningún cable tenga bisagras de metal de ramas Dele...

Страница 13: ...vo se funde es posible que exista un cortocircuito Si es así el producto se debe revisar para determinar la causa 1 Desenchufe el producto de la fuente de alimentación 2 Abra la cubierta de acceso en la parte superior del enchufe y ubique el fusible quemado 3 Retire el fusible quemado 4 Ubique el fusible de repuesto dentro del enchufe Abra el soporte y retire el fusible de repuesto 5 Inserte el fu...

Страница 14: ...etirarla del portalámpara No dé vuelta para girar la bombilla 3 Reemplace la bombilla quemada SOLO por una bombilla de 2 5 voltios se incluyen bombillas de repuesto Reemplace la bombilla destellante quemada SOLO por una bombilla de 3 5 voltios se incluyen bombillas de repuesto NOTA Reemplace las bombillas quemadas lo antes posible Si no reemplaza las bombillas quemadas reducirá la vida útil de las...

Отзывы: