


5
TROUBLESHOOTING__________________________________________________________
In case of burned out bulbs, follow the bulb replacement procedures in the use and care instructions.
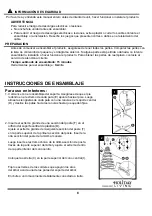
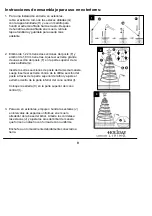
The strings that support the tree rings sometimes get looped around the socket when the tree is lifted out
of the box. Look closely anywhere the rings look uneven and find where the string is looped or entangled,
then free the string. Also the rings of the tree rest on knots in the support strings. Make sure the top four
rings are resting on the knots by pulling down gently on the rings.
(1) Sometimes a circuit of lamps may fail to light up because of one loose contact bulb in the circuit. If
this problem develops, do the following:
1. Start at the top of the tree with the first unlit bulb. Inspect the lamp holder to determine that it is fully
seated in the lamp socket. If it isn’t, push it in so that it is properly seated.
2. If the lamp still does not light, gently twist the bulb back and forth. If a lead wire is broken, it will
usually make contact and light up. If it does, replace the bulb.
Repeat steps 1 and 2 for each unlit bulb in the circuit. Work from top down.
Keep checking until you find the bulb which is not completing the circuit.
SOLUTIONS AND TIPS
IF YOUR TREE HANGS UNEVENLY:
The strings that support the tree rings sometimes get looped around
the socket when the tree is lifted out of the box. Look closely anywhere
the rings look uneven an find where the string is looped or tangled,
then free the string. Makes sure the top four rings are resting on the knots by pulling
down gently on the rings. Your tree should look evenly spaced like the pictures on the package.
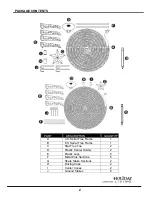
REPLACEMENT PARTS LIST
For replacement parts, call our customer service department at
1-800-643-0067, 8 a.m. – 6 p.m., EST, Monday – Thursday,
8 a.m. - 5 p.m., EST, Friday.
UL MODEL #TY-S4-B TY-S6-A
FOR INDOOR AND OUTDOOR USE PRINTED IN CHINA
PART
DESCRIPTION
PART #
H
Plastic cap
R11
I
Center cone
R10
J
Ground stake
R4
K
Flasher bulb
R1
L
Regular bulb
R2
M Fuse
R3
5
H
I
Holiday Living® is a registered
trademark of LF, LLC. All Rights
Reserved.
H
I
J
K
L
M


